Delta print dimension Issues - smart effector
-
@pelz135
I'm not at home now...so I post config file tomorrow.
Yes, I do autocalibrazione with G32 command and it regulate all dimensions.
My rods are very precises: all rods measures 360,28mm... I check all with a caliper from the middle of the magnetic balls. -
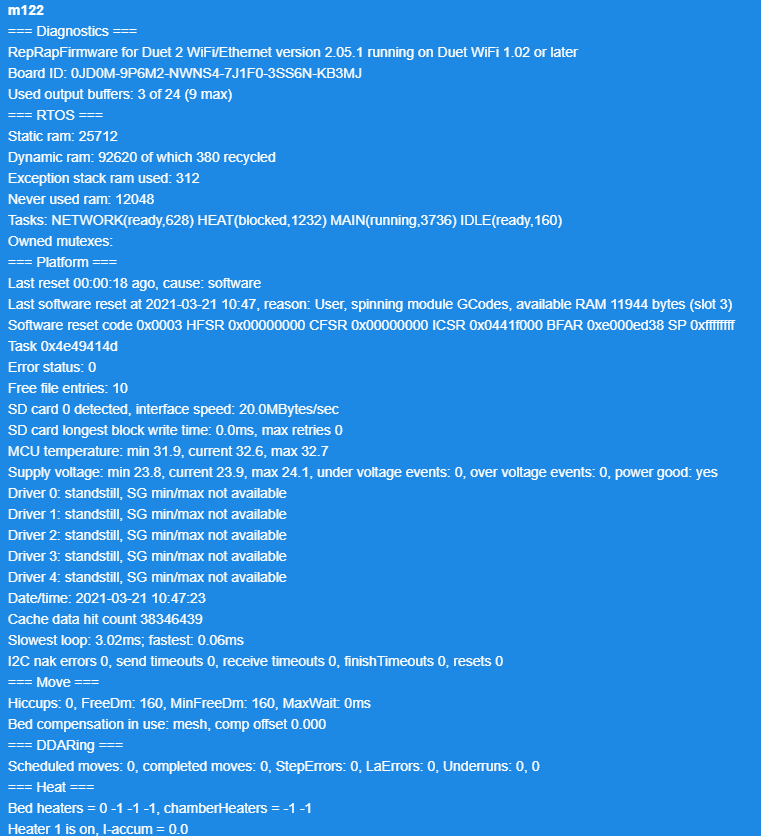
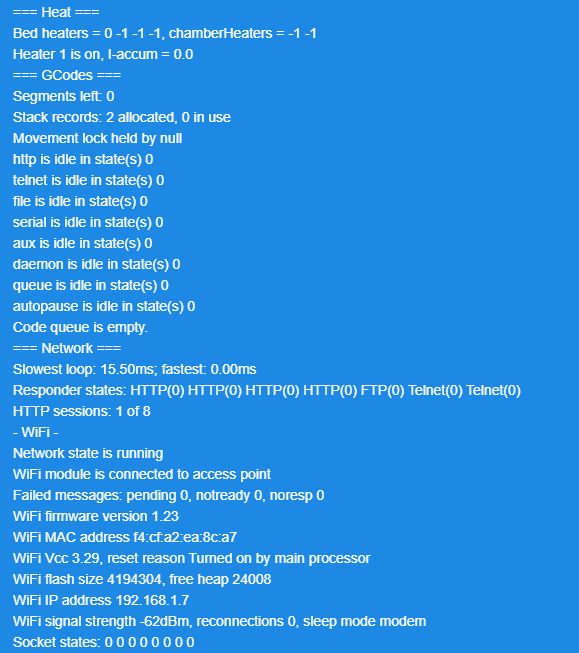
Post your config.g, homedelta.g, bed.g, an image of your heightmap, and the results of M122 and M98 P"config.g" please.
-
@Phaedrux ;
Configuration file for Duet WiFi (firmware version 2.03)
; executed by the firmware on start-up
;
; generated by RepRapFirmware Configuration Tool v3.2.1 on Fri Jan 15 2021 10:16:31 GMT+0100 (Ora standard dell’Europa centrale)
M80
; General preferences
G90 ; send absolute coordinates...
M83 ; ...but relative extruder moves
M550 P"DELTA" ; set printer name;Delta Setting
M665 R180 L360.28 B150 H323 ; Set delta radius, diagonal rod length, printable radius and homed height
M666 X0 Y0 Z0 ; put your endstop adjustments here, or let auto calibration find them; Network
M552 S1 ; enable network
M586 P0 S1 ; enable HTTP
M586 P1 S0 ; disable FTP
M586 P2 S0 ; disable Telnet; Drives
M569 P0 S0 ; physical drive 0 goes forwards
M569 P1 S0 ; physical drive 1 goes forwards
M569 P2 S0 ; physical drive 2 goes forwards
M569 P3 S0 ; physical drive 3 goes forwards
M584 X0 Y1 Z2 E3 ; set drive mapping
M350 X16 Y16 Z16 E16 I1 ; configure microstepping with interpolation
M92 X160.00 Y160.00 Z160.00 E398 ; set steps per mmM566 X120 Y120 Z120 E600 ; set maximum instantaneous speed changes (mm/min)
M203 X6000.00 Y6000.00 Z6000.00 E1800 ; set maximum speeds (mm/min)
M201 X1000.00 Y1000.00 Z1000.00 E1000 ; set accelerations (mm/s^2)M906 X1600 Y1600 Z1600 E800 I30 ; set motor currents (mA) and motor idle factor in per cent
M84 S30 ; Set idle timeout; Axis Limits
M208 Z0 S1 ; set minimum Z; Endstops
M574 X2 Y2 Z2 S1 ; set active high endstops; Z-Probe
M558 P5 R0.4 H5 F1200 T6000 ; set Z probe type to effector and the dive height + speeds
G31 P500 X0 Y0 Z-0.44 ; set Z probe trigger value, offset and trigger height
M557 R130 S25 ; define mesh grid; Heaters
M305 P0 T100000 B4092 R4700 ; set thermistor + ADC parameters for heater 0
M143 H0 S110 ; set temperature limit for heater 0 to 120C
M305 P1 T100000 B4092 R4700 ; set thermistor + ADC parameters for heater 1
M143 H1 S280 ; set temperature limit for heater 1 to 280C; Fans
M106 P0 S0 I0 F500 H-1 ; set fan 0 value, PWM signal inversion and frequency. Thermostatic control is turned off
M106 P1 S1 I0 F500 H1 T45 ; set fan 1 value, PWM signal inversion and frequency. Thermostatic control is turned on; Tools
M563 P0 D0 H1 ; define tool 0
G10 P0 X0 Y0 Z0 ; set tool 0 axis offsets
G10 P0 R0 S0 ; set initial tool 0 active and standby temperatures to 0C; Custom settings are not defined
; Miscellaneous
M575 P1 S1 B57600 ; enable support for PanelDue
M572 D0 S0.050 ; Pressure Advance
M501
G29 S1
T0 -
homedelta.g
; called to home all towers on a delta printer
;
; generated by RepRapFirmware Configuration Tool v3.2.1 on Fri Jan 15 2021 10:16:31 GMT+0100 (Ora standard dell’Europa centrale)
G91 ; relative positioning
G1 H1 X700 Y700 Z700 F2100 ; move all towers to the high end stopping at the endstops (first pass)
G1 H2 X-5 Y-5 Z-5 F1800 ; go down a few mm
G1 H1 X10 Y10 Z10 F360 ; move all towers up once more (second pass)
; G1 Z-5 F6000 ; move down a few mm so that the nozzle can be centred
G90 ; absolute positioning
; G1 X0 Y0 F6000 ; move X+Y to the centre -
; bed.g
; called to perform automatic delta calibration via G32
;
; generated by RepRapFirmware Configuration Tool v3.2.1 on Fri Jan 15 2021 10:16:31 GMT+0100 (Ora standard dell’Europa centrale)
M561 ; clear any bed transform
; Probe the bed at 3 peripheral and 3 halfway points, and perform 6-factor auto compensation
; Before running this, you should have set up your Z-probe trigger height to suit your build, in the G31 command in config.g.
G30 P0 X0 Y129.9 H0 Z-99999
G30 P1 X64.95 Y112.5 H0 Z-99999
G30 P2 X112.5 Y64.95 H0 Z-99999
G30 P3 X129.9 Y0 H0 Z-99999
G30 P4 X112.5 Y-64.95 H0 Z-99999
G30 P5 X64.95 Y-112.5 H0 Z-99999
G30 P6 X0 Y-129.9 H0 Z-99999
G30 P7 X-64.95 Y-112.5 H0 Z-99999
G30 P8 X-112.5 Y-64.95 H0 Z-99999
G30 P9 X-129.9 Y0 H0 Z-99999
G30 P10 X-112.5 Y64.95 H0 Z-99999
G30 P11 X-64.95 Y112.5 H0 Z-99999
G30 P12 X0 Y64.9 H0 Z-99999
G30 P13 X56.21 Y32.45 H0 Z-99999
G30 P14 X56.21 Y-32.45 H0 Z-99999
G30 P15 X0 Y-64.9 H0 Z-99999
G30 P16 X-56.21 Y-32.45 H0 Z-99999
G30 P17 X-56.21 Y32.45 H0 Z-99999
G30 P18 X0 Y0 H0 Z-99999 S8G1 X0 Y0 Z150 F4000
; Use S-1 for measurements only, without calculations. Use S4 for endstop heights and Z-height only. Use S6 for full 6 factors
; If your Z probe has significantly different trigger heights depending on XY position, adjust the H parameters in the G30 commands accordingly. The value of each H parameter should be (trigger height at that XY position) - (trigger height at centre of bed) -
 image url)
 -
This post is deleted! -


-

-
@polbofree said in Delta print dimension Issues - smart effector:
Hello guys,
I have some problems with my delta printer.
I read all documentation about smart effector configuration and setup, but when I print the dimensions of X Y and Z tower are wrong.
For example I printed a calibration hexagon with 80 mm and the results are:
X axis 80,6mm
Y axis 80,7mm
Z axis 80,2mmHow can i fix it?
The delta rods are perfect with same lenghts.
ThanksThe Z axis error is small and best ignored. The other two errors are near enough equal. You can adjust the X and Y scale by making a small adjustment to the M665 L parameter. For example, if you are currently using L360 than the new value should be (80/80.65)*360. After changing the L parameter, run auto calibration again because the delta radius will have changed slightly.
Alternatively, use the M579 command to scale the axes.
-
@dc42
Thanks for your prompt answer.
Z axis is refered to third tower of delta printer, not to third axis of piece.Any tower on my printer give me different measure
-
@polbofree said in Delta print dimension Issues - smart effector:
Z axis is refered to third tower of delta printer, not to third axis of piece.
I'm sorry, I failed to read your post completely. Evidently there is a geometric error somewhere. See https://duet3d.dozuki.com/Wiki/Calibrating_a_delta_printer#Section_Make_sure_your_build_is_accurate for common causes. The Smart Effector avoids many possible errors but not all, e.g. carriages rotated slightly either in the Z plane or perpendicular to the carriage face.
It's possible to adjust individual rod lengths in the M665 command to counter this sort of error, but if you do that then print a large noughts-and-crosses/tic-tac-toe pattern before and after to check for non-linearity.
-
@polbofree you are also loading your heightmap from within config.g which is not recommended (you can see you get a warning for it!). You should only load the heightmap after you've set the Z=0 position using your z probe (I.e. a G30). Typically you'd only load it when you start a print (I have G29 S1 in my start.g). You should also only create your heightmap after you've set your z=0 position with your z probe (you may have done this).
Not sure if this will solve your issue though as your bed.g cancels your heightmap. As dc42 says, I'd check through the mechanicals first.
-
@engikeneer you advice me to delete G29 command into config.g and repeat configuration with G30?
-
@polbofree yes delete the G29 S1 from config. when the config.g is run at boot, you haven't homed your axes, so the printer has no idea where Z=0 is.
Here is my start code for a print (I have this in my slicer, but you could put it in start.g). I home my delta (my homing file is very similar to yours but I don't comment out the last 2 lines), drop the nozzle down to Z=5, then probe the bed with a G30 to accurately set the bed height. I then activate mesh compensation by loading my heightmap
G28 ; home all axes
G1 X0 Y0 Z5 F5000 ; drop nozzle
G30 ; probe bed
G29 S1 ; activate mesh compensation
G1 Z15; lift nozzle
To create a heightmap, I have a little macro (see below). You can see here I also home, then use the probe to accuarately set the Z=0 height. Then I do G29 to create the heightmap. Note that my G30 probe to set the Z=0 height is always at the same point before creating and loading the heightmap (0,0).
M561 ; disable any mesh compensation
G28 ; home all axes
G1X0 Y0 Z5 F5000 ; drop nozzle
G30 ; probe bed
G29 ; run mesh compensation
As I said before, I doubt this will fix the issue you're seeing with dimensional accuracy, but it may help with getting a better/more consistent first layer.
Edit: this is all covered in abit more detail on the wiki page for using mesh compensation https://duet3d.dozuki.com/Wiki/Using_mesh_bed_compensation
-
@engikeneer said in Delta print dimension Issues - smart effector:
As I said before, I doubt this will fix the issue you're seeing with dimensional accuracy, but it may help with getting a better/more consistent first layer.
When I send G30 S1 command, the nozzle hit the bed ang retur ne avery a different value.
If I try some times, I give:
-0.41
-0.43
-0.44
-0.43
-0.47
-0.43
-0.45
-0.51
....the nozzle is clean. Is it normal to have that differences?
-
@polbofree I'd hope you gould get a bit better than that, but I don't have a smart effector so can't say for sure. I would say that such variations could also impact how accurate your delta calibration is so I would definitely look at improving it. A couple of things to think about/check:
Are you probing with a hot nozzle? When I used a nozzle contact piezo I always heated to 130deg C and did a double probe (i.e. two G30's). That was hot enough that any filament on the nozzle got squished after the first probe, but if I went much hotter, the nozzle would damage my bed surface (I use a Ziflex flex plate).
Have you gone through the smart effector comissioning wiki page (particularrly the section on settingb the sensitivity)? https://duet3d.dozuki.com/Wiki/Smart_effector_and_carriage_adapters_for_delta_printer#Section_Commissioning
Your M558 in config uses probe type P5, but I beleive P8 is recommended (it's the same but unfiltered for a faster response)
In general, nozzle contact probes require a stiff mechanism to get a reliable result. Any backlash/flex issues in your delta arms or carriages could be giving you issues (and could be a source of your dimensional errors?)
You can use the A & S parameters in your M558 definition in config to setup repeated probing to improve accuracy. I do this on all my printers, but would generally try and improve everything else first. Typically I use A10 S0.01 (so it keep probing until two results are within 0.01mm of each other and take the average of those two, but if it gets to 10 probes it just take the average of all 10)
Hope that helps!