Configuring S42B Close Loop Stepper Controller
-
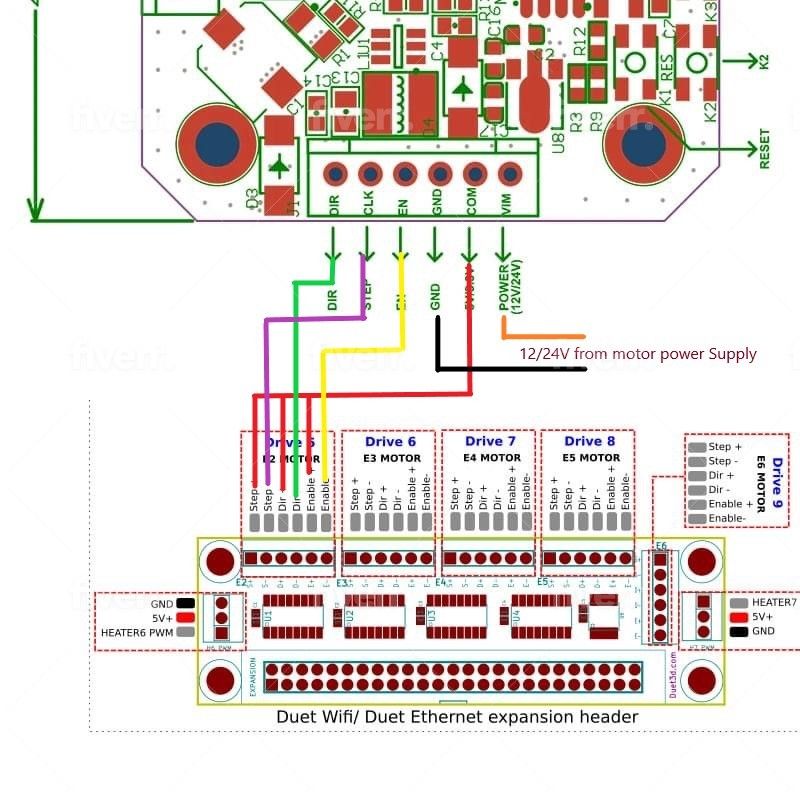
Had someone with Electronics experience help me figure out how to connect them.
hope this is right lol
-
You will damage the expansion breakout board with the driver connected like that. Disconnect the driver 5V common pin from all 3 pins on the breakout board. Connect it to 5V+ on one of the servo connectors on the breakout board instead.
-
Servo connectors? Do you mean the 5v+ on the Two Heater6&7 areas?
-
@Adamfilip said in Configuring S42B Close Loop Stepper Controller:
Servo connectors? Do you mean the 5v+ on the Two Heater6&7 areas?
Yes.
-
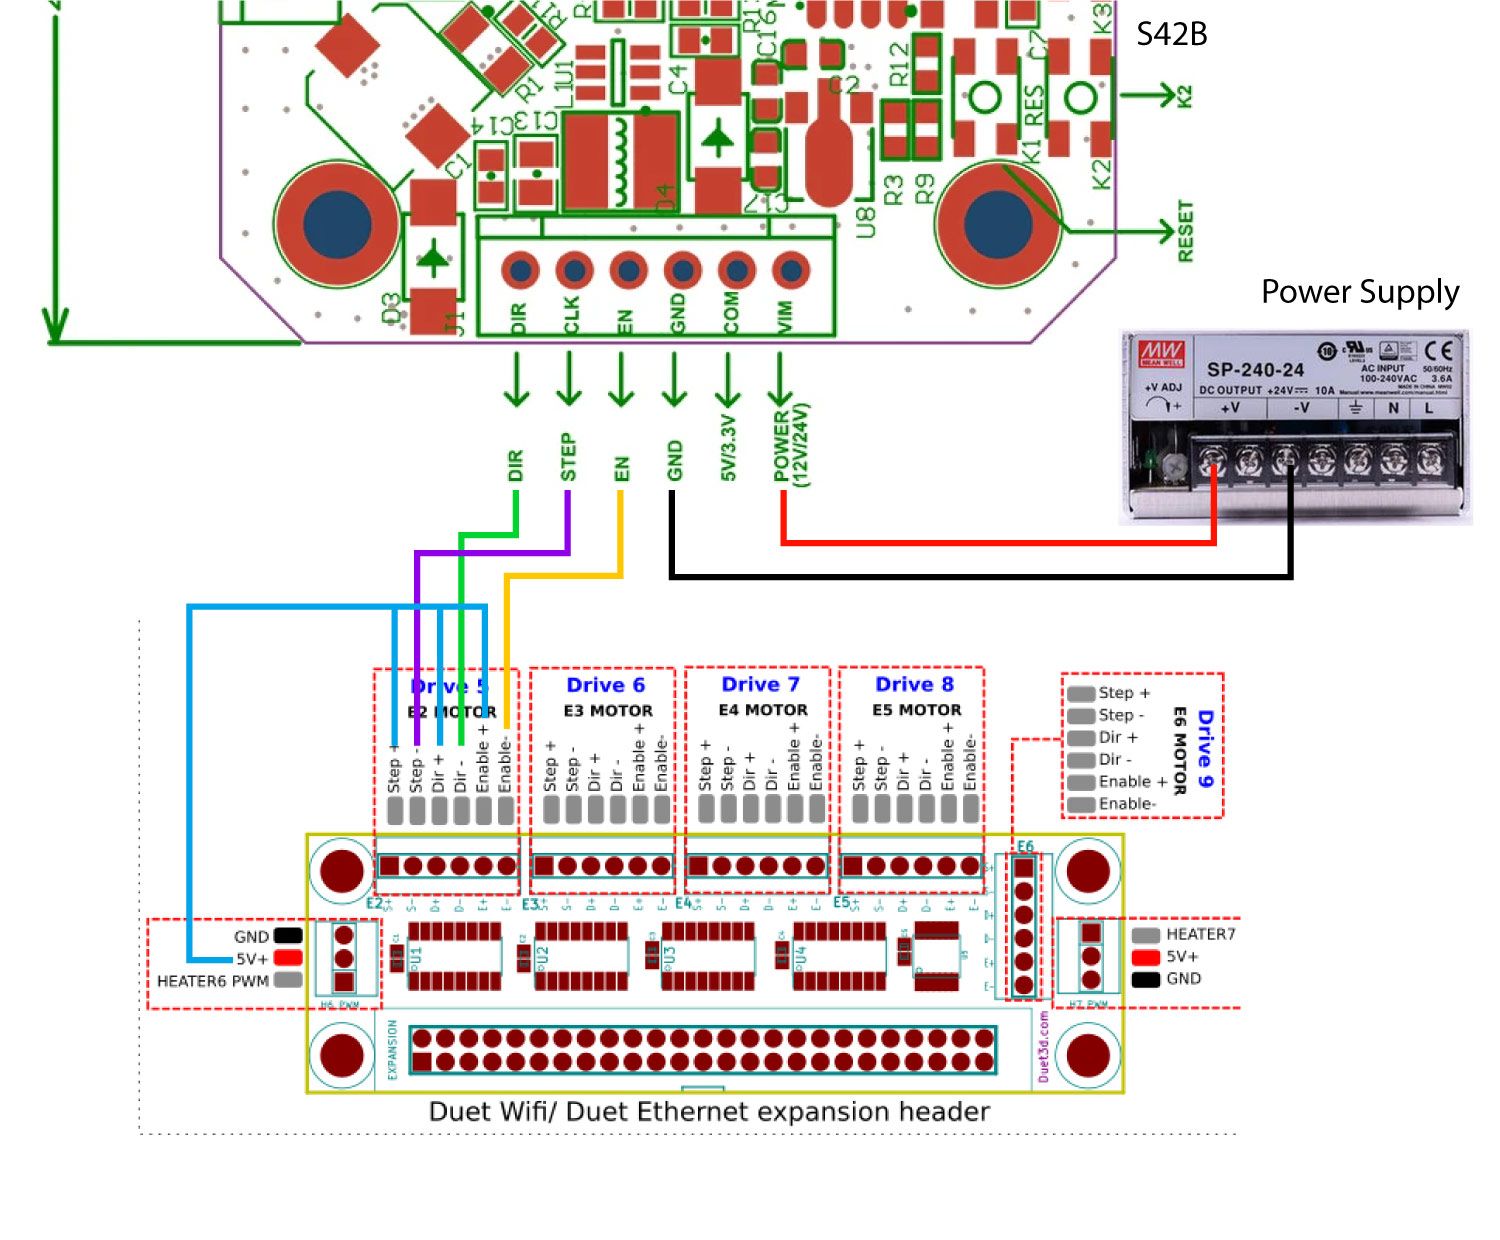
Here is a revised diagram

-
Still not right:
- Leave the breakout board Step+, Dir+ and Enable+ not connected to anything (and not connected to each other)
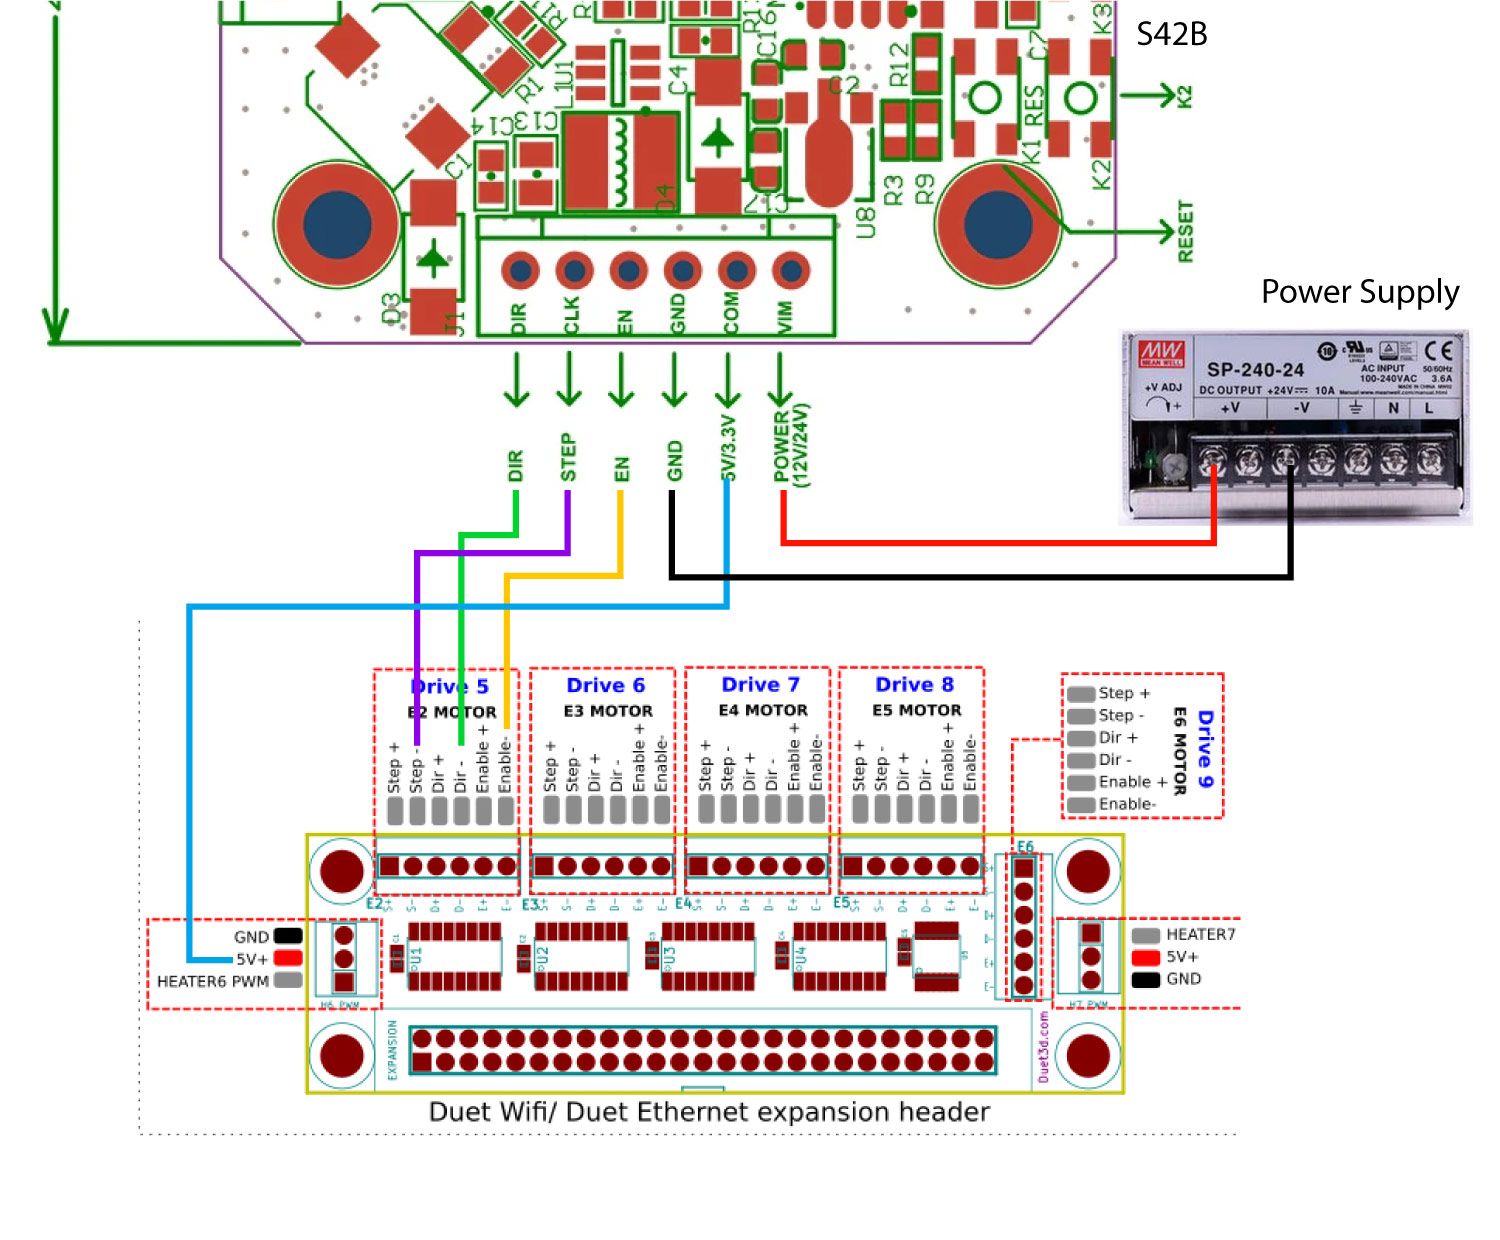
- Connect +5V from the breakout board to COM on your driver
-
Ok so your suggesting like this

-
@Adamfilip said in Configuring S42B Close Loop Stepper Controller:
BigtreeTech S42B Closed
Is this working for you ?!
I'm doing the simplest thing possible
DIR -> GND
EN -> GND
GND -> GND
VM -> 12V
5V -> 5V
STEP -> 0-5V gpioand darn thing won't move ?!?! loosing my hair for 2 days already
-
@arhi said in Configuring S42B Close Loop Stepper Controller:
EN -> GND
I don't mean to be Captain Obvious, but do you have the system configured for enable=low?
It looks like it can be set to either.
Also, do you have both power supply grounds connected together and to GND on the servo?
-
I have just wired up my S42B and Motors
After i changed settings, I do calibrated and it started working
This is my current settings for it,
M569 P5 R0 S0 T3.33:3.33:5:0 ; physical drive 0 goes backwards previously P0, p5 is on expansion board M569 P8 R0 S0 T3.33:3.33:5:0 ; physical drive 1 goes backwarsa previously P1, p8 is on expansion board M569 P2 S0 ; Z physical drive 2 goes backwards M569 P3 S1 ; Extruder physical drive 3 goes Forwards M584 X5 Y8 Z2 E3 ; set drive mapping , old X0 Y1 M350 X16 Y16 Z32 I0 ; configure microstepping without interpolation, previously 32 M350 E16 I1 ; configure microstepping with interpolation M92 X100 Y100 Z1593 E409 ; set steps per mm M566 X600 Y600 Z20 E800 ; Set maximum instantaneous speed changes (mm/min) JERK M203 X9000 Y9000 Z1500 E10000 ; Set maximum speeds (mm/min) M201 X1000 Y1000 Z250 E5000 ; Set accelerations (mm/s^2) M906 X1400 Y1400 Z1500 E1300 I30 ; Set motor currents (mA) and motor idle factor in per cent M84 S30 ; Set idle timeout M572 D0 S0.0125 ; Pressure Advance -
Woohoo Got it working. check out demo
https://youtu.be/Qz6EoinibEc -
@Adamfilip Very cool. Thanks for sharing. Let us know how it works out in practice.
-
@alankilian said in Configuring S42B Close Loop Stepper Controller:
I don't mean to be Captain Obvious, but do you have the system configured for enable=low?
tried both !Enable and Enable configuration for the good measure, no help
Also, do you have both power supply grounds connected together and to GND on the servo?
yes
Also tried 1234 dip's as 1111 (default, first two are what I understand microstepping, third is open/closed control and fourth is write enable for calibration), 1100, 1101, 0000, 0011, 0001 ... no change
at one point I got it to "turn" but was going into "error" after few steps but most of the time it just won't turn at all ... wasted too much time with it I'll try a second driver and a second motor to be sure but I'm moving with my testing to other systems
 I think this one was just not meant to be
 -
@Adamfilip said in Configuring S42B Close Loop Stepper Controller:
Woohoo Got it working. check out demo
https://youtu.be/Qz6EoinibEcIn real world printing what conditions would correspond to displacing the position with your thumb as you did in your video?
Thanks.
Frederick
-
@fcwilt none this was as test to see if it would return back to position. this is to help recover from layer shifts.
if nozzle gets snagged on something.. its an issue that has been a problem for me and I havent found another mechanical reason to resolve it. -
@Adamfilip said in Configuring S42B Close Loop Stepper Controller:
if nozzle gets snagged on something.. its an issue that has been a problem for me and I havent found another mechanical reason to resolve it.
I've seen the nozzle get snagged on bits of the previous layer sticking up, most always in the area of the gap created by holes the are being made in a vertical section of the object.
It would be interesting to see how these devices would behave when that happened.
I may have to try closed-loop.
Thanks.
Frederick
-
Im still trying to resolve some glitches and reached out to BIGTREETECH for support.
Sometime its working fine and sometimes they are not responding at all.. and sometimes they will vibrate very strongly. perhaps its a magnet issue..I think im going to crazy glue the magnet onto the stepper motor shaft.
-
What wiring configuration did you end up with?
I'm considering trying out the MKS servo42 which has similar connections.
Many thanks
Barry M -
@adamfilip the magnet placing is very sensitive, with my previous Creality and SKR boards I just could not get the distance to work right on the y-axis on my ender 5+ b/c it is a dual shaft stepper.
The x-axis always worked fine (OEM complete motor with board and screen already installed out of the box), absolute delight not to have layer shifts anymore, for example PETG blob blocking the carriage and ruining the whole print.
-
@arhi check if microstepping is 16, dipswitch 4 on, 123 off => press calibrate, make sure the carriage is in the middle of the axis b/c it will calibrate in both directions.
then make sure to press reset and the screen really resets, otherwise it won't work
then dip 4 off, 1 and 2 stay off and dip 3 on, that's it
I wouldn't recommend it without the OLED screen
there is one more thing which may affect you, in Marlin I had to change minimum_stepper_pulse to 3 instead of 2 and maximum_stepper_rate to 150000 from 250000