@phaedrux Ah, ok. This was done with the configurator, so I must've selected something wrong.
Best posts made by Neil
-
RE: Extruder heater config issueposted in Firmware installation
-
RE: Extruder heater config issueposted in Firmware installation
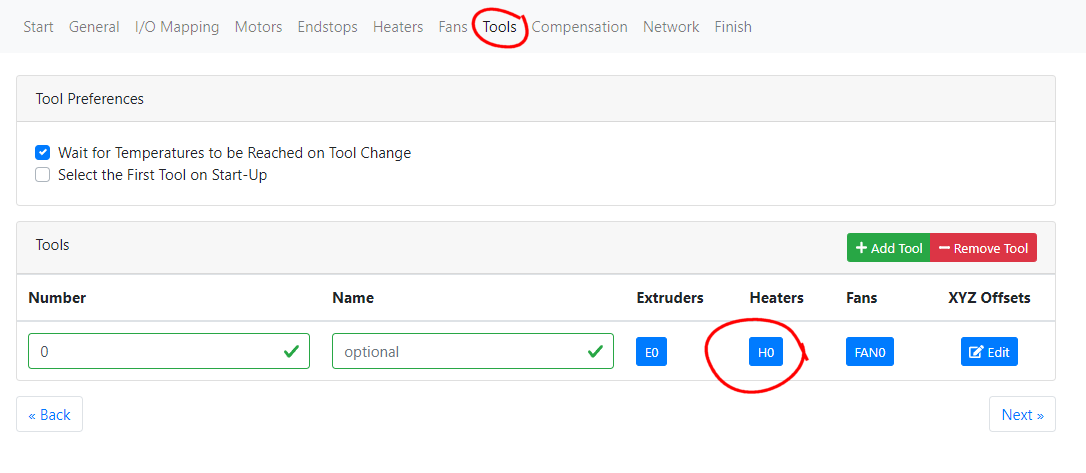
Found it. For anyone else with this same issue who comes across this thread in the future, the heater needs to be associated with the tool in the Tools tab of the online configurator. (I had it un-checked).

Latest posts made by Neil
-
RE: Homing direction not changingposted in Tuning and tweaking
Ok, looks like I got it. I wasn't aware that there was a separate homing file. Hadn't paid attention to it before as RRF configurator was generating my files.
-
RE: 2 Thermistors in bedposted in Tuning and tweaking
Not an answer to your question, but I'm curious how big your print-bed is? I'm planning on around 18" x 18", and I'm thinking 3/8" thick will be good so it won't warp.
-
RE: Homing direction not changingposted in Tuning and tweaking
@norder said in Homing direction not changing:
@neil
Za and Zb are connected in series and together they have only one driver.
I assume you have connected two axes there.I have 3 Z-motors, connected to ports "Drive 0", "Drive 1" and "Drive 3". So 3 motors, each with it's own driver. Z is working fine.
-
Homing direction not changingposted in Tuning and tweaking
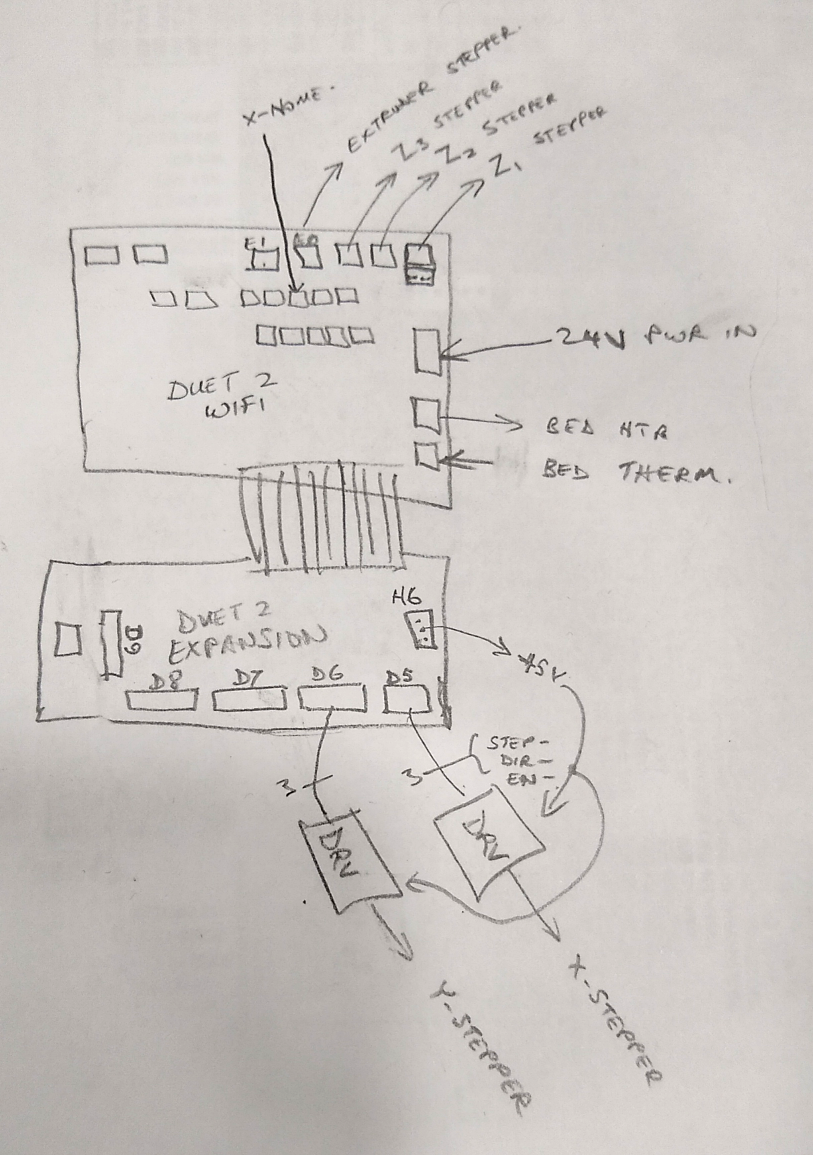
Setting up a Duet 2 Wifi for a custom 3D-printer build and I couldn't find a way to setup stepper drivers on the expansion board ports in RRF, so I'm manually tinkering the config file now. (First time I'm doing this).
X-axis driver is on output 5, and the X-axis homing switch is on the main board, xstop port. X-axis physical switch is on the right (high-end).
I set the X-motor direction such that I can hit X+100 etc on the DWC dashboard and the motor moves in the correct direction now. But changing the endstops from low-end to high-end does not change the direction that it homes towards... it's always to the left (incorrect). Am I missing something here?
M569 P5 S1 R1 ; Forwards x-axis, enable = High
M584 X5 Y6 Z0:1:2 E3 ; set drive mapping, 3 Z motors
M574 X2 S1 P"xstop" ; x-stop on high-endFull config file attached in case there's something else relevant.
config.g -
RE: Help getting started with Duet 2 Wifiposted in Duet Hardware and wiring
@droftarts
I got the Expansion board already, so I'll use that for now with the single extruder, but yes it seems the Duex is the way to go when I'm ready to uprade.Was not aware of the PanelDue controller... I'll just get that when I'm ready.
Much thanks for your help. I dropped this for a couple weeks due to work crises, but back on it now.
Cheers,
-Neil. -
RE: Extruder heater config issueposted in Firmware installation
Found it. For anyone else with this same issue who comes across this thread in the future, the heater needs to be associated with the tool in the Tools tab of the online configurator. (I had it un-checked).

-
RE: Extruder heater config issueposted in Firmware installation
@engikeneer said in Extruder heater config issue:
...
Just add H0 to your M563 which should fix it
Yes! Success!!! That did it.
I need to go figure out what I need to do in the online configurator so that it auto generates it for me.Thanks for all the help everyone!
-
RE: Extruder heater config issueposted in Firmware installation
@engikeneer I do see an M563, which was created by the configurator. I'm reading though the docs for the command now, but here's my full config file in the meanwhile.
I do see that now (Heater 0 vs Tool 0), but my implied understanding is that the head is the tool, and the head consists of a heater, a thermistor, an extruder, and a fan... or is this incorrect?; Configuration file for Duet WiFi (firmware version 3.3) ; executed by the firmware on start-up ; ; generated by RepRapFirmware Configuration Tool v3.3.10 on Tue Jul 12 2022 14:40:33 GMT-0400 (Eastern Daylight Time) ; General preferences G90 ; send absolute coordinates... M83 ; ...but relative extruder moves M550 P"RW" ; set printer name ; Network M552 S1 ; enable network M586 P0 S1 ; enable HTTP M586 P1 S0 ; disable FTP M586 P2 S0 ; disable Telnet ; Drives M569 P0 S1 ; physical drive 0 goes forwards M569 P1 S1 ; physical drive 1 goes forwards M569 P2 S1 ; physical drive 2 goes forwards M569 P3 S1 ; physical drive 3 goes forwards M584 X0 Y1 Z2 E3 ; set drive mapping M350 X16 Y16 Z16 E16 I1 ; configure microstepping with interpolation M92 X1259.84 Y80.00 Z200.00 E420.00 ; set steps per mm M566 X900.00 Y900.00 Z60.00 E120.00 ; set maximum instantaneous speed changes (mm/min) M203 X120000.00 Y120000.00 Z60000.00 E1200.00 ; set maximum speeds (mm/min) M201 X2000.00 Y2000.00 Z100.00 E250.00 ; set accelerations (mm/s^2) M906 X1700 Y1700 Z1700 E1400 I30 ; set motor currents (mA) and motor idle factor in per cent M84 S30 ; Set idle timeout ; Axis Limits M208 X0 Y0 Z0 S1 ; set axis minima M208 X305 Y500 Z200 S0 ; set axis maxima ; Endstops M574 X1 S1 P"xstop" ; configure switch-type (e.g. microswitch) endstop for low end on X via pin xstop M574 Y1 S1 P"ystop" ; configure switch-type (e.g. microswitch) endstop for low end on Y via pin ystop M574 Z1 S1 P"zstop" ; configure switch-type (e.g. microswitch) endstop for low end on Z via pin zstop ; Z-Probe M558 P0 H5 F120 T30000 ; disable Z probe but set dive height, probe speed and travel speed M557 X15:215 Y15:195 S20 ; define mesh grid ; Heaters M140 H-1 ; disable heated bed (overrides default heater mapping) M308 S0 P"e0temp" Y"thermistor" T100000 B4138 ; configure sensor 0 as thermistor on pin e0temp M950 H0 C"e0heat" T0 ; create nozzle heater output on e0heat and map it to sensor 0 M307 H0 B1 S1.00 ; disable bang-bang mode for heater and set PWM limit M143 H0 S200 ; set temperature limit for heater 0 to 200C ; Fans M950 F0 C"fan0" Q500 ; create fan 0 on pin fan0 and set its frequency M106 P0 S0.01 H-1 ; set fan 0 value. Thermostatic control is turned off ; Tools M563 P0 D0 F0 ; define tool 0 G10 P0 X0 Y0 Z0 ; set tool 0 axis offsets G10 P0 R0 S0 ; set initial tool 0 active and standby temperatures to 0C ; Custom settings are not defined
