can change it to SOLVE
Posts made by apak
-
RE: smarteffector v2 sensitivity not storedposted in Smart effector for delta printers
-
RE: PID manual tunning help neededposted in Tuning and tweaking
@dc42 said in PID manual tunning help needed:
It's also possible that the PID tune is giving the correct results but the problem is the extra heat needed to melt the filament. If that's the case then configuring heater feedforward may help, if your current heater is capable of supplying enough heat.
I will try both things, Thanks. My bet is that a 1.75 mm filament and a 1.5x0.5 extrusion are hard to do with an old school volcano, but sure it can be tunned a bit....
-
PID manual tunning help neededposted in Tuning and tweaking
Hello.
Delta Printer, SmartEffector with Volcano and silicon sock on the heater block.
nozzle 1.2, set to 22mm3/s limit ant slicer.FW 3.6.1 RC1
PID autotune with M303 T0 S250, Nozzle at the center of the heated bed at room temp and at Z=5
Autopid successfull, stored and working.
Start print with PLA at 220ºC, first layer fan off.
At second layer, fan at 100%, temperature starts droping, and could not reach again target temp (220)
My only change to have temp at target is settings fan al 58%.
I am planning to update heater to a 80W, but I also want to know if there is a chance that my current pid can be manual tunned to gain some "power" when fan is at 100%.
No need really because printing speed at 1.5 width and 0.5 height limits speed to about 40mm/sec, nad pla is cooled fine with fan al 58%, but would learn how to tweak pid so can have fan at 100%. Could heater stepfordward help somehow?
This is my actual pid config.
I just asked chtgpt how could I tune ir, and will try it later
https://chatgpt.com/share/67e11718-3250-800f-9be8-a58d467c3aa4M307 H1 R1.588 K0.266:0.074 D7.56 E1.35 S1.00 B0 V23.5Thanks...
-
RE: smarteffector v2 sensitivity not storedposted in Smart effector for delta printers
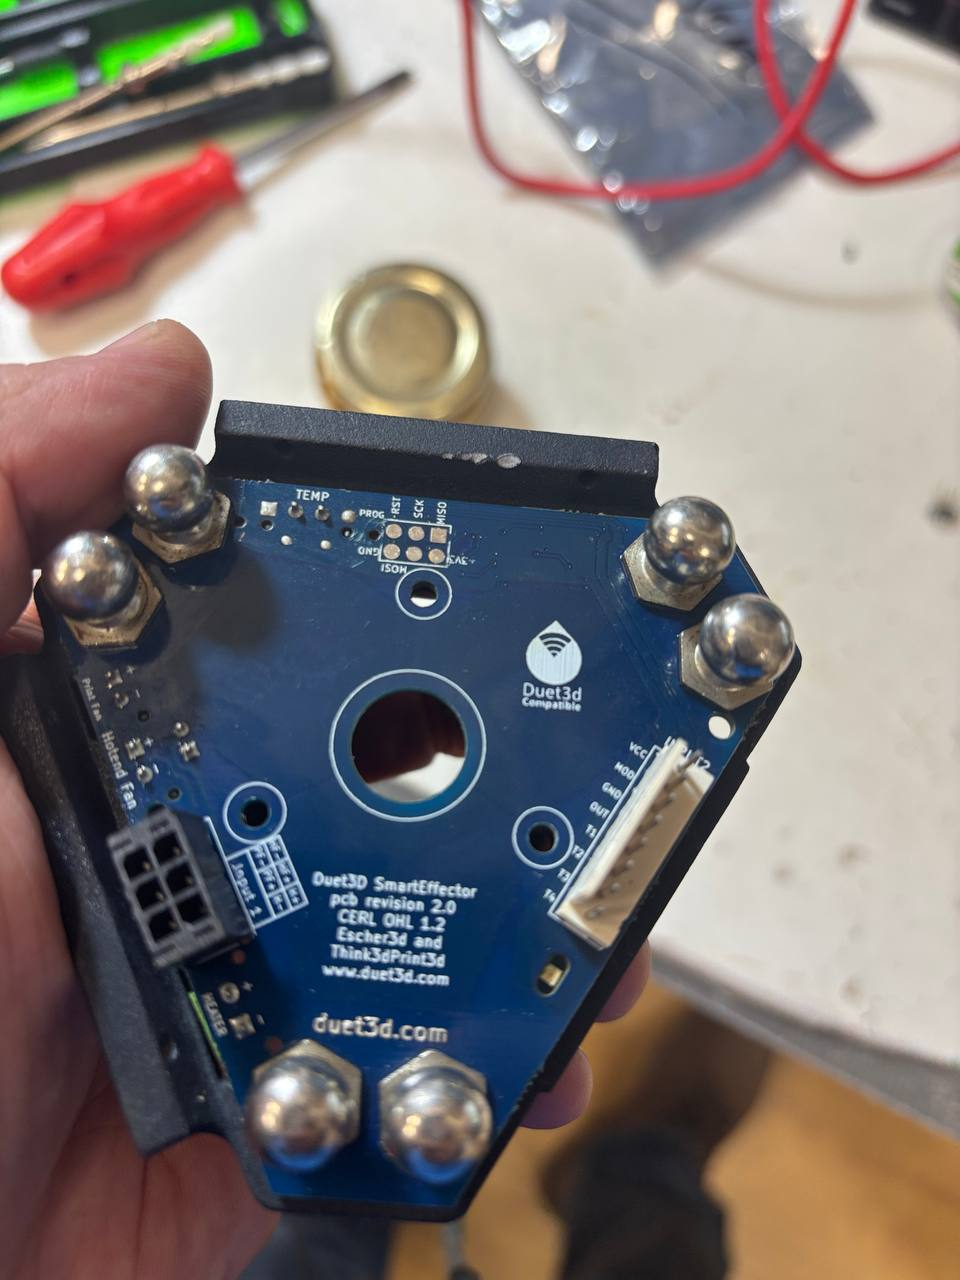
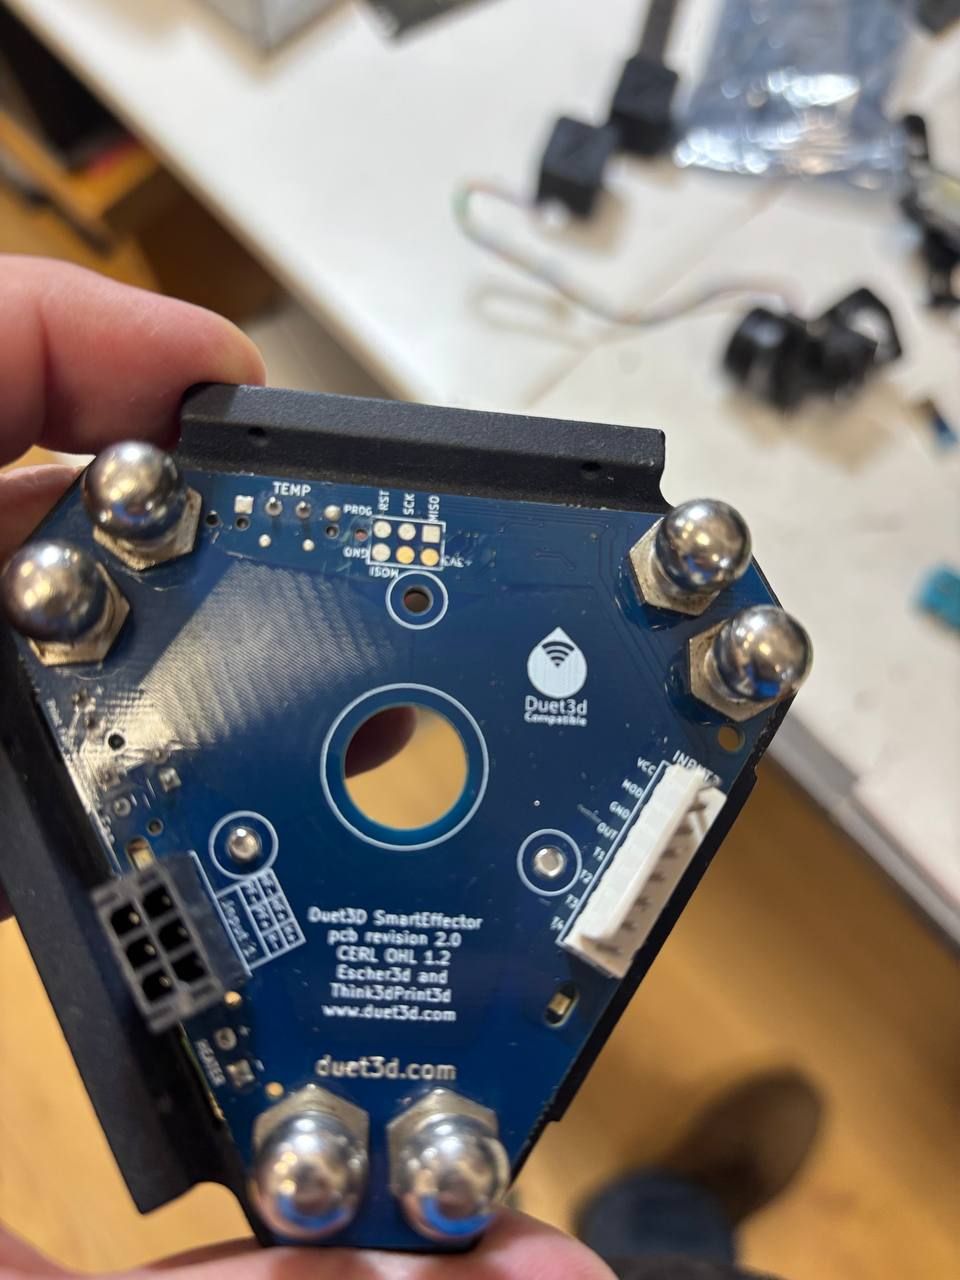
Recap: Old smarteffector v2 that does not remember sensitivity custom settings.
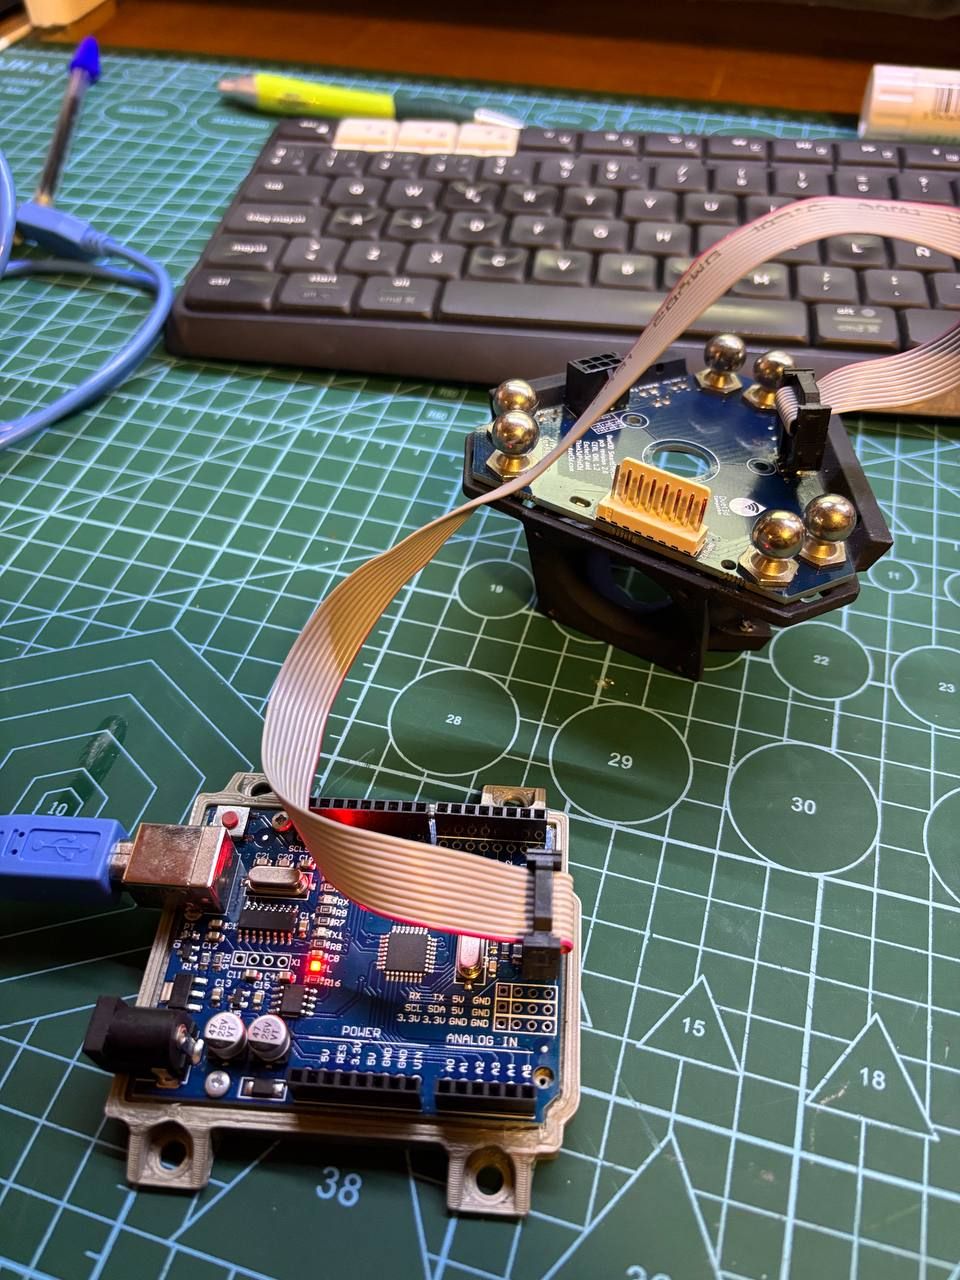
Solution: Flash new firmware V2.13 via PROG pin pads on top board side.
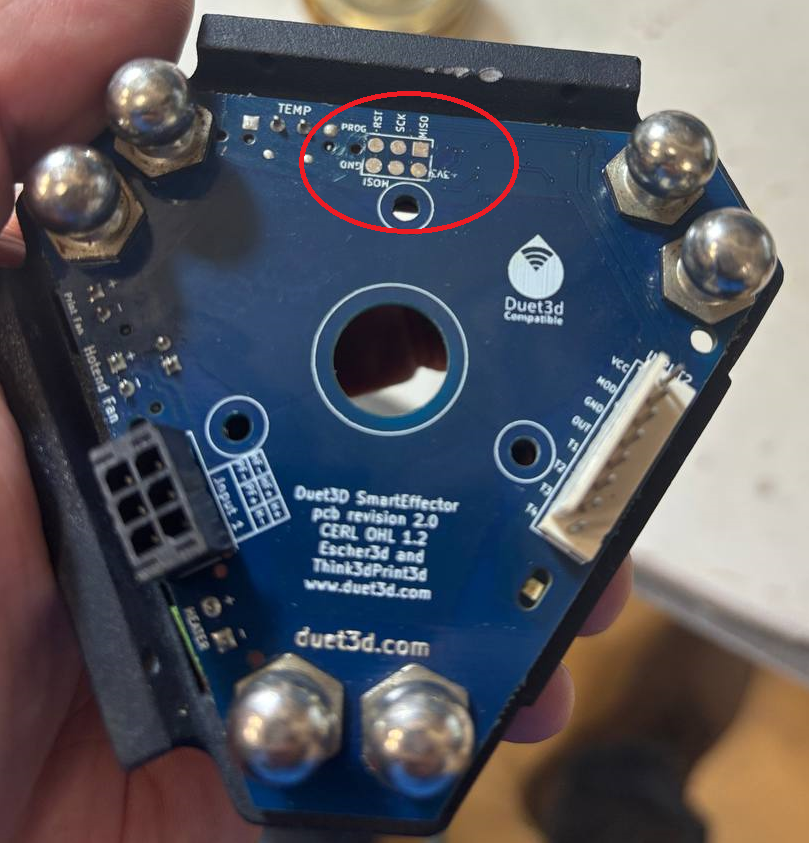
Procedure: Solver pin strip to exposed pads and use a direct pin to pin cable from the ISP port on programer

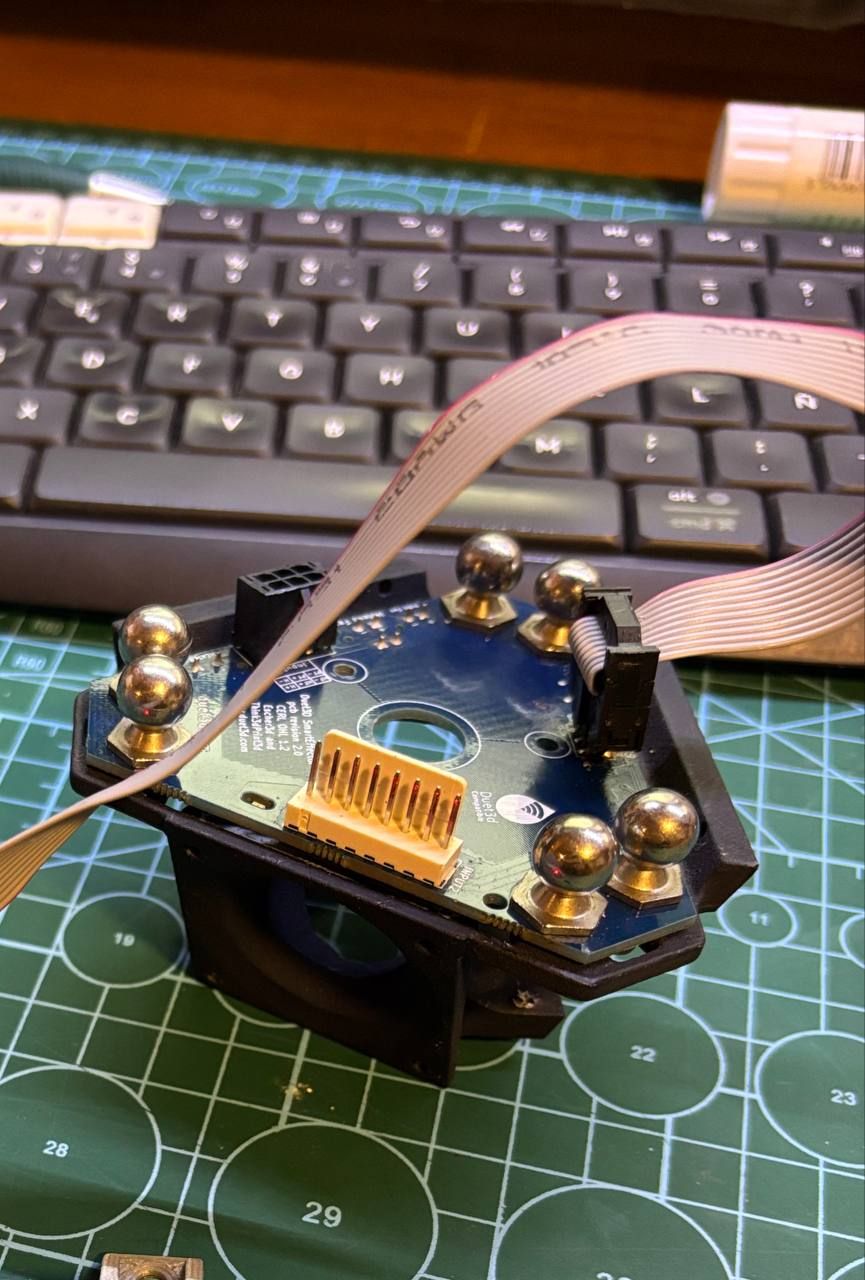
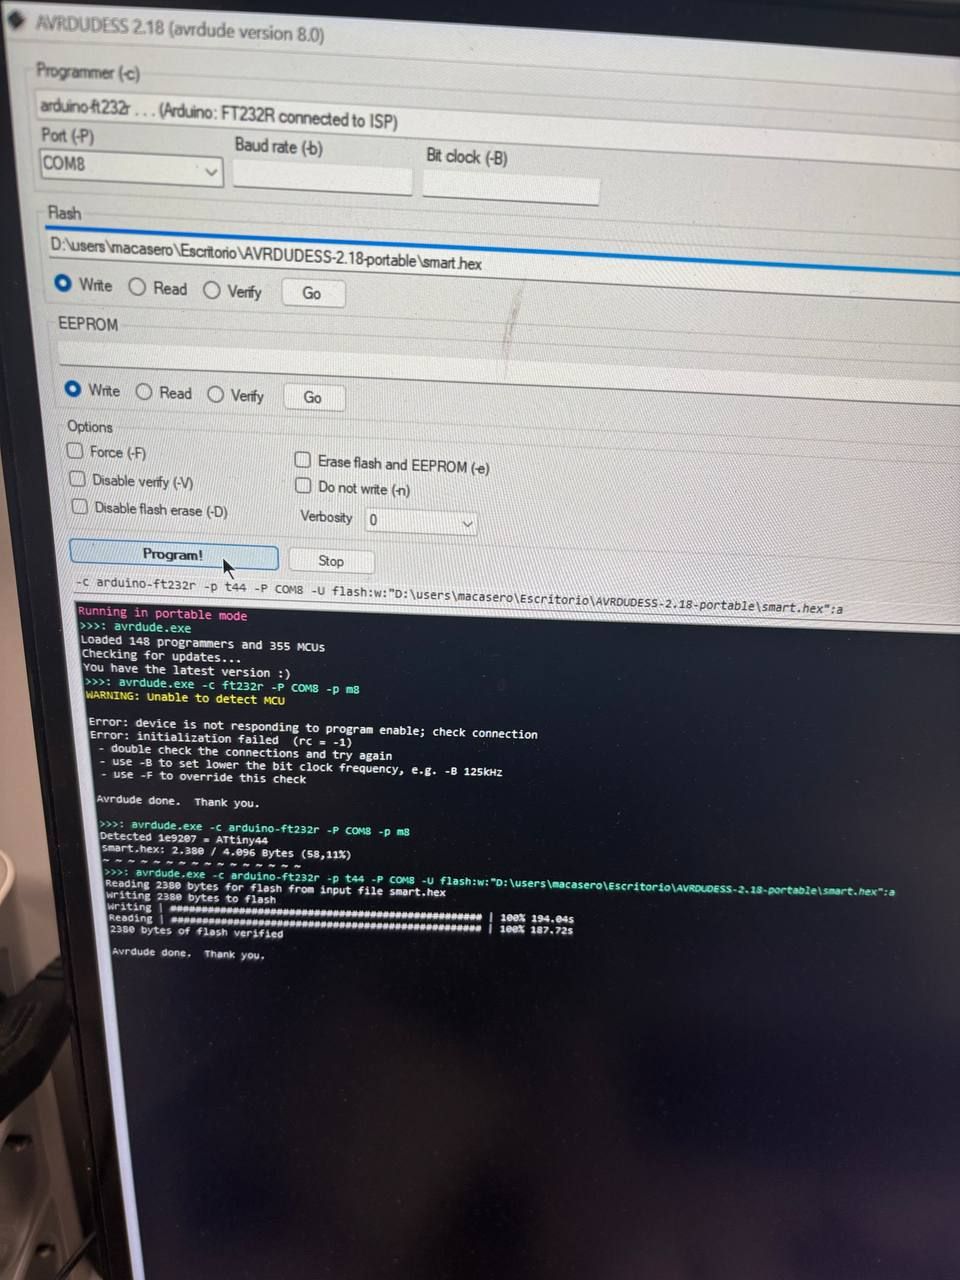
Programed with a FT232r programer with AVRDUDES app
-
RE: smarteffector v2 sensitivity not storedposted in Smart effector for delta printers
@droftarts i didn’t use the arduino uno.
Now once changed sensitibity, if power cicle led blinks 3 timesWill upload tomorrow destiled instructions
-
RE: smarteffector v2 sensitivity not storedposted in Smart effector for delta printers
Succesfully updated to 2.13 and solder pad restored
thanks

-
RE: smarteffector v2 sensitivity not storedposted in Smart effector for delta printers
@apak Update, It did not flash ok. I set a sensitibity other that stock, power cicle and only 2 led flashing
-
RE: smarteffector v2 sensitivity not storedposted in Smart effector for delta printers
@dc42
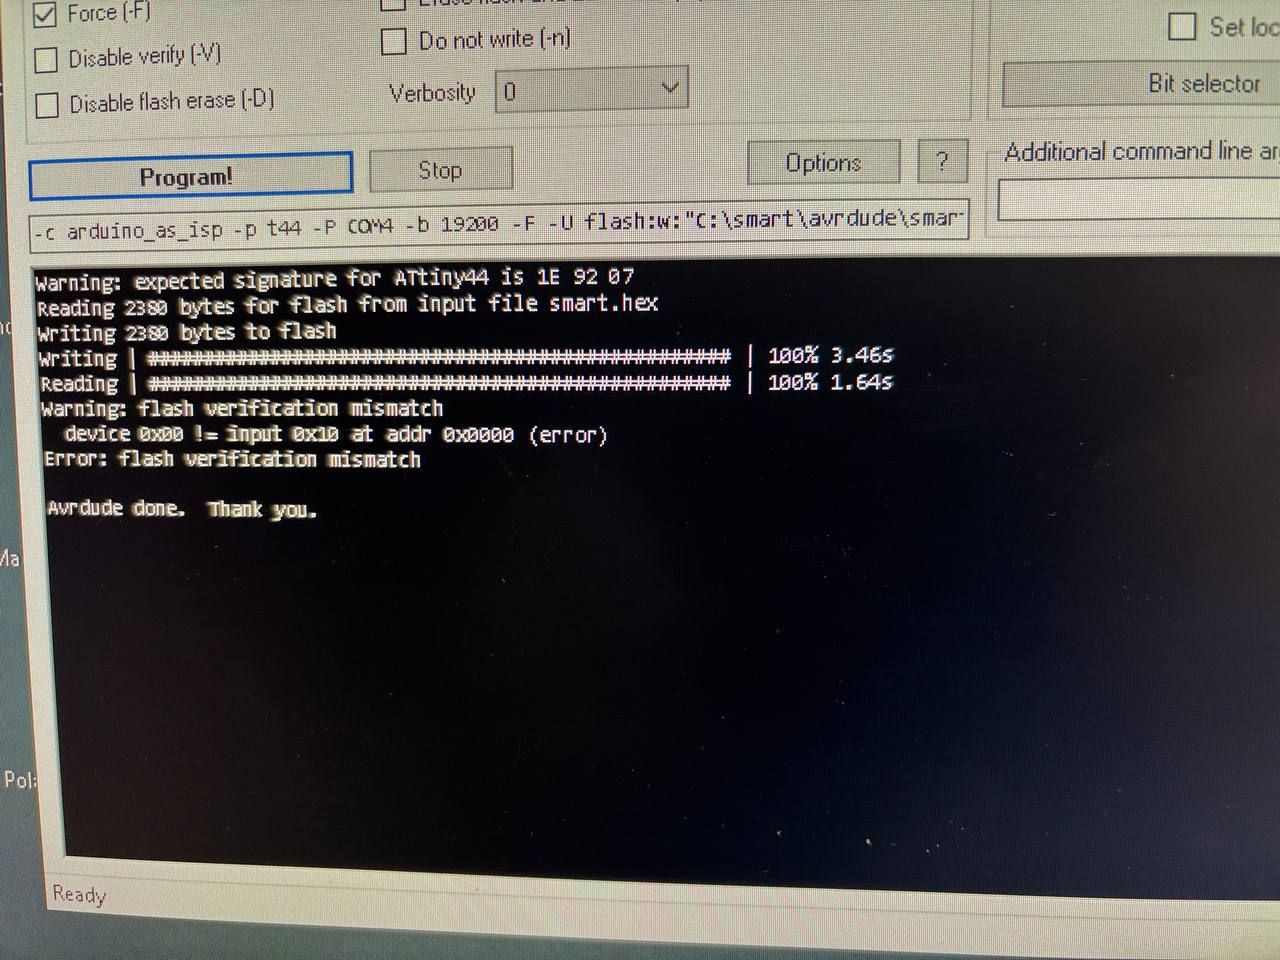
I didn´t wait for the popo pins to arrive, so I soldered some pins and used a Arduino UNO as Arduino ISP Programer, with avrdudes and upload he .hex file you mentioned.At detect (before uploading) it had a checksum mismatch, but I forced the upload and had that log below.
Is it there and way to know what version of fw it uploaded on a smarteffecto?
How could I know it was flashed ok? Maybe with a new M command such as M672 S99:99 that was included in fw 2.13?
I was only able this morning to plug the 8 pin plug and the smarteffector flashed 2 times, but couldnt test any more, had to leave to work
-
RE: Smart effector not remembering sensitivityposted in Smart effector for delta printers
@droftarts already opened a new post for my problem here
https://forum.duet3d.com/topic/37697/smarteffector-v2-sensitivity-not-stored/4 -
RE: smarteffector v2 sensitivity not storedposted in Smart effector for delta printers
@apak and what app and board should I configure asuming I have a arduino UNO
also have this little fellow

-
RE: smarteffector v2 sensitivity not storedposted in Smart effector for delta printers
@dc42 can you confirm me, what version of fw from https://github.com/Duet3D/SmartEffectorFirmware/releases should I flash to this board.
thanks in advance
-
RE: delta Z motor goes clunk, regardless of motor or driverposted in General Discussion
@achrn I can confirm that I have also ZVDDD configured on a 3.5.4 delta, and also have some clunks issues.
Will update this afternoon to 3.6 RC and test
-
RE: smarteffector v2 sensitivity not storedposted in Smart effector for delta printers
@dc42 I live in spain. The reason to change sensibility it´s because It triggers with any slight touch or movement so it does not trigger as it should. It´s my only smarteffector that ever has this behaviour, but I just got it from a old abandon printer that I am rebuilding.
It also triggers with a fan turn on.
In this case I have two diferent smarteffector, one with volcano and this one with a V6, and this is the only one with problems.
The predator and a v2 also with volcano and no troubles .
Already have low Z acc wih M201.1
M201.1 X500 Y500 Z500 E500 ; Set accelerations for special moves (mm/s^2)
Also I am going to buy this and try to update fw on board
https://es.aliexpress.com/item/1005006888442559.html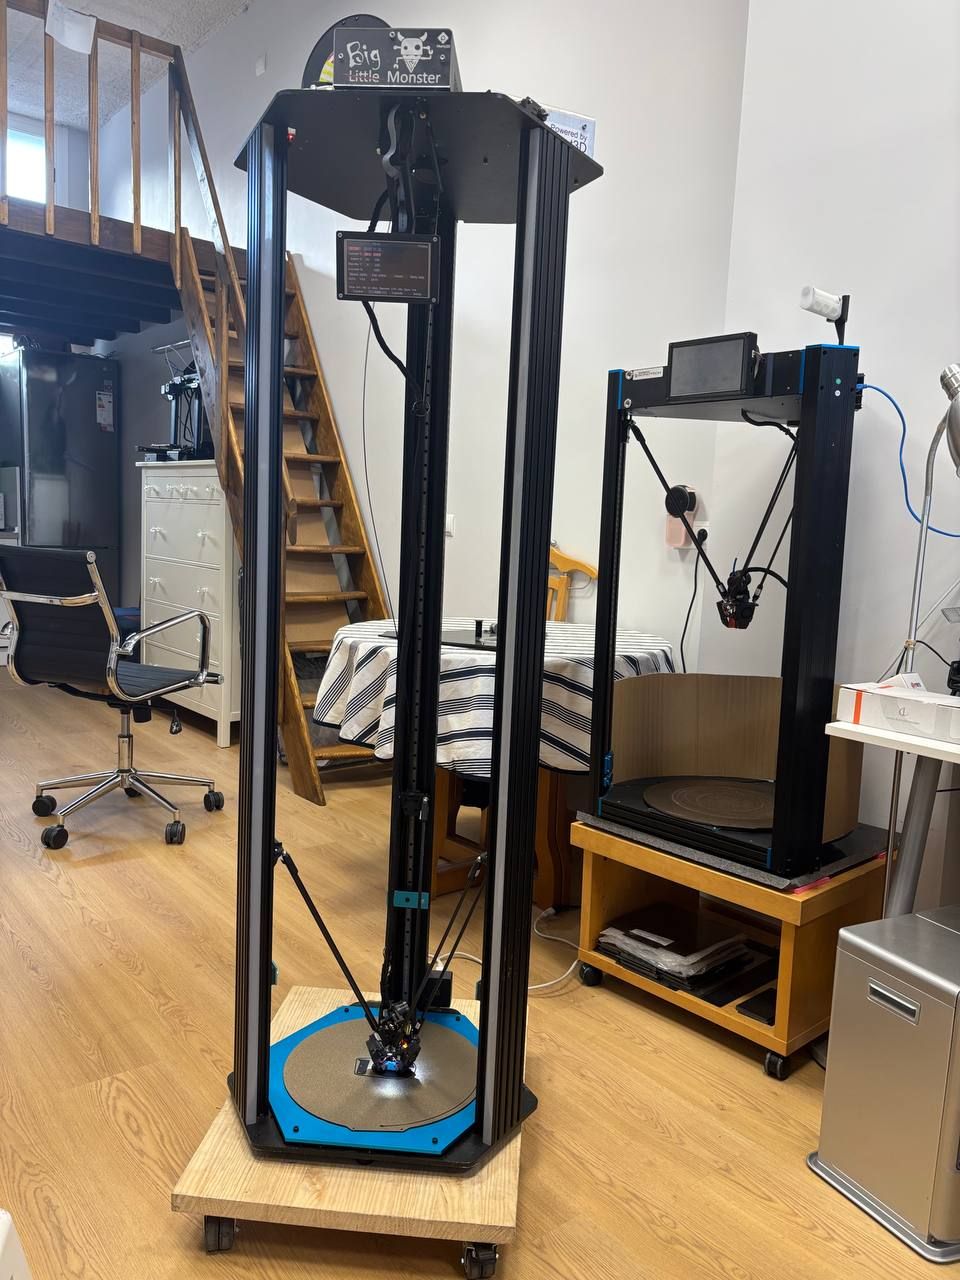
-
adaptative mesh on delta, helpposted in Tuning and tweaking
This is my startup script in orcaslcier
G28                                    ; home
M104 S150                              ; Precaliento nozzle
M140 S[first_layer_bed_temperature]    ; Caliento la cama
M190 S[first_layer_bed_temperature]    ; wait for bed temp
M109 S150                              ; wait for extruder temp
G1 Z10 F30000                           ; Bajo rapido para hacer el probe
G30                                    ;Establezco altura Z para evitar error Z-datum y que cargue correctamente el offset del prob
M98 P"0:/sys/00-Functions/print_area_mesh.g" A{first_layer_print_min[0]} B{first_layer_print_max[0]} C{first_layer_print_min[1]} D{first_layer_print_max[1]}
M376 H5                               ; turn on fade feature so it fades after 5mm height
G1 X0 Y-165 Z80 F6000                  ; Me pongo en posicion para limpiar el filamento
M104 S[first_layer_temperature]        ; set extruder temp
M109 S[first_layer_temperature]        ; wait for extruder temp
G92 E0                                 ;zero the extruded length
M400
M98 P"0:/sys/primeLine.g"                     ; Fichero de purga por el borde
G92 E0.0
And this is the script I am using to do the adaptative mesh.
; This command will only create a mesh of the print area
; This will reduce the printing time considerably by only probing what is needed
; start script call
; M98 P"0:/sys/00-Functions/print_area_mesh.g" A{first_layer_print_min[0]} B{first_layer_print_max[0]} C{first_layer_print_min[1]} D{first_layer_print_max[1]}

var deviationFromOriginal = 20

var probeGridMinX = move.compensation.probeGrid.mins[0]
var probeGridMaxX = move.compensation.probeGrid.maxs[0]
var probeGridMinY = move.compensation.probeGrid.mins[1]
var probeGridMaxY = move.compensation.probeGrid.maxs[1]

var pamMinX = {var.probeGridMinX}                                                                                                                                  ; Default the pamMinX value to the min x that is set for the mesh in M557. Originally coming from sys/printer_size_config.g
var pamMaxX = {var.probeGridMaxX}                                                                                                                                  ; Default the pamMaxX value to the min x that is set for the mesh in M557. Originally coming from sys/printer_size_config.g
var pamMinY = {var.probeGridMinY}                                                                                                                                  ; Default the pamMinY value to the min x that is set for the mesh in M557. Originally coming from sys/printer_size_config.g
var pamMaxY = {var.probeGridMaxY}                                                                                                                                  ; Default the pamMaxY value to the min x that is set for the mesh in M557. Originally coming from sys/printer_size_config.g
var meshSpacing = {move.compensation.probeGrid.spacings[0]}                                                                                                        ; Grabbing the spacing of the current M557 settings
var minMeshPoints = 3                                                                                                                                              ; The minimal amount of probing points for both X & Y.
var maxMeshPoints = 10                                                                                                                                             ; The max amount of probing points for both X & Y

if exists(param.A)
	set var.pamMinX = {param.A}                                                                                                                                       ; The min X position of the print job

if exists(param.B)
	set var.pamMaxX = {param.B}                                                                                                                                       ; The max X position of the print job

if exists(param.C)
	set var.pamMinY = {param.C}                                                                                                                                       ; The min Y position of the print job

if exists(param.D)
	set var.pamMaxY = {param.D}                                                                                                                                       ; The max Y position of the print job

if (var.probeGridMinX + var.deviationFromOriginal) >= var.pamMinX                                                                                                  ; Check if the difference between the min X and the print job min X is smaller than the set deviation
	set var.pamMinX = {var.probeGridMinX}                                                                                                                             ; The difference is smaller than the set deviation so set minX to the minimal of the printer's X

if (var.probeGridMaxX - var.deviationFromOriginal) <= var.pamMaxX                                                                                                  ; Check if the difference between the max X and the print job max X is smaller than the set devation
	set var.pamMaxX = {var.probeGridMaxX}                                                                                                                             ; The difference is smaller than the set devation so set maxX to the max of the printer's X

if (var.probeGridMinY + var.deviationFromOriginal) >= var.pamMinY                                                                                                  ; Check if the difference between the min Y and the print job min Y is smaller than the set devation
	set var.pamMinY = {var.probeGridMinY}                                                                                                                             ; the difference is smaller than the set devation so set minY to the minimal of the printer's Y

if (var.probeGridMaxY - var.deviationFromOriginal) <= var.pamMaxY                                                                                                  ; Check if the difference between the max X and the print job max X is smaller than the set devation
	set var.pamMaxY = {var.probeGridMaxY}                                                                                                                             ; The difference is smaller than the set devation so set maxY to the max of the printer's Y

var meshX = floor(min(var.maxMeshPoints - 1, (max(var.minMeshPoints - 1, (var.pamMaxX - var.pamMinX) / var.meshSpacing) + 1)))                                     ; Get the number of probes for X taking minMeshPoints and maxMeshPoints into account
var meshY = floor(min(var.maxMeshPoints - 1, (max(var.minMeshPoints - 1, (var.pamMaxY - var.pamMinY) / var.meshSpacing) + 1)))                                     ; Get the number of probes for Y taking minMeshPoints and maxMeshPoints into account

var consoleMessage = "Set probe grid to use X-min: " ^ var.pamMinX ^ "                                                                                             ; X-max: " ^ var.pamMaxX ^ "; Y-min: " ^ var.pamMinY ^ "; Y-max: " ^ var.pamMaxY "; Probing points: " ^ var.meshX ^ ";" ^ var.meshY	; Set the console message
M118 P2 S{var.consoleMessage}                                                                                                                                      ; send used probe grid to paneldue
M118 P3 S{var.consoleMessage}                                                                                                                                      ; send average to DWC console

M557 X{var.pamMinX, var.pamMaxX} Y{var.pamMinY, var.pamMaxY} P{var.meshX, var.meshY}                                                                               ; Set the probing mesh

G0 X{var.pamMinX + ((var.pamMaxX - var.pamMinX)/2) - sensors.probes[0].offsets[0]} Y{var.pamMinY + ((var.pamMaxY - var.pamMinY)/2) - sensors.probes[0].offsets[1]} ; Move to the center of the print area
G30                                                                                                                                                                ; Set the z height for the center of the print area
G29                                                                                                                                                                ; Probe the print area

; Restore the probing mesh to the original settings
set var.meshX = floor((var.probeGridMaxX - var.probeGridMinX) / var.meshSpacing + 1)
set var.meshY = floor((var.probeGridMaxY - var.probeGridMinY) / var.meshSpacing + 1)


;M557 R165 S40:40 							; define grid for mesh bed compensation MAX ALLOWED
M557 X{var.probeGridMinX, var.probeGridMaxX} Y{var.probeGridMinY, var.probeGridMaxY} P{var.meshX, var.meshY}
I have not had any problems yet, but I think I could have it if I set a big enought piece, so that Min and Max X,Y point make a rectangule bigger than print area, and would love to set mesh area in RADIUS format instead of rectangle.
but don´t remember where I collected this code to ask for it, so would like for some advice on how to do it.
-
smarteffector v2 sensitivity not storedposted in Smart effector for delta printers
Had some trouble with a smarteffector v2 and sensitivity.
I use this macro on all my other deltas.
;Set smarteffector sensibility (standard is 50)
; Lower numbers need less nozzle contact force to trigger the sensor. However, there is a greater risk that vibration from the stepper motors will cause false triggering.
; M672 S105:aaa:bbb replacing aaa by the desired sensitivity and bbb by 255 - aaa

;M672 S131:131                                          ; reset sensibility
;M672 S65:65                                            ;Factory Settings
;M672 S99:99                                            ; responds with two or three flashes of the LED according to whether default or custom sensitivity has been set

G4 S3                                                   ; pause 3s
M672 S131:131                                           ; reset sensibility
G4 S4                                                   ; pause 4s
M672 S105:105:150                                 ; set smarteffector sensibility TEVO BIG
G4 S3                                                  ; pause 3s
I power up the printer and sensitivity seams to be default, because it´s too sensible with my setup.
I try to set it and the smart effector does not respond as it should.
I power cycle the printer once o twice more, and I can run the macro and works fine.
But if I power down the printer, next time I power it up, need to do de sentitivity adjustment again, and again.
This is my config
; Configuration file for RepRapFirmware on Duet 2 WiFi for a Tevo Little Monster XL
;
; =========================================================================================================
; General
; =========================================================================================================
M111 S0                                                                        ; debugging off
G21                                                                            ; work in millimetres
G90                                                                            ; absolute coordinates
M83                                                                            ; relative extruder moves
; =========================================================================================================
; global variables
; =========================================================================================================
M98 P"0:/sys/settings/Set-Global-Variables.g"                                  ; set global variables
; =========================================================================================================
; Network
; =========================================================================================================
M550 P"TEVO"                                                                   ; set printer name
M552 S1                                                                        ; configure WiFi adapter
M586 P0 S1                                                                     ; configure HTTP
; =========================================================================================================
; Kinematics for Delta Printer Haydn´s mag arms
; =========================================================================================================
M665 L400.320:400.320:400.320 R172.293 H1030.009 B170.0 X-0.975 Y-0.686 Z0.000 ; H1026.594 volcano   ; H1036.193 V6
M666 X-0.183 Y0.948 Z-0.765 A0.00 B0.00
; =========================================================================================================
; Drives
; =========================================================================================================
M569 P0 S0 D2                                                                  ; driver 0 goes forwards (ALPHA axis)
M569 P1 S0 D2                                                                  ; driver 1 goes forwards (BETA axis)
M569 P2 S0 D2                                                                  ; driver 2 goes forwards (GAMMA axis)
M569 P3 S1 D2                                                                  ; driver 3 goes forwards (extruder 0)
; =========================================================================================================
; Drives maping
; =========================================================================================================
M584 X0 Y1 Z2                                                                  ; set axis mapping
M584 E3                                                                        ; set extruder mapping
; =========================================================================================================
; Set motor currents
; =========================================================================================================
M906 X1200 Y1200 Z1200                                                         ; set axis driver currents
M906 E800                                                                      ; set extruder driver currents
; =========================================================================================================
; Motor Idle Current Reduction
; =========================================================================================================
M906 I30                                                                       ; set motor current idle factor
M84 S30                                                                        ; set motor current idle timeout
; =========================================================================================================
; Set microsteps and steps / mm
; =========================================================================================================
M350 X16 Y16 Z16 I1                                                            ; configure microstepping with interpolation
M350 E16 I0                                                                    ; configure microstepping without interpolation
M92 X80 Y80 Z80                                                                ; configure steps per mm
M98 P"0:/sys/settings/Set-E-Steps.g"                                           ; configure steps per mm for extruder
; =========================================================================================================
; set speeds
; =========================================================================================================
M201 X4000 Y4000 Z4000 E1500                                                   ; set accelerations (mm/s^2)
M203 X18000 Y18000 Z18000 E6000                                                ; set maximum speeds (mm/min) 500mm/s
M204 P3000.0 T5000.0                                                           ; set print and travel accelerations (mm/s^2)
M566 E600                                                                      ; set maximum instantaneous speed changes (mm/min)
M201.1 X500 Y500 Z500 E500                                                     ; Set accelerations for special moves (mm/s^2)
M205 X9 Y9 Z9
;
set global.x_accel = move.axes[0].acceleration                                 ; save accelerations (mm/s^2)
set global.x_jerk = move.axes[0].jerk                                          ; save maximum instantaneous speed changes (mm/min)
;
set global.y_accel = move.axes[1].acceleration                                 ; save accelerations (mm/s^2)
set global.y_jerk = move.axes[1].jerk                                          ; save maximum instantaneous speed changes (mm/min)
; =========================================================================================================
; axes limits
; =========================================================================================================
M208 Z-1 S1                                                                    ; Set minimum Z
; =========================================================================================================
; Endstops
; =========================================================================================================
M574 X2 P"xstop" S1                                                            ; configure ALPHA axis endstop
M574 Y2 P"ystop" S1                                                            ; configure BETA axis endstop
M574 Z2 P"zstop" S1                                                            ; configure GAMMA axis endstop
; =========================================================================================================
; Probes
; =========================================================================================================
M558 K0 P8 R0.4 C"zprobe.in+zprobe.mod" H5 F1200 T60000 B1                     ; configure digital probe via slot #0
G31 P1000 X0 Y0 Z-0.36                                                         ; set Z probe trigger value, offset and trigger height v6
; =========================================================================================================
; Mesh Bed Compensation
; =========================================================================================================
M557 R165 S40:40                                                               ; define grid for mesh bed compensation
; =========================================================================================================
; heaters, fans, thermistors
; =========================================================================================================
; heated bed
; =========================================================================================================
M308 S0 P"bedtemp" Y"thermistor" A"Heated Bed" T100000 B4092                   ; configure sensor #0
M950 H0 C"bedheat" T0                                                          ; create heater #0
M143 H0 P0 T0 C0 S140 A0                                                       ; configure heater monitor #0 for heater #0
M140 P0 H0                                                                     ; configure heated bed #0
; =========================================================================================================
; hotend
; =========================================================================================================
M308 S1 P"e0temp" Y"thermistor" A"Nozzle" T100000 B4388 C7.06e-8               ; configure sensor #1
M950 H1 C"e0heat" T1                                                           ; create heater #1
M143 H1 P0 T1 C0 S285 A0                                                       ; configure heater monitor #0 for heater #1
M143 H1 S280                                                                   ; set temperature limit for heater 1 to 280°C
; =========================================================================================================
; Fans
; =========================================================================================================
; Part Cooling
; =========================================================================================================
M950 F0 C"fan0"                                                                ; create fan #0 part cooling
M106 P0 S0 L0.3 X1 B0.3                                                        ; configure fan #0
; =========================================================================================================
; Hotend fan (temperature controlled)
; =========================================================================================================
M950 F1 C"fan1"                                                                ; create fan #1 hotend
M106 P1 S0 B0.2 H1 T45                                                         ; configure fan #1
; =========================================================================================================
; Fan2 = MotherBoard Cooling
;----MCU & DRIVERS sensors------
; =========================================================================================================
M308 S3 Y"mcu-temp"	A"MCU"                                                     ; create sensor for MCU temp M308 S3 Y"mcutemp"
M308 S4 Y"drivers"	A"Drivers"                                                  ; create sensor for drivers temp M308 S4 Y"drivers"
M912 P0 S-8                                                                    ; Calibrate MCU temp
M950 F2 C"fan2" Q500                                                           ; create fan 2 on pin out4 - alternative with tacho M950 F2 C"!fan2+^pb6"
M106 P2 H3:4 L.3 B.5 X1 T40:65                                                 ; Set fan 2 PWR fan. Turns on when MCU temperature, hits 45C and full when the MCU temperature reaches 65C or any TMC2660 alarms
; ========================================================================================================
; Tools
; ========================================================================================================
M200 D1.75
M563 P0 D0 H1 F0                                                               ; create tool #0
G10 P0 X0 Y0 Z0                                                                ; set tool 0 axis offsets
M568 P0 R0 S0 A0                                                               ; set initial tool #0 active and standby temperatures to 0C
M302 S180 R180                                                                 ; allow extrusion starting from 180°C and retractions already from 180°C
; ========================================================================================================
; Power Restore
M911 S19.8 R22 P"M913 X0 Y0 G91 M83 G1 Z3 E-5 F1000"                           ; set voltage thresholds and actions to run on power loss
; ========================================================================================================
; Panel Due
; ========================================================================================================
M575 P1 S0 B57600                                                              ; configure PanelDue support
; ========================================================================================================
; =========================================================================================================
; other settings
; =========================================================================================================
M98 P"0:/sys/settings/Set-PID-Bed.g"                                           ; set PID values for the heated bed
M98 P"0:/sys/settings/Set-PID-Nozzle.g"                                        ; set PID values for the nozzle
;M307 H1 R1.588 K0.266:0.074 D7.56 E1.35 S1.00 B0 V23.5						; Volcano 1.2mm
; =========================================================================================================
; filament handling
; =========================================================================================================
; execute macros that determine the status of the filament sensor
;
M98 P"0:/sys/settings/Set-FilamentSensorStatus.g"                              ; load filament sensor settings
M98 P"0:/sys/settings/Set-AutoLoadStatus.g"                                    ; load autoload settings
M98 P"0:/sys/00-Functions/FilamentsensorStatus"                                ; update sensor status
;
; =========================================================================================================
; offsets - place off-sets for x and y here. z-offsets are handled in the print sheet macros
; =========================================================================================================
M98 P"0:/sys/settings/Set-Probe-XY-Offsets.g"                                  ; set probe xy-offset
M98 P"0:/sys/settings/Set-Probe-Z-Offset.g"                                    ; set probe z-offset
; =========================================================================================================
; Accelerometer and input Shaping
; =========================================================================================================
;
;M955 P0 I20 C"spi.cs2+spi.cs1" ; all wires connected to temp DB connector, no temperature daughterboard
M593 P"zvddd" F40 S0.10                                                        ; Input Shaping
;
; =========================================================================================================
; check connectivity
; =========================================================================================================
if {network.interfaces[0].type = "wifi"}
  echo >"0:/sys/runonce.g" "M98 P""0:/sys/test-WiFi.g"""
; =========================================================================================================
; Miscellaneous
; =========================================================================================================
M501                                                                           ; load saved parameters from non-volatile memory
T0                                                                             ; select first tool
On the same printer I have another smarteffector that didn´t need to adjust sensitivity to work properly
-
RE: Smart effector not remembering sensitivityposted in Smart effector for delta printers
I just got a old smarteffector that seems to have this very same problem.
No sensitivity store, and need to program it every power cicle.
Is it there any instruction on how to flash fw to smarteffector? It´s a V2. So don´t know the best or latest fw to install
-
RE: M291 not capturen input to varposted in Gcode meta commands
@apak my bad, DWC 3.2.2
updated to 3.5.4 and works fine
-
M291 not capturen input to varposted in Gcode meta commands
var target_temperature = 60                                            ; target temperature in °C
M291 R"Enter target temperature in °C:" P"Heat bed PID tuning interval: 50°C - 100°C" F{var.target_temperature} S5 L50 H100 J1
set var.target_temperature = input
The input box does not allow me to enter any value and stores NULL value
fw 3.5.4
any sugestion?
-
RE: Bluetooth PanelDue, less com issuesposted in PanelDue
@jackantubis nice, thanks for sharing, I am rebuilding a Tevo Little monster for a total of 1000mm Z size, so I love the wireless solution for the paneldue