Some Other AnyCubic Kossel Linear Plus Mods...
-
@mindbender9, and all,
Hi.
Re; my AnyCubic Kossel Linear Plus (AKLP)...
With a bunch of help from numerous folks here on this bbs & DC42...
My AnyCubic printer is just now starting to behave, but I have heavily modified it. As a matter fact the only parts that remain from the original kit, are the ShenZhen 42HD4027-01 (1.8°/stp, 400mN.m, 3.3V, 1.5A) NEMA-17 stepper motors, belts, pulleys, and 2020 profiles. Everything else has been replaced. I even replaced all those cheesy excuses for T-Nuts and most of the metric screws, as many were the wrong lengths or wrong diameters for the intended application. The AnyCubic heat-bed I have was not included in my 'version', but they sold it me as an option accessory, later. I am having problems in that area too, as it barely attains PLA stiction temperature. In my perspective, this AnyCubic printer is snake-bit. It'll eventually run well.
The plastic vertex corners, on your version printer may require replacement with metal corners. Before I swapped out the TriGorilla controller board (it burst into flames...a clone chip). I replaced it with a DUET-E controller. I too was experiencing height drift, and it seemed to be dependant upon the temperature of the heat-bed? The 'drift' anomaly ceased when I replaced the plastic corners with metal corners. I acquired the aluminum corners from UltiBots along with an order for a set of 288mm Hayden 'MagBall Rods'+ Delrin. Should you procure the corners from them, I recommend that you also procure the 'hardware set', it'll make your life easier. And because one must literally disassemble the entire printer, one can be rebuild, being very careful to 'square-up' every joint, checking with a small machinist's square or similar measuring tool/reference. Tightened and LocTite'd during the rebuild. Trust me, things will be better.
Another area, and one that Danal and many others have previously mentioned, is re; the replacement of the bed holding fixtures, which is still a good idea. Part of the problem with these...those plastic fixtures are not properly engineered for 2020 profile slot. The problem is caused by the bottom plastic 'step' that prevents the fixture from rotating, the step is too big, and when tightening the screw down, the step butts up against the T-Nut, leaving a small gap between the tightened screw/T-Nut and the fixture, --the fixture isn't tightened to the profile!! It makes a 'crack' sound when you move it. That's the T-Nut breaking loose from having been pulled into the bottom of the plastic step!! Shortening the screw can't solve the problem. One can not tighten the bed clips down, so there exists a small gap between the profile and the fixture. It seems really tight, but it doesn't hold the bed well and the fixtures move slightly when the temperature of the bed changes, thereby changing the 'tortional' geometry of the bed. (I'd like to say something choice about their engineering staff...) To remedy that matter I used a file to grind down the size of the step by grinding a slot wide enough to leave a gap between the shoulder of the T-Nut to enable it to clamp on to the profile. (see the photo). Later I discovered that the top-of-tower micro-switch end-stop plastic mounts also have the same problem which again was resolved by filing away the plastic step in the middle so that the screw can actually tighten the support-mount down to the 2020 profile which prevent the switches from moving about.
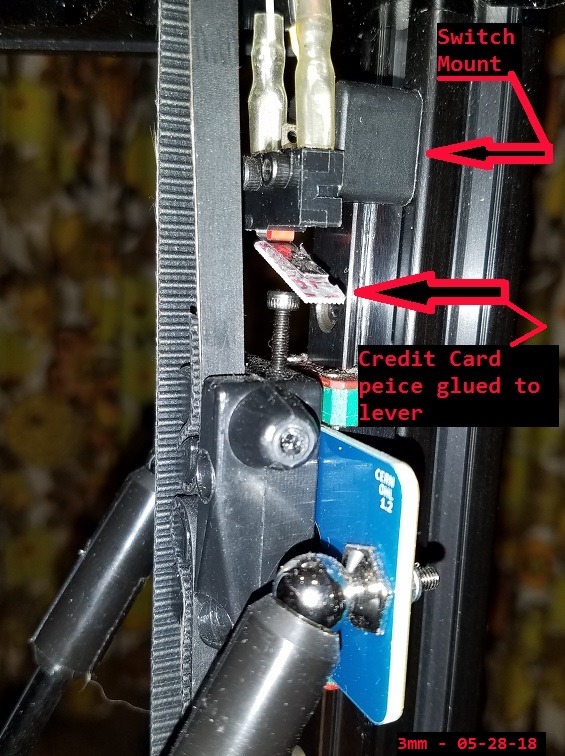
When one mounts the carriage mag-ball adapter plate between the belt ends holder, the alignment axis of the top-of-tower adjustment screw head is pushed out causing mis-alignment with the micro-switch lever. This can be kiwi'd by gluing a small stiff strip of something...I cut up an old credit-card. I glued it to the switch lever to widen it. I used Goop to glue it. Tough and resilient. See the photo.
Another problem, at least on my AKLP version, the heads of the metric screws touch the belts. Instead of being cap-heads, those metric bolts need to be button-heads. But should you elect to change-out the corners to those made of metal, that problem evaporates because the idler pully is located further out onto the pulley axle which moves the belt out away from the screw heads. That can be easily mitigated by simply moving the belt over the pulley side. It actually lines up well with the stepper motor toothed pulley below..its a somewhat kiwi work-around but so far it is working well. But at some future juncture I will properly resolve that issue. See the photo.
In a nut-shell, rid yourself of that AnyCubic effector & rip-off clone of the E3D hotend, by replacing it with a DC42 Smart-Effector.
I tossed in a couple of photos of the Smart-Effector, top and bottom for you to gander-at and one of my switching power-supply with a 100Ampere SSR puck mounted to it. It runs cool in that arrangement. If later I determine that it needs more heat-sinking, I'll add one to the stack with a fan.
Consider the fact that these kind folks here in this forum as well as the engineers of the fine Escher & Think3DPrinters products are providing hugely time-consuming technical support for OTHER factories' products, simply because 'we' bought an electronic controller from them. We are very fortunate, indeed. .
3mm
See the few modification photos..


-
@3mm, thanks for providing so much detail!
That narrowing belt spacing will cause the belt tension to vary with carriage position. It looks like it needs a smaller idler pulley, preferably toothed.