Cast Toolplate Bed Progress ?
-
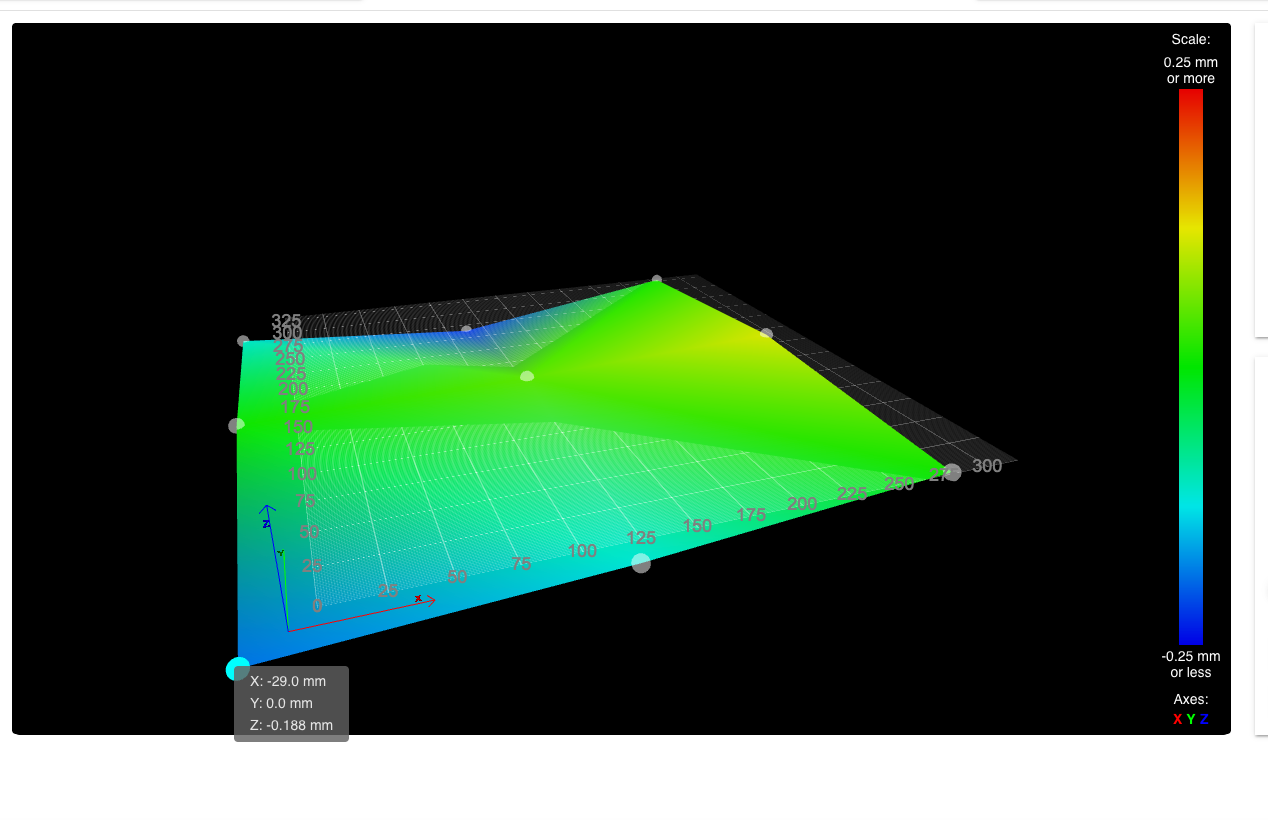
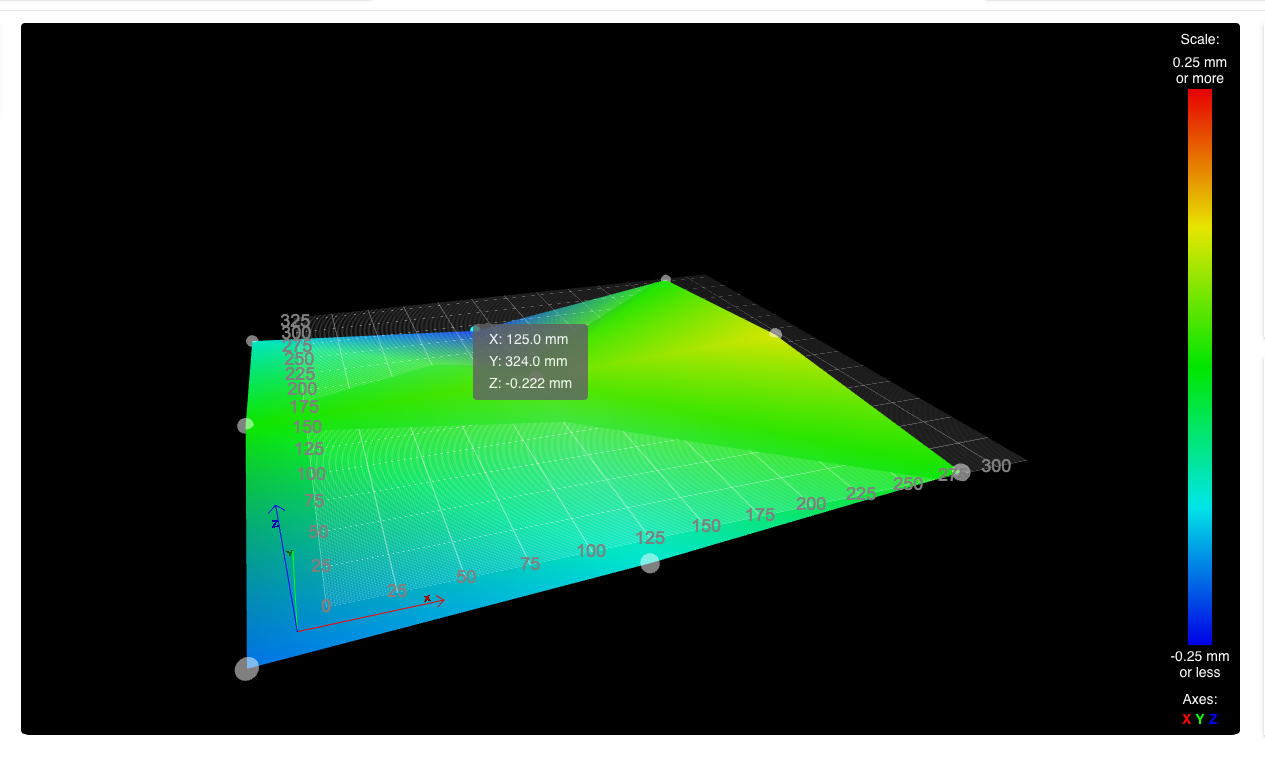
With the washers and shims I currently have (1mm & 0.5mm), I think this is the best I'm going to get it.
Just ordered some 0.1 and 0.2mm shims, so can hopefully improve this in the new year 'while saving for a new frame'.
Dizzwold.

-
@Dizzwold definitely carry on with getting your frame and gantry trammel up, but be aware of the published specs (if any) for your cast plate.
As an example, this material and vendor is popular in the states:
https://www.midweststeelsupply.com/store/ATP5Flyer.pdfNote that for material less than 12.7mm thick, the flatness tolerance is .381mm or better across the entire plate. Example image of what ‘flatness’ means below.
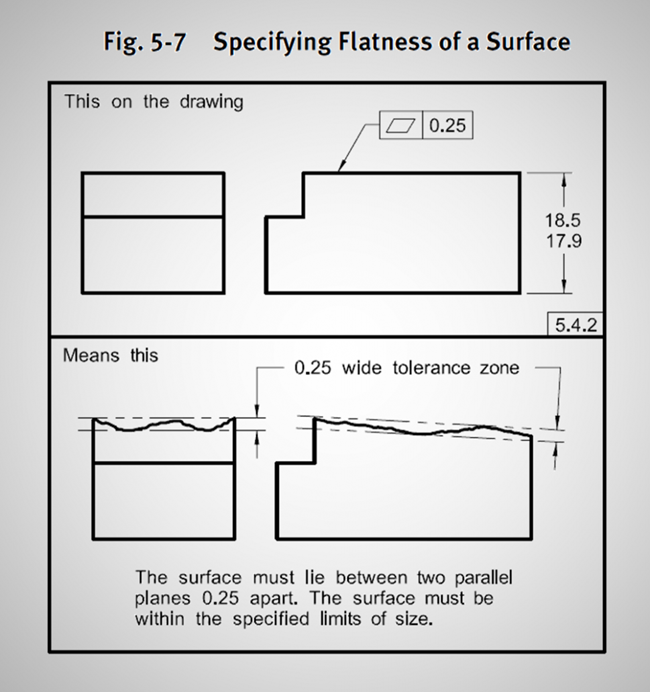
https://media.faro.com/-/media/Project/FARO/FARO/FARO/Images/Resources/2021/01/15/23/03/flatness-ASMEex-969x1030.png?h=692&w=650&rev=97ef025583f14db4a5c22b058fb7b809&hash=F3D4FD2D475501E30BEB379E0BBDA981Specs vary by manufacturer, and you may well never see the worse case flatness tolerance, but just a tidbit to keep in mind.
-
@sebkritikel said in Cast Toolplate Bed Progress ?:
.................... Note that for material less than 12.7mm thick, the flatness tolerance is .381mm or better across the entire plate.................
That's not exactly correct. The specs refer to "guaranteed flatness" not "flatness tolerance". It's a common safety margin that suppliers use to cover themselves in case of litigation. The quoted flatness also applies to the entire sheet which could have a length of 3670mm and a width of 1842mm. That's an area of 6.76 m^2 whereas if the OPs bed was 500mm x 500mm that would only be 0.25 m^2 so it's highly unlikely that his small section of a (machined) sheet would have a deviation anything like that.
-
@deckingman @droftarts @fcwilt @sebkritikel
Hi Guys,
I'm back with an update after much tinkering, finessing and frustration.
The following image show's a cold 9 point bed compensation. Again I've only used 9 points for quickness to test the flatness of the bed and to try and eliminate any tramming.
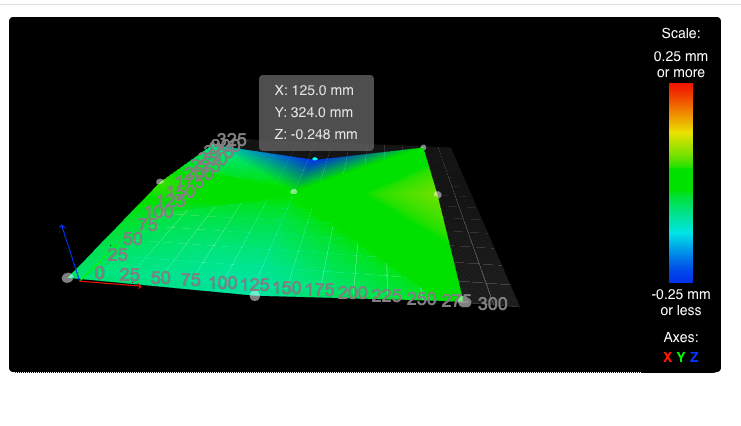
The point at the rear centre is now the only point that is out. The rest vary from +0.004 to -0.090.
Going back to the Emergency stop button I have (the mushroom type on a NC circuit).
Is it possible so when the switch is reset, it will reset the Emergency Stop in DWC?
I've tried using M999 in a variety of ways, in config.g as trigger 0 and in sys/trigger2.g and just can't figure this out.
Config.g; Custom settings are not defined ; Emergency Stop M950 J2 C"!io3.in" M581 P2 T2 S0 R0 ;M582 T0 S0 ; Z Axis Limit Switch M950 J3 C"io2.in" M581 P3 T3 S0 R0 ;M582 T2 S0Trigger 2.g
;Trigger2.g Emergency Stop Button

M112				;stop all
M582 T2 S0
M999				;restart all
Trigger 3.g
;Trigger3.g Z Axis Limt Switch
M112				;stop all
M582 T3 S0
M999				;restart all
The Z Axis limit switch is a fail-safe for while I'm tinkering as I've already accidentally touched the paneldue after a M564 S0 and crashed the leadscrew nuts into the motor mounts.
Dizzwold.
-
@Dizzwold said in Cast Toolplate Bed Progress ?:
Is it possible so when the switch is reset, it will reset the Emergency Stop in DWC?
I've tried using M999 in a variety of ways, in config.g as trigger 0 and in sys/trigger2.g and just can't figure this out.
Config.gI'm not sure that you can use M999 to reset after an emergency stop. The docs say it'll restart the firmware after a software reset which isn't the same thing. The usual way to reset an emergency stop is to power cycle the board. I have mine wired such that it kills all power to the boards so resetting the emergency stop button effectively does just that. You could maybe do M98 P "config.g" which will run config.g again - that might work as a reset mechanism.
The way to do it would be to have two triggers, one that works on an active to inactive edge, and the other that works on inactive to active. So you can use M581 P2 T0 S0 R0 which will do an emergency stop as if M112 was run - you don't need create a trigger0 macro to do an emergency stop. Then use M581 P2 T2 S1 R0 to run the macro "trigger2" which would contain M98 P "config.g". You might need to swap S0 and S1 around depending on how the switch is wired.
-
Hi Ian,
@deckingman said in Cast Toolplate Bed Progress ?:
You could maybe do M98 P "config.g"
Now there's an idea, thank you for that.
-
Hi Ian,
A quick question. Should the
M582line be within thetrigger.gor within the mainconfig.g?Dizzwold.
-
@Dizzwold said in Cast Toolplate Bed Progress ?:
Hi Ian,
A quick question. Should the
M582line be within thetrigger.gor within the mainconfig.g?Dizzwold.
Not sure I understand. Triggers are activated when the input defined in M581 changes state. So you don't normally have to do anything as the relevant macro will run "automatically" when the input state changes. AFAIK, M582 is just a way of checking the state of the inputs so I've never used it.
-
Hi Ian,
Sadly the Trigger 2,
M98 P"config.g"has no influance on restarting DWC. It still needs manually resetting.
Config.g; Custom settings are not defined ; Emergency Stop M950 J2 C"io3.in" M581 P2 T0 S1 R0 ;M582 T2 S0 M581 P2 T2 S0 R0Trigger2.g
;Trigger2.g Reset Emergency Stop Button

M98 P"config.g"
I've tried many variants with
M112, M999, M400and tried changing theS0, S1, S-1values, although I have it connected on a NC circuit soS1on a non-inverted pin triggersT0(M112 Emergency Stop), then releasing the
Emergency Stop ButtonS0Triggers the same non-inverted pinT2, M98 P"config.g"
Have got something wrong somewhere? -
@Dizzwold Dunno. I guess we need to first check that the correct macro is being triggered with the switch in each position. Try doing M581 P2 T3 S1 R0 and keep the existing M581 P2 T2 S0 R0. So we have two triggers (2 and 3) and one should run on a rising edge the other on a falling edge. Then make trigger2.g with just a single command M118 S" This is trigger 2", and trigger3.g with just a single command M118 S"This is trigger 3".
Then exercise your switch and see what happens. Hopefully you'll get a message "This is trigger 2" when the switch changes from one state to another and "This is trigger 3" when the state changes back. Once we are sure that part is working, then we can think about what commands to put in each trigger macro.
-
@deckingman said in Cast Toolplate Bed Progress ?:
This is trigger 2
Hi Ian,
Hmm... I tried what you suggested above, and i worked as expected;
Trigger 2 when the E Stop Button is pressedS1
Trigger 3 when releasedS0So I've then replaced Trigger 2 with
M112
M999
and Trigger 3 with
M98 P"config.g"Same problem DWC on my computer needs a physical click on the RESET button displayed on the screen (paneldue states HALTED), so it would seem that the
M98 P"config.g"is the issue.
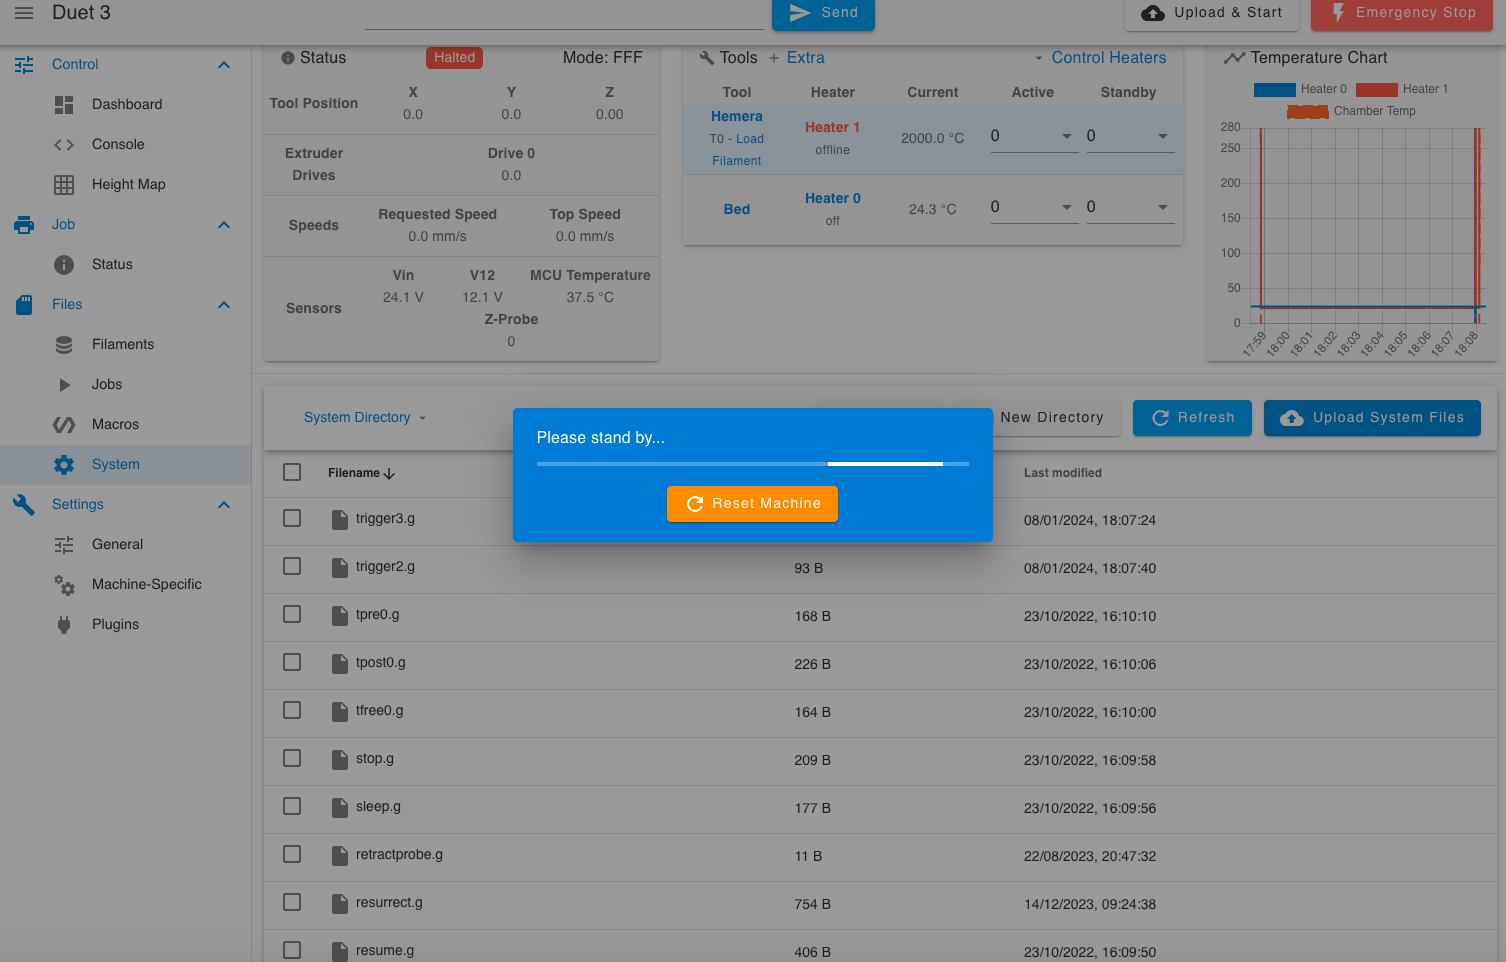
Config.g;; Custom settings are not defined ; Emergency Stop M950 J2 C"io3.in" M581 P2 T2 S1 R0 ;M950 J2 C"io3.in" M581 P2 T3 S0 R0 ; Z Axis Limit Switch ;M950 J3 C"io2.in" ;M581 P3 T3 S0 R0Trigger2.g;
;Trigger2.g Reset Emergency Stop Button
M112
M999

;M118 S"This is Trigger 2"
Trigger3.g
;Trigger3.g Z Axis Limt Switch

;M118 S"This is Trigger 3"
M98 P"config.g"
Maybe it's not possible?
Dizzwold
-
@Dizzwold said in Cast Toolplate Bed Progress ?:
Maybe it's not possible?
Maybe. I'd have thought there ought to be a way to recover from an emergency stop but the docs just talk about power cycling the board. I'm surprised running config g doesn't work because that is effectively all that happens when power is restored.......but there is possibly a work around.
The obvious one is do as I do and use the emergency stop button to physically interrupt the 24V power to the board(s).
But failing that, maybe we can do something else. So rather than an emergency stop, think about what you actually want to stop. I guess that's motors and heaters. Heaters are easy - just set the temperatures to zero in one macro and restore them in the other. So what about using M18 instead of M112 to disable motors? It might not be immediate though so might have to wait for any moves to finish which I guess is not what you want an emergency stop to do? M0 is another option but again, I don't think it will work until the current move is complete.
-
@Dizzwold said in Cast Toolplate Bed Progress ?:
Maybe it's not possible?
A question for @chrishamm I think.
-
@Phaedrux said in Cast Toolplate Bed Progress ?:
@Dizzwold said in Cast Toolplate Bed Progress ?:
Maybe it's not possible?
A question for @chrishamm I think.
,..,....or @dc42. Essentially we're trying to find a way to reset a printer after M112 has been sent, without cycling power. The OP is using trigger macros so it can be a series of commands rather than a single command. Apparently running config g via M98 doesn't do the job and I'd have thought it would.
-
@deckingman sending M999 works. The emergency stop button sends M112 followed a little later by M999.
-
@dc42 said in Cast Toolplate Bed Progress ?:
@deckingman sending M999 works. The emergency stop button sends M112 followed a little later by M999.
Maybe I've misunderstood the OP's problem. Looking back through his posts he is saying " DWC on my computer needs a physical click on the RESET button displayed on the screen". I think it's that "DWC thing" that he's trying to overcome. He says he's tried all combinations of M999 etc in his trigger macros.
-
That's correct, I'm talking on the computer DWC interface.
If I clicking a button on screen with my cursor on my computer, I'm essentially sending a single line of code once to the Duet, so why can't a physical button do this?
I appreciate that DWC is an interface used both by the Paneldue and as it would suggest on mobile or computers (Duet 'Web' Control).I had looked at other options like for a filament run-out sensor, maybe this or like you've suggested with disabling/re-enabling the steppers are the only options.
-
@Dizzwold Definitely one for @chrishamm then.
-
@Dizzwold said in Cast Toolplate Bed Progress ?:
I'm essentially sending a single line of code once to the Duet, so why can't a physical button do this?
What code are you trying to send?
Frederick
-
@Dizzwold Just a thought but what happens if you refresh your browser after the macro containing M999 has run? Does DWC still want you to press a reset button?