Duet 0.6 which firmware release
-
I think the Huxley Duo config and homing files would be similar to an Ormerod 2, except that the axis lengths are lower, also I think it used a different extruder so the extruder steps/mm may be different.
-
@dc42 Thanks, once again!
By the way I do have the 4.7K resistor on my Duet 0.6.
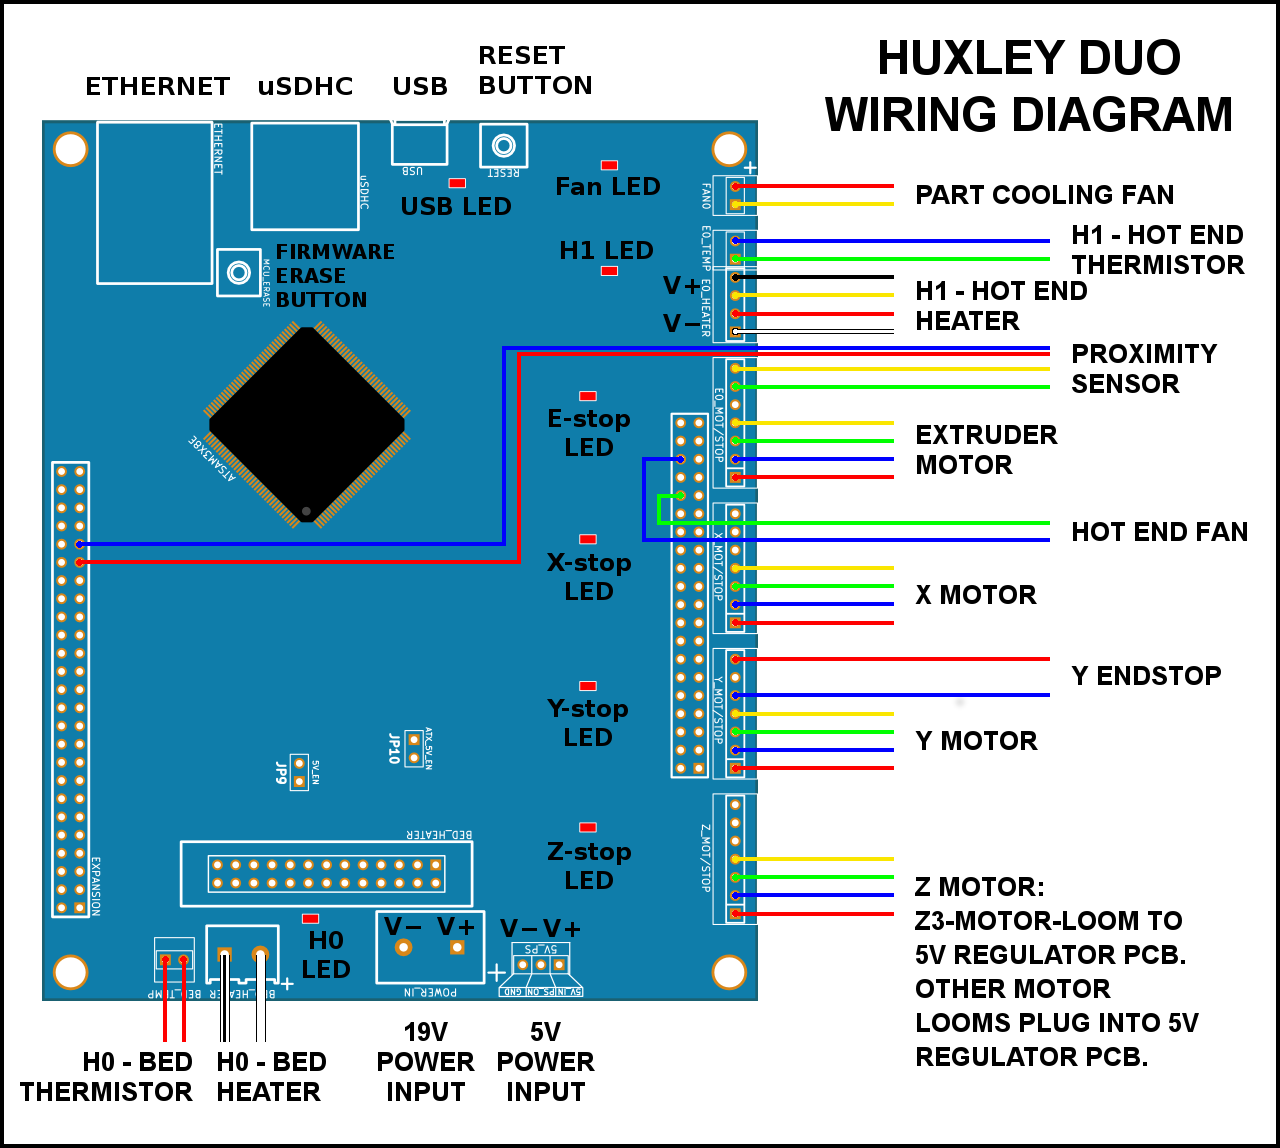
I'm concerned by how to properly map the motors on the Huxley Duo? The physical is:
- 2 Z motors
- 1 Y motor
- 1 X motor
- 1 extruder motor
- 1 Y end stop
- X and Z use the modulated IR prob to home
- 2 extruder fans
cf. wiring diagram
Does that mean the the drives are?
- 0 extruder
- 1 X motor
- 2 Y motor
- 3:4 Z motors
My original config.g contains
M569 P0 S1
M569 P3 S0
M569 P4 S0
but no M584 mapping the drives...But really, I just don't have enough understanding and cannot find my way through the docs. Also, the config tool doesn't seem to allow for multiple motors for the Z axis...
Another question I have is that in the bed.g file I see the M561 to clear any bed transforms. What exactly does that mean? and how do any "transforms" get back, if needed?
-
@gratefulfrog I've used the 'stock' settings (with a bit of input from your files) to produce a json file for the Huxley. Download this, then load it into the RRF config tool (https://configtool.reprapfirmware.org/Start then click 'Use existing configuration' at the bottom of the page): RepRapPro Huxley config.json
I've done this rather quickly, but looks to mimic your setup, and adds some detail/missing commands, eg thermistor settings. It also sets the hot end fan to thermostatic, but you'll need to move it from an 'always on' pin to a PWM controlled fan output. Homing files look sensible, but as with all things... Caveat Emptor!
FYI here's the original RepRapPro settings: https://github.com/reprappro/RepRapFirmware/tree/master/SD-image/sys-Huxley-Duo
And Sir/Dr Adrian Bowyer's company is hosting a mirror of the original instructions here: http://reprapltd.com/reprappro/documentation/huxley-duo.html
Ian
-
@gratefulfrog The json config I've just made will produce an M584 command, and is:
M584 X0 Y1 Z2 E3 ; set drive mapping
This isn't the physical order of drives on the board, as that is E(3), X(0), Y(1), Z(2), where the letter is the label on the PCB and the number is the drive number in firmware (which is fixed). Wire the motors as shown in http://reprapltd.com/reprappro/documentation/huxley-duo/wiring/index.html#Connecting_the_looms_to_the_DuetEdit: You can move the motor wiring around if it's more convenient. eg if you want to connect the motors in the order X, Y, Z, E physically, you would change the mapping in M584 to M584 X3 Y0 Z1 E2. But endstops will take there original assignments, ie Y endstop to Y endstop pins, rather than moving with the drive mapping. But perhaps stick with the original layout for clarity!
As you only have 4 stepper drivers on a Duet 0.6, you don't have another stepper driver to allow for independent Z motors. It's true the config tool doesn't actually have the ability to set multiple motors per axis at the moment, but even if it did, it shouldn't offer that option for a Duet 0.6!
M561 will clear all transformations, because you don't want to probe the bed while already running some other compensation, as it will give false results. A quick test on my machine (running RRF 3.01-RC4) shows that this DOESN'T clear the M556 axis skew compensation, but you can check by sending M561, followed by M556 (which should show the current setting). If it does clear it, you can always add that back in at the end of the bed.g to re-enable it. Or just build your printer square!
Another FYI: I was tech support at RepRapPro, and produced most of the documentation!
Ian
-
@droftarts
Hi Ian!
Yes, I remember all your pleasant help in our exchanges when I was building the Huxley Duo which I got from reprappro uk!Thank you once again for all this new help!!!
I used your template to generate the sys files and then tested them on the machine.
I've attached my template and config files:
config.json
config.gI had to make a few changes, which I did very carefully so as to not crash the extruder. In particular, the direction of the drives needed to be updated. Also, I set the Z homing to the center of the bed.
Now I wonder what changes you made to the fan? I see that this is the "part cooling fan", which previously came on by magic when the part being print was small, I think.
Now, in testing I see that the fan comes on full speed as soon as the extruder temp passes 45C.
You mention that I need to "move it from an 'always on' pin to a PWM controlled fan output" - what does that mean?
I wonder if this is correct as is, or if it will over cool parts ?
All the rest seems good, ready for a printing test!
Thanks so much!
Cheers,
Bob -
@gratefulfrog Uh, sorry, I forgot Huxley had two fans! The hot end fan (the one that cools the hot end) is usually connected directly to +12V and Ground, so is on all the time the printer is on. The cooling fan is connected to the FAN0 pins. See

The Huxley doesn't have another PWM fan output to connect the hot end fan to, so you're kind of stuck with this arrangement. But you need the Part cooling fan to run independently of the hot end, so the slicer gcode can tell it when to turn on, so change the fans and tools settings to:; Fans M106 P0 S0 I0 F500 H-1 ; set fan 0 value, PWM signal inversion and frequency. Thermostatic control is turned off ; Tools M563 P0 S"Hot end" D0 H1 F-1 ; define tool 0Here's another json that reflects these changes: RepRapPro Huxley config.json
You could use one of the heater PWM channels on the expansion header to drive a MOSFET to turn the hot end fan on and off thermostatically, if the noise of the hot end fan whirring away when the printer isn't doing anything drives you mad!
Ian
-
Ian, Thanks once again!
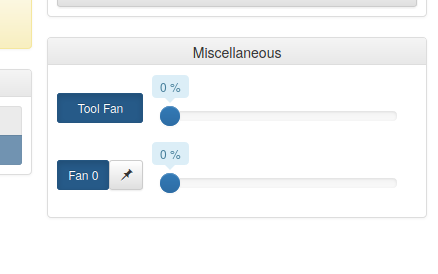
We are getting close, but now the web control shows 2 fans:

The sliders both control the part cooling fan...
Is this ok?
-
@gratefulfrog said in Duet 0.6 which firmware release:
The sliders both control the part cooling fan...
Is this ok?Yes, this is normal. The "tool fan" is the fan active on the currently selected tool. Fan0 is one fan in particular. Since you only have 1 tool, they are one and the same, but if you had multiple tools the tool fan would change depending on the active tool.
In recent versions of DWC you can choose which fans are shown or hidden.
-
Great Ian!
You have saved the day, once again!
Tell me, now that I have spent days getting this old printer to work again, what do you think is the best value for a printer with a full sized bed today? Prusa I3 MK3? other?
In any case, thanks so much for all your kind help - I would still be struggling without you and the rest of this community!
Ciao,
Bob -
 undefined FridgeFreezer referenced this topic
-
 undefined FridgeFreezer referenced this topic
-
 undefined FridgeFreezer referenced this topic