3.4.0 b3 leaning prints
-
@dc42 I have some more to add to the theory

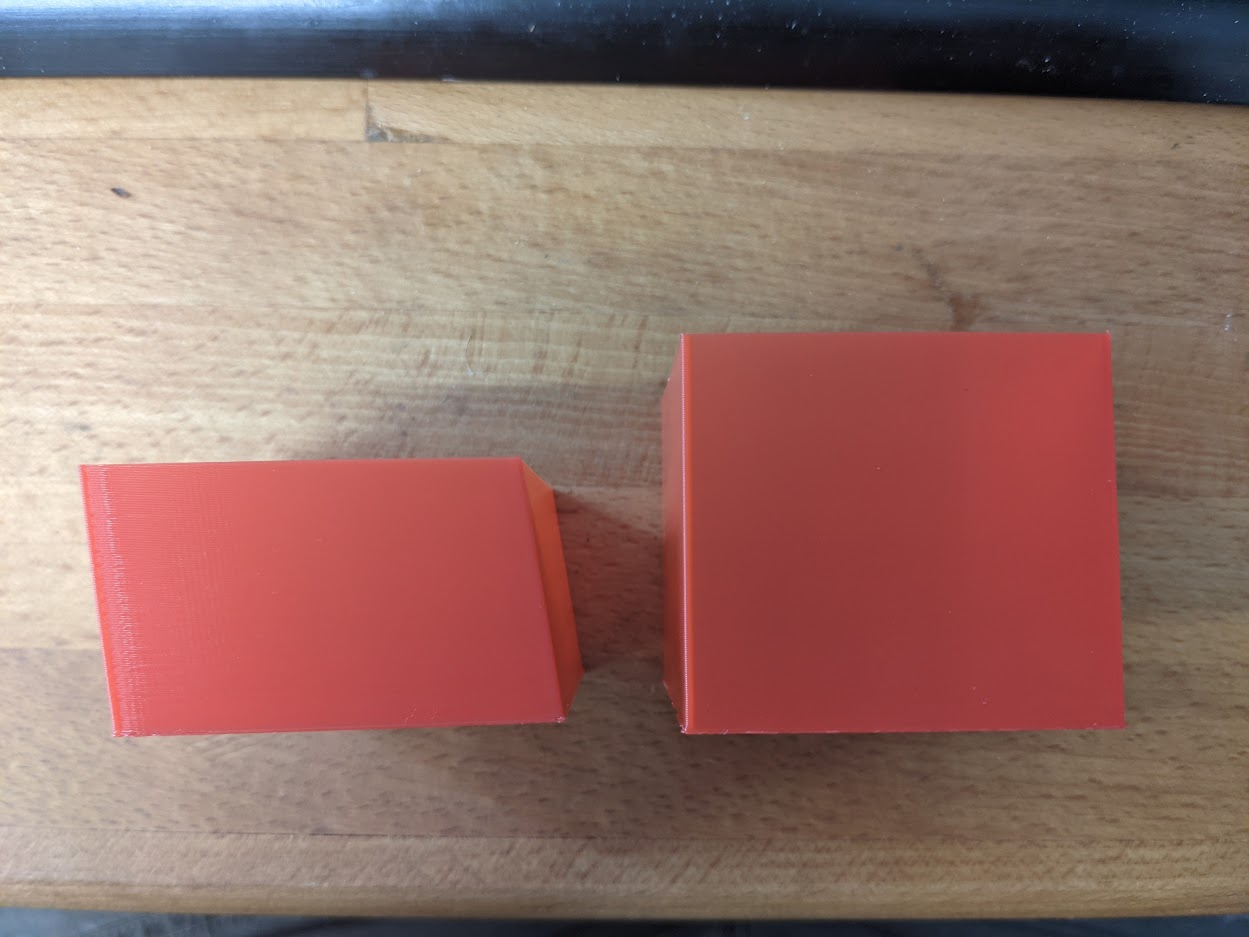
Both cubes are printed with 3.4b3.
The right hollow cube is printed in vase mode.
The left hollow cube was printed as a single wall. This one had a z hop setting of 1mm
I am currently printing the same gcode with no z hop and it is not exhibiting the same leaning in Y.
here is my config; Configuration file for Fly-E3-Pro (firmware version 3) ; executed by the firmware on start-up ; ; generated by RepRapFirmware Configuration Tool v3.2.1-LPC+17 on Wed Jun 30 2021 09:24:28 GMT+0100 (British Summer Time) ; General preferences G90 ; send absolute coordinates... M83 ; ...but relative extruder moves M550 P"Predator" ; set printer name M665 R227 L450 B185 H400 ; Set delta radius, diagonal rod length, printable radius and homed height M666 X0 Y0 Z0 ; put your endstop adjustments here, or let auto calibration find them ; Network M552 S1 ; enable network M586 P0 S1 ; enable HTTP M586 P1 S0 ; disable FTP M586 P2 S0 ; disable Telnet ; Drives M569 P0 S1 ; physical drive 0 goes forwards using TMC2209 driver timings M569 P1 S1 ; physical drive 1 goes forwards using TMC2209 driver timings M569 P2 S1 ; physical drive 2 goes forwards using TMC2209 driver timings M569 P3 S1 ; physical drive 3 goes forwards using TMC2209 driver timings M584 X0 Y1 Z2 E3 ; set drive mapping M350 X16 Y16 Z16 E16 I1 ; configure microstepping with interpolation M92 X160.00 Y160.00 Z160.00 E415.00 ; set steps per mm M566 X500.00 Y500.00 Z500.00 E1000.00 ; set maximum instantaneous speed changes (mm/min) next try 3000 M203 X9000.00 Y9000.00 Z9000.00 E10000.00 ; set maximum speeds (mm/min) M201 X1000.00 Y1000.00 Z1000.00 E3000.00 ; set accelerations (mm/s^2) next try 6000 M906 X1344 Y1344 Z1344 E560 I30 ; set motor currents (mA) and motor idle factor in per cent M84 S30 ; Set idle timeout ; Axis Limits M208 Z0 S1 ; set minimum Z ; Endstops M574 X2 S1 P"e1stop" ; configure active-high endstop for high end on X via pin e1stop M574 Y2 S1 P"pson" ; configure active-high endstop for high end on Y via pin pson M574 Z2 S1 P"e0stop" ; configure active-high endstop for high end on Z via pin e0stop ; Z-Probe M558 P8 C"probe" H5 R0.4 F1200 T6000 A9 ; set Z probe type to switch and the dive height + speeds G31 P100 X0 Y0 Z-0.1 ; set Z probe trigger value, offset and trigger height M557 R180 S20 ; define mesh grid ; Heaters M308 S0 P"bedtemp" Y"thermistor" T100000 B4092 ; configure sensor 0 as thermistor on pin bedtemp M950 H0 C"e1heat" T0 ; create bed heater output on e1heat and map it to sensor 0 M307 H0 B0 S1.00 ; disable bang-bang mode for the bed heater and set PWM limit M140 H0 ; map heated bed to heater 0 M143 H0 S120 ; set temperature limit for heater 0 to 120C M143 H0 S120 ; set temperature limit for heater 0 to 120C M308 S1 P"e0temp" Y"thermistor" T100000 B4725 C7.060000e-8 ; configure sensor 1 as thermistor on pin e0temp M950 H1 C"e0heat" T1 ; create nozzle heater output on e0heat and map it to sensor 1 M307 H1 B0 S1.00 ; disable bang-bang mode for heater and set PWM limit M143 H1 S280 ; set temperature limit for heater 1 to 280C M308 S2 P"boardtemp" Y"thermistor" T100000 B4092 ; Fans M950 F0 C"fan0" Q500 ; create fan 0 on pin fan0 and set its frequency M106 P0 S0 H-1 ; set fan 0 value. Thermostatic control is turned off M950 F1 C"fan1" Q500 ; create fan 1 on pin fan1 and set its frequency M106 P1 S1 H1 T45 ; set fan 1 value. Thermostatic control is turned on ; Tools M563 P0 D0 H1 F0 ; define tool 0 G10 P0 X0 Y0 Z0 ; set tool 0 axis offsets G10 P0 R0 S0 ; set initial tool 0 active and standby temperatures to 0C ; Custom settings are not defined M207 S4.0 F2400 Z1 M572 D0 S0.4 M955 P0 C"B.1+E.8" I50 ; Miscellaneous M501 T0 ; select first toolI should add that I am using no form of input shaping but I am using PA
-
@jay_s_uk that's interesting! Is the Z hop configured using M207 and firmware retraction, or in the slicer?
-
@dc42 using M207.
The gcode files are the same.
I changed it to 0 using M207 from the console and checked it to ensure it had changed -
@jay_s_uk thanks. Please share the GCode, and I will try it on my delta with Z hop this afternoon.
-
-
@t3p3tony have now tried the two cubes without infill, without input shaping, with z hop=0, and with pa=0, and the slope in the - y direction is the same.
-
@adrian52 so its not z hop.
that just adds to the complexity then -
Here is my config and the example gcode. All my prints were printed in vase mode, no Z hop configured for PETG.
AAP_Dynamic_Acceleration_Adjustment.gcode
; General preferences G90 ; Send absolute coordinates... M83 ; ...but relative extruder moves ; Delta Settings M665 L440.000:440.000:440.000 R227.102 H449.038 B185.0 X-0.233 Y0.113 Z0.000 M666 X-0.220 Y0.388 Z-0.169 A0.00 B0.00 ; Network M550 P"Apex Predator" ; Set machine name M552 S1 M586 P0 S1 ; Enable HTTP M586 P1 S0 ; Disable FTP M586 P2 S0 ; Disable Telnet ; Drives M569 P0 S1 ; Drive 0 goes forwards M569 P1 S1 ; Drive 1 goes forwards M569 P2 S1 ; Drive 2 goes forwards M569 P3 S0 ; Drive 3 goes forwards M584 X0 Y1 Z2 E3 ; set drive mapping ;Stepper Configuration M350 X16 Y16 Z16 E16 I1 ; Configure microstepping with interpolation M92 X160 Y160 Z160 E679 ; Set steps per mm Orbiter greentec E689 @1mm 679 nonlinear M906 X1800 Y1800 Z1800 E550 I11 ; Set motor currents (mA) and motor idle factor in per cent M84 S30 ; Set idle timeout ;Normal Speed M566 X900 Y900 Z900 E1200 ; Set JERK(mm/min) M201 X6000 Y6000 Z6000 E3600 ; Set accelerations (mm/s^2) M203 X30000 Y30000 Z30000 E15000 ; Set maximum speeds (mm/min) 18k is 300mm/s M204 P3000 T6000 ; set Print accel and travel accel ; Axis Limits M208 Z0 S1 ; Set minimum Z ; Endstops M574 X2 S1 P"xstop" ; configure active-high endstop for high end on X via pin xstop M574 Y2 S1 P"ystop" ; configure active-high endstop for high end on Y via pin ystop M574 Z2 S1 P"zstop" ; configure active-high endstop for high end on Z via pin zstop ;Display M575 P1 S0 B57600 ; Z-Probe micro switch M558 P5 C"^e0stop" H2 F460 T12000 A6 ; Set Z probe type to switch and the dive height + speeds 3 Probe Iterations G31 P500 X0 Y0 Z20.567 ; Set Z probe M557 R175 S30 ; Define mesh grid ;Super PINDA ;M558 P5 C"^exp.e2stop" H2 F460 T9000 A3 ;G31 P500 X0 Y-32.750 Z1.775 ;M557 R165 S30 ;Dial Gauge ;M558 P0 ;G31 P500 X0 Y0 Z15 ;M557 R165 S30 ;Filament Sensor M591 D0 P2 C"e1_stop" S1 ;activate Filament Sensor S0 for deactivating ; Bed Heater M308 S0 A"Ultrabase Pro" P"bedtemp" Y"thermistor" T100000 B4300 C0 R4700 ; Set thermistor + ADC parameters for heater 0 M950 H0 C"bedheat" Q250 T0 ; create bed heater output on bedheat and map it to sensor 0 M307 H0 B0 R0.376 C428 D1.14 S1.00 V24.1 ; Disable bang-bang mode for the bed heater and set PWM limit M140 H0 P0 ; Create bed Heater M143 H0 S125 A0 C0 ; Extruder Heater M308 S1 A"Mosquito Hybrid" P"e0temp" Y"thermistor" T100000 B4725 C7.06e-8 H0 L0 ; Temperature Sensor ;M308 S1 A"Mosquito Hybrid" P"e0temp" Y"thermistor" T4606017 B5848 C5.548428e-8 R4700 H0 L0 ; blue sensor M950 H1 C"e0heat" T1 ; create nozzle heater output on e0heat and map it to sensor 1 M143 H1 S280 A0 ; Set temperature limit for heater 1 to 280C M307 H1 B0 R3.324 C137.4 D5.67 S1.00 V24.3 ; Disable bang-bang mode for the Hotend and set PWM limit M570 H1 P15 T15 S120 ;Additional Sensors M308 S2 A"Chamber" P"e1temp" Y"thermistor" T100000 B4725 C7.06e-8 ; define Chmaber temperature sensor ;M308 S10 P"spi.cs6" Y"dht22" A"Filament Temperature" ; define DHT22 temperature sensor DATA Pin on E3_Stop ;M308 S11 P"S10.1" Y"dhthumidity" A"Filament Humidity[%]" ; Attach DHT22 humidity sensor to secondary output of temperature sensor M955 P0 S1000 C"spi.cs3+spi.cs4" ; Accelerometer ; Hotend Fan M950 F1 C"fan1" Q100 ;HOTEND FAN create fan 1 on pin fan1 and set its frequency M106 C"HotendFAN" P1 H1 L1 T45 ; set fan 1 value. Thermostatic control is turned on ;Part Cooling Fan M950 F0 C"!fan0+^exp.pb6" Q24000 ;CPAP create fan 0 on pin fan0 and set its frequency !fan2+exp.pb6 Q24000 M106 C"CPAP" P0 S0 H-1 ; set fan 0 value. Thermostatic control is turned off L0.3 X1 ; Tools M563 S"NF crazy" P0 D0 H1 ; Define tool 0 G10 P0 X0 Y0 Z0 ; Set tool 0 axis offsets G10 P0 R0 S0 ; Set initial tool 0 active and standby temperatures to 0C T0 ; select Tool 0 ;Extrusion settings M207 S2.5 F3600 R0 T2800 Z0 ;Retraction M572 D0 S0.1 ;Pressure Advance ;standard settings M593 P"ei3" F41.4 ;F Resonance Frequency ;M593 P"daa" F41.5 M703 ;Load filament config M501 ;load config-override -
@cabalsoul thanks. so I have managed to get a lean on "simpler" boxes printed as @Adrian52 suggested, offset in the +/- Y direction. (using gyroid infil and el3 input shaping)
Has anyone observed sloping in any direction other than -Y ?
-
@t3p3tony In my case always -Y.
If i rotate the object it doesn't change anything. -
@t3p3tony in my case it is also always in -y and happens regardless of position on the build plate
-
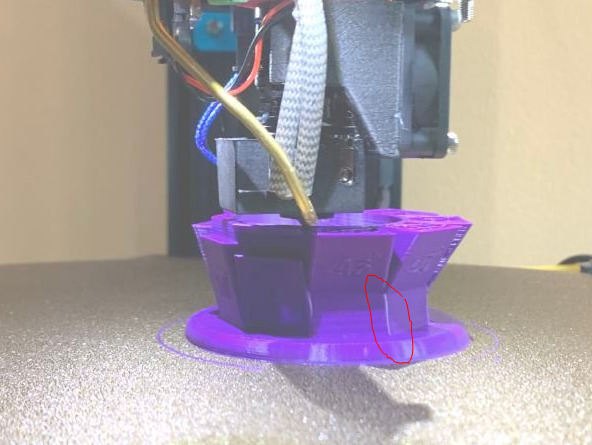
@t3p3tony It seems that I got one of my prints leaning on both -X and +Y
On this picture it is leaning on the left and also back.

I spent quite some time today trying to reproduce the issue on simple objects like basic cubes, calibration cubes, ringing test with and without infill (rectilinear, gyroid...) but all seems fine.
I guess I changed something on SuperSclicer ... I even checked I was still on the beta3.
 -
@fred-y thanks for spending the time in testing this - it helps!
I will test to see if I can get a lean with the two box prints arranged in different orientations then looking for anything on +/-X
-
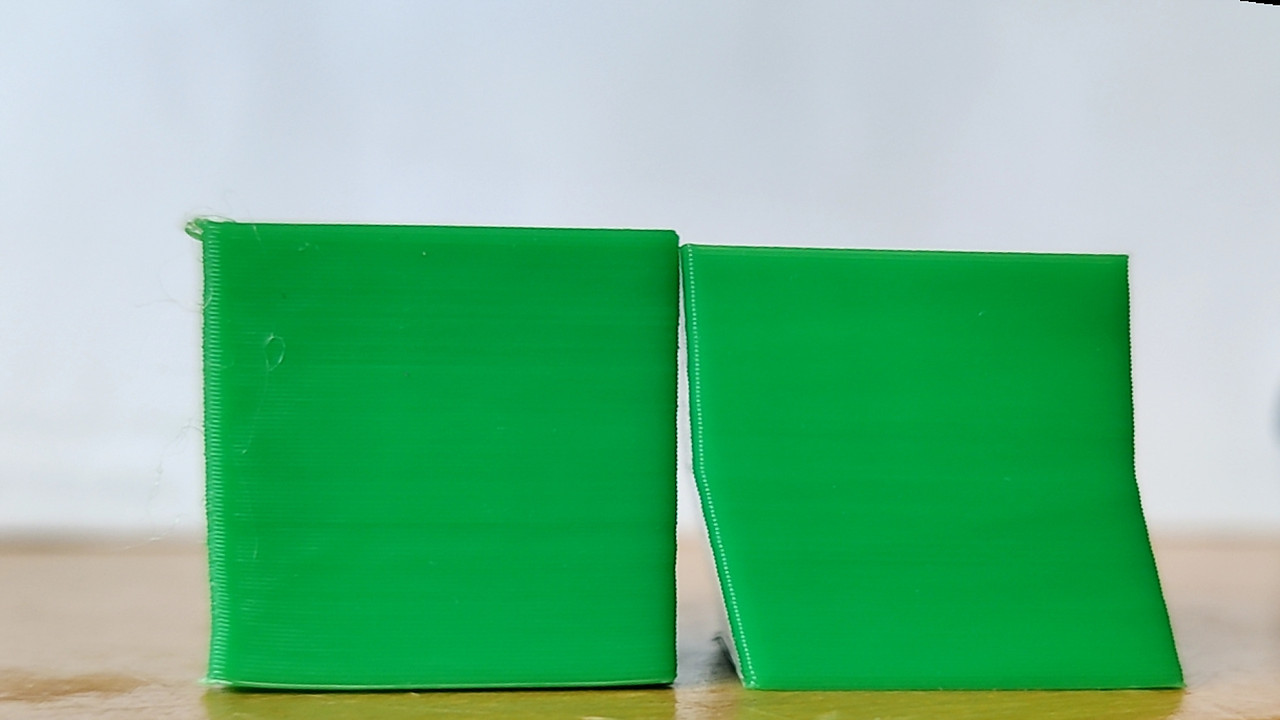
With a 20mm cube and a 20x20x10high cube offset in the y direction printed together, the 20mm cube (on the right) looks like this

The left cube for comparison printed with no y offset. You can see that the lean reduces after 10mm, but interestingly a smaller lean is still seen. Havent tried a 45deg rotated cube yet. -
Thanks to everyone who has helped us to try to track this down. @chrishamm has managed to reduce one of your leaning prints to a pair of 2 moves that leaves one of the carriages 2 microsteps away from the correct position. I expect to be able to track down the problem now.
-
@Adrian52 @CabalSoul @DaveA @Fred-Y @jay_s_uk @SIam I have put new firmware builds with a fix for the issue I was eventually able to reproduce at https://www.dropbox.com/sh/kgah0ylh2zu2f7w/AAD2vQOiTQrFly1p22sob6c7a?dl=0. As with all unofficial builds, use them with care.
-
@dc42 thank you exactly what I needed. I am going to test right away.
.
.
.I've tested it and it seems to work. Thanks again.
-
@dc42 one print completed so far and no leaning!
What was it in the end? -
@jay_s_uk said in 3.4.0 b3 leaning prints:
@dc42 one print completed so far and no leaning!
What was it in the end?It was the Pisa effect apparently…….
-
@jay_s_uk said in 3.4.0 b3 leaning prints:
@dc42 one print completed so far and no leaning!
What was it in the end?The new code didn't fully allow for the case of a move ending when a tower that had been moving up was on the point of reversing and moving down, but the required final position was one microstep higher than the theoretical highest point reached, because the stepper motor position had been rounded up to the next microstep to get closer to the commanded position for the end or the move.