Anycubic I3 Mega Mod questions
-
Z Axis Problem still not solved but at least the last crash was some time ago... I now monitor the Z endstops IO pins with my oscilloscope to find out if there is something strange if it crashes again.
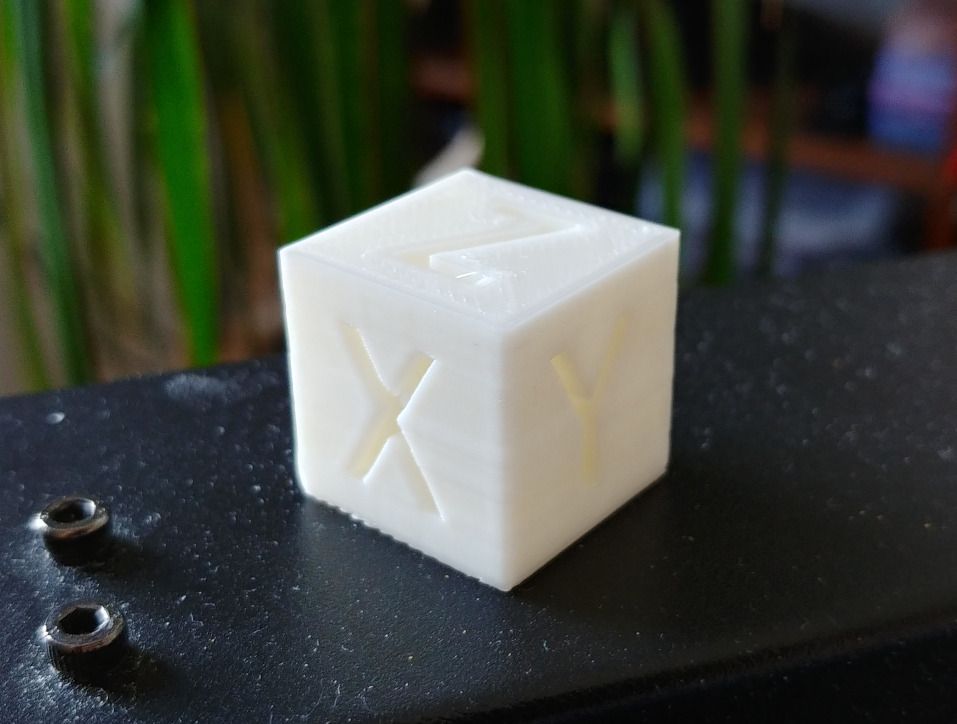
But I couldnt resist to print my first testcube that came out good, with a LOT room
 for optimization.
Thermal situation while printing the cube:
(steppers set to 1.2A)https://www.youtube.com/watch?v=Dd4siLtXD9I&feature=youtu.be
-
I noticed something weird if I do a "HOME-Z". That might be the reason
for crashing Z-axis into endstops or my understanding of that process is wrong/incomplete. Just as a side note, I changed the endstops with new ones and checked the endstop signals on my oscilloscope but this did not solve the crashing problem...What I observed:
I move the Z axis up a bit so that I can test both endstops without crashing the axis onto them.
I press HOME-Z.
Z axis moves slowly down. I press the right endstop first, nothing happens, both steppers continue moving until I press the left endstop.
(that would produce a crash if endstops are triggered with delay).Now I test HOME-Z again but this time I press left endstop first.
As I trigger left endstop the RIGHT stepper stops, the left one keeps moving until I trigger the right endstop.
(that would produce a crash too if there is a delay between both endstop triggering...)Is my understanding wrong and this is the intended procedure or is there something wrong?
Shouldn't stop the left stepper if I trigger the left endstop and vice versa? Is this maybe a software problem?
I also recorded a video, you might have problems to see the steppers stop because they move quite slowly...
-
@pauledd How about posting your current config.g and homing files? Also, can you confirm which end stop inputs and motor outputs you have the two Z motors and two Z end stop switches connected to?
-
Sure.

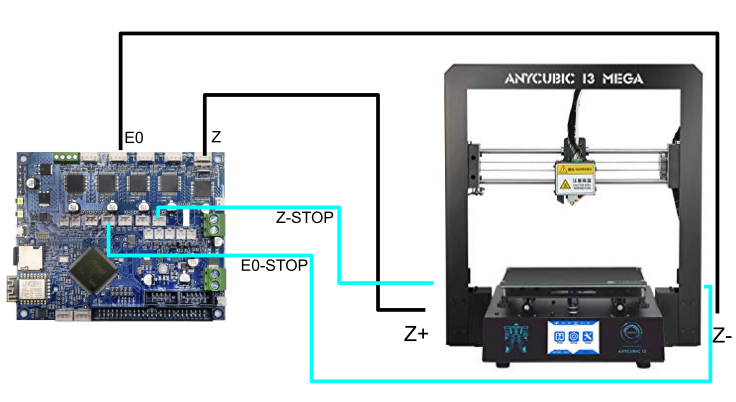
Z+ stepper --> Z
Z- stepper --> E0
Z+ endstop --> Z-STOP
Z- endstop --> E0-STOPconfig.g:
M584 X0 Y1 Z2:3 U3 E4 P3                          ; set drive mapping

M208 X-115:107.5 Y-107.5:107.5 Z0:205 U0:205

; Endstops
M574 X1 Y1 Z1 U1 S0                          ; set active low and disabled endstops

G90                                       ; send absolute coordinates...
M83                                       ; ...but relative extruder moves
M550 P"Pauls Duet"                        ; set printer name

; Network
M552 S1                                   ; enable network
M586 P0 S1                                ; enable HTTP
M586 P1 S0                                ; disable FTP
M586 P2 S1                                ; enable Telnet

; Drives
M569 P0 S0                                ; physical drive 0 goes backwards
M569 P1 S0                                ; physical drive 1 goes backwards
M569 P2 S1                                ; physical drive 2 goes forwards
M569 P3 S1                                ; physical drive 3 goes forwards
M569 P4 S1				  ; Z- physical drive 4 goes forwards
M350 X16 Y16 Z16 U16 E16 I1                   ; configure microstepping with interpolation
M92 X80.02 Y80.07 Z398.00 U398.00 E92.60          ; set steps per mm
M566 X900.00 Y900.00 Z12.00 U12.00 E120.00       ; set maximum instantaneous speed changes (mm/min)
M203 X4000 Y4000 Z360.00 U360.00 E1200.00 ; set maximum speeds (mm/min)
M201 X2000.00 Y2000.00 Z50.00 U50.00 E250.00     ; set accelerations (mm/s^2)
M906 X1200 Y1200 Z1200 U1200 E1200 I30          ; set motor currents (mA) and motor idle factor in per cent
M84 S10                                   ; Set idle timeout

; Z-Probe
M558 P0 H40 F120 T3000                    ; disable Z probe but set dive height, probe speed and travel speed
M557 X15:210 Y15:195 S20                  ; define mesh grid

; Heaters
M305 P0 T100000 B4725 C7.060000e-8 R4700  ; set thermistor + ADC parameters for heater 0
M143 H0 S90                               ; set temperature limit for heater 0 to 90C
M305 P1 T100000 B4725 C7.060000e-8 R4700  ; set thermistor + ADC parameters for heater 1
M143 H1 S245                              ; set temperature limit for heater 1 to 245C

; Fans
M106 P0 S0 I0 F500 H-1                    ; set fan 0 value, PWM signal inversion and frequency. Thermostatic control is turned off
M106 P1 S1 I0 F500 H1 T45                 ; set fan 1 value, PWM signal inversion and frequency. Thermostatic control is turned on

; Tools
M563 P0 D0 H1 F0                          ; define tool 0
G10 P0 X0 Y0 Z0                           ; set tool 0 axis offsets
G10 P0 R0 S0                              ; set initial tool 0 active and standby temperatures to 0C

; Custom settings
M552 S1
homeall.g:
G91                     ; relative positioning
G1 Z10 F3000 H2     	; lift Z relative to current position
G1 X-215 Y-215 F1800 H1 ; move quickly to X and Y axis endstops and stop there (first pass)
G1 X5 Y5 F3000          ; go back a few mm
G1 X-215 Y-215 F360 H1  ; move slowly to X and Y axis endstops once more (second pass)

M98 Phomez.g
home.x:
G91               ; relative positioning
G1 Z10 F3000 H2   ; lift Z relative to current position
G1 X-215 F1800 H1 ; move quickly to X axis endstop and stop there (first pass)
G1 X5 F1800       ; go back a few mm
G1 X-215 F360 H1  ; move slowly to X axis endstop once more (second pass)
G1 Z-10 F1800 H2  ; lower Z again
G90               ; absolute positioning
home.y:
G91               ; relative positioning
G1 Z10 F3000 H2   ; lift Z relative to current position
G1 Y-215 F1800 H1 ; move quickly to Y axis endstop and stop there (first pass)
G1 Y5 F1800       ; go back a few mm
G1 Y-215 F360 H1  ; move slowly to Y axis endstop once more (second pass)
G1 Z-10 F1800 H2  ; lower Z again
G90               ; absolute positioning
home.z:
M98 Phomex.g ; home X first to move head outside G91 ; relative positioning G1 Z10 F3000 H2 ; lift Z relative 10mm M584 Z2:3 U3 P4 G1 Z-205 U-205 F100 H1 M584 Z2:3 U3 P3 G90 G92 Z0 ; lift Z after probing G91 G1 Z10 F1000 G90 -
@pauledd In your homez.g you have:
M584 Z2:3 U3 P4
G1 Z-205 U-205 F100 H1
M584 Z2:3 U3 P3That should be:
M584 Z2 U3 P4
G1 Z-205 U-205 F100 H1
M584 Z2:3 P3 -
@grizewald
Thanks a lot! I changed the lines to your suggestions.If I now HOME-Z and I trigger the left endstop the right stepper stops moving and the left stepper keeps moving until I trigger the right endstop.
And vice versa if I trigger the the right endstop first the left stepper stops moving and the right stepper keeps moving until I trigger the left endstop.

So the behaviour is now much more kind of correct but exactly the opposite of what I expected, that is to say left endstop stops left stepper, right endstop stops right stepper. I double checked that I didnt twist the endstops accidentally but they are in the correct socket as drawn in the image above.
Shall I twist them simply to make them behave correctly or is there still somewhere a misconfiguration perceivable -
@pauledd I'd just try swapping them and see if it works!
-
Seems to work, will test extensively tomorrow but I am quite optimistic, thanks so far

-
Good news!
-
@pauledd said in Anycubic I3 Mega Mod questions:
Yes, I consider that if everything else works perfectly.
14.3A is not a problem for the Duet. It's normal for fuses to get hot when you run them close to rated current.
-
@dc42 said in Anycubic I3 Mega Mod questions:
@pauledd said in Anycubic I3 Mega Mod questions:
Yes, I consider that if everything else works perfectly.
14.3A is not a problem for the Duet. It's normal for fuses to get hot when you run them close to rated current.
Thanks, that would have been the next question today, to order a SSD or a Mosfet Module. So I can now put that money into something else.
One more question. Is it somehow harmful to the drivers to move any of the axis
by hand (of cause disabled corresponding steppers prior with M18...)?I ask because it is kind of routine to level the Anycubic bed by hand, I've done this since years and its standard procedure with the old Anycubic mainboard and I do not consider yet to upgrade to Z probing sensors because I had no problems levelling by hand...
-
@pauledd said in Anycubic I3 Mega Mod questions:
One more question. Is it somehow harmful to the drivers to move any of the axis
by hand (of cause disabled corresponding steppers prior with M18...)?I'm sure dc42 will correct me if I'm mistaken, but as long as the printer and the Duet are powered, there's no problem moving the bed by hand.
When it's not powered, make sure you move the bed slowly. The stepper motors, like all motors, are actually generators if you spin them and moving the bed quickly while the machine is not powered on will generate enough voltage to make the LCD display light up. I believe that the danger is here when the machine is not powered and the rest of the circuitry is not set up to cope with the generated voltage.
On all my machines, I try to avoid any rapid manual axis movement when they are not powered up.
-
I did a lot of "Homings" today and the Z-axis didn't crash in the endstops again. I consider this Anycubic to Anyduet conversion as success!

The rest is just optimizing, putting all the stuff together an waiting for delivery of new cables. Thanks a lot for your help.
-
@pauledd said in Anycubic I3 Mega Mod questions:
One more question. Is it somehow harmful to the drivers to move any of the axis
by hand (of cause disabled corresponding steppers prior with M18...)?It can be harmful if you move the stepper motors quickly, especially if the Duet is not powered. So move them slowly.
-
@pauledd said in Anycubic I3 Mega Mod questions:
Thanks a lot for your help.
My pleasure!
My i3 Mega came with the Mega2560 controller board, so I could flash a custom build of Marlin to add a BLTouch probe and things like that, so I never considered upgrading the board. I did swap out the stepper drivers for TMC2208s though which made a real difference in terms of noise. To keep everything nice and cool, I reworked the cooling inside the case. From the beginning, it would make terrible noises when it was cold and the cooling for the stepper drivers was very poor.
I also upgraded the bed holder and added a drag chain for the bed heater wires. At the same time, I swapped out the bearings for the Y rails with new, better quality ones and only three of them instead of four.
Then I swapped the bearings on the X axis and replaced the entire hot end assembly to add a BLTouch and a genuine E3D V6 full metal hot end all in a 3D printed mount.
After about three months, the power supply died and was duly replaced with a good quality Mean Well supply.
It's now a very stable and reliable little machine and it made most of the printed parts for my big Core-XY printer which dwarfs the Anycubic in every way.
I hope you enjoy your Duet powered machine! If you want details of any of the improvements that I made, just drop me a PM. I think I have pictures of most of what I did.
-
I have an anycubic i3 Mega and was thinking about doing the same mod, would you mind posting your full configuration that i could use as a starting point

Any updates on how this is working? Thanks !
-
Sure:
http://p-bg.de/files/AnyDuet_config.rarBut be careful and always have one finger in the power switch when testing my config. Config without warranty
