Hi guys,
I'm playing with my new extruder and would like to know how much it extrudes in a real print.
Is it possible to display extrusion volume in DWC? Printspeed, layerheight and layerwidth? should be available for calculations.
I extruded in free air to get ballpark numbers, but real life is different.
Best posts made by o_lampe
-
Displaying current extrusion volume possible?posted in Duet Web Control wishlist
-
RE: Music skipping beats after firmware update (3.4.0beta6)posted in Tuning and tweaking
@gtaman
It's actually the same:- create a global variable blockDaemon
- set global.blockDaemon = true at the start of the M300 file
- set global.blockDaemon = false at the end
Then anyone using Daemon.g for real can add these lines
while global.blockDaemon = true G4 S1000 -
RE: Hollow shaft extruderposted in General Discussion
Had my first simpleFOC project running today. It was an old brushless gimbal controller without encoders and with 8bit mcu.
I was able to control two motors independently and relatively smooth (USB power only)
The atmega328 was also at it's limit, but I'm now confident it will work well with the right mcu. -
RE: External stepper drivers (TB6600) on duet 2 wifiposted in Using Duet Controllers
@m0ck1nj
Check the TB6600 datasheet. If it is OK with 3.3V signals on step, dir, enable you can wire it directly.
If it needs differential signals or 5V you can use the much cheaper expansion breakout board -
RE: Hollow shaft extruderposted in General Discussion
First print today

Instead of a benchy, I tried the extruder-woodgrain test. Yes there is some, but hardly visible. The corners were sharp and even, that was a relieve. The close loop PID setting are quite soft, so I expected worse...
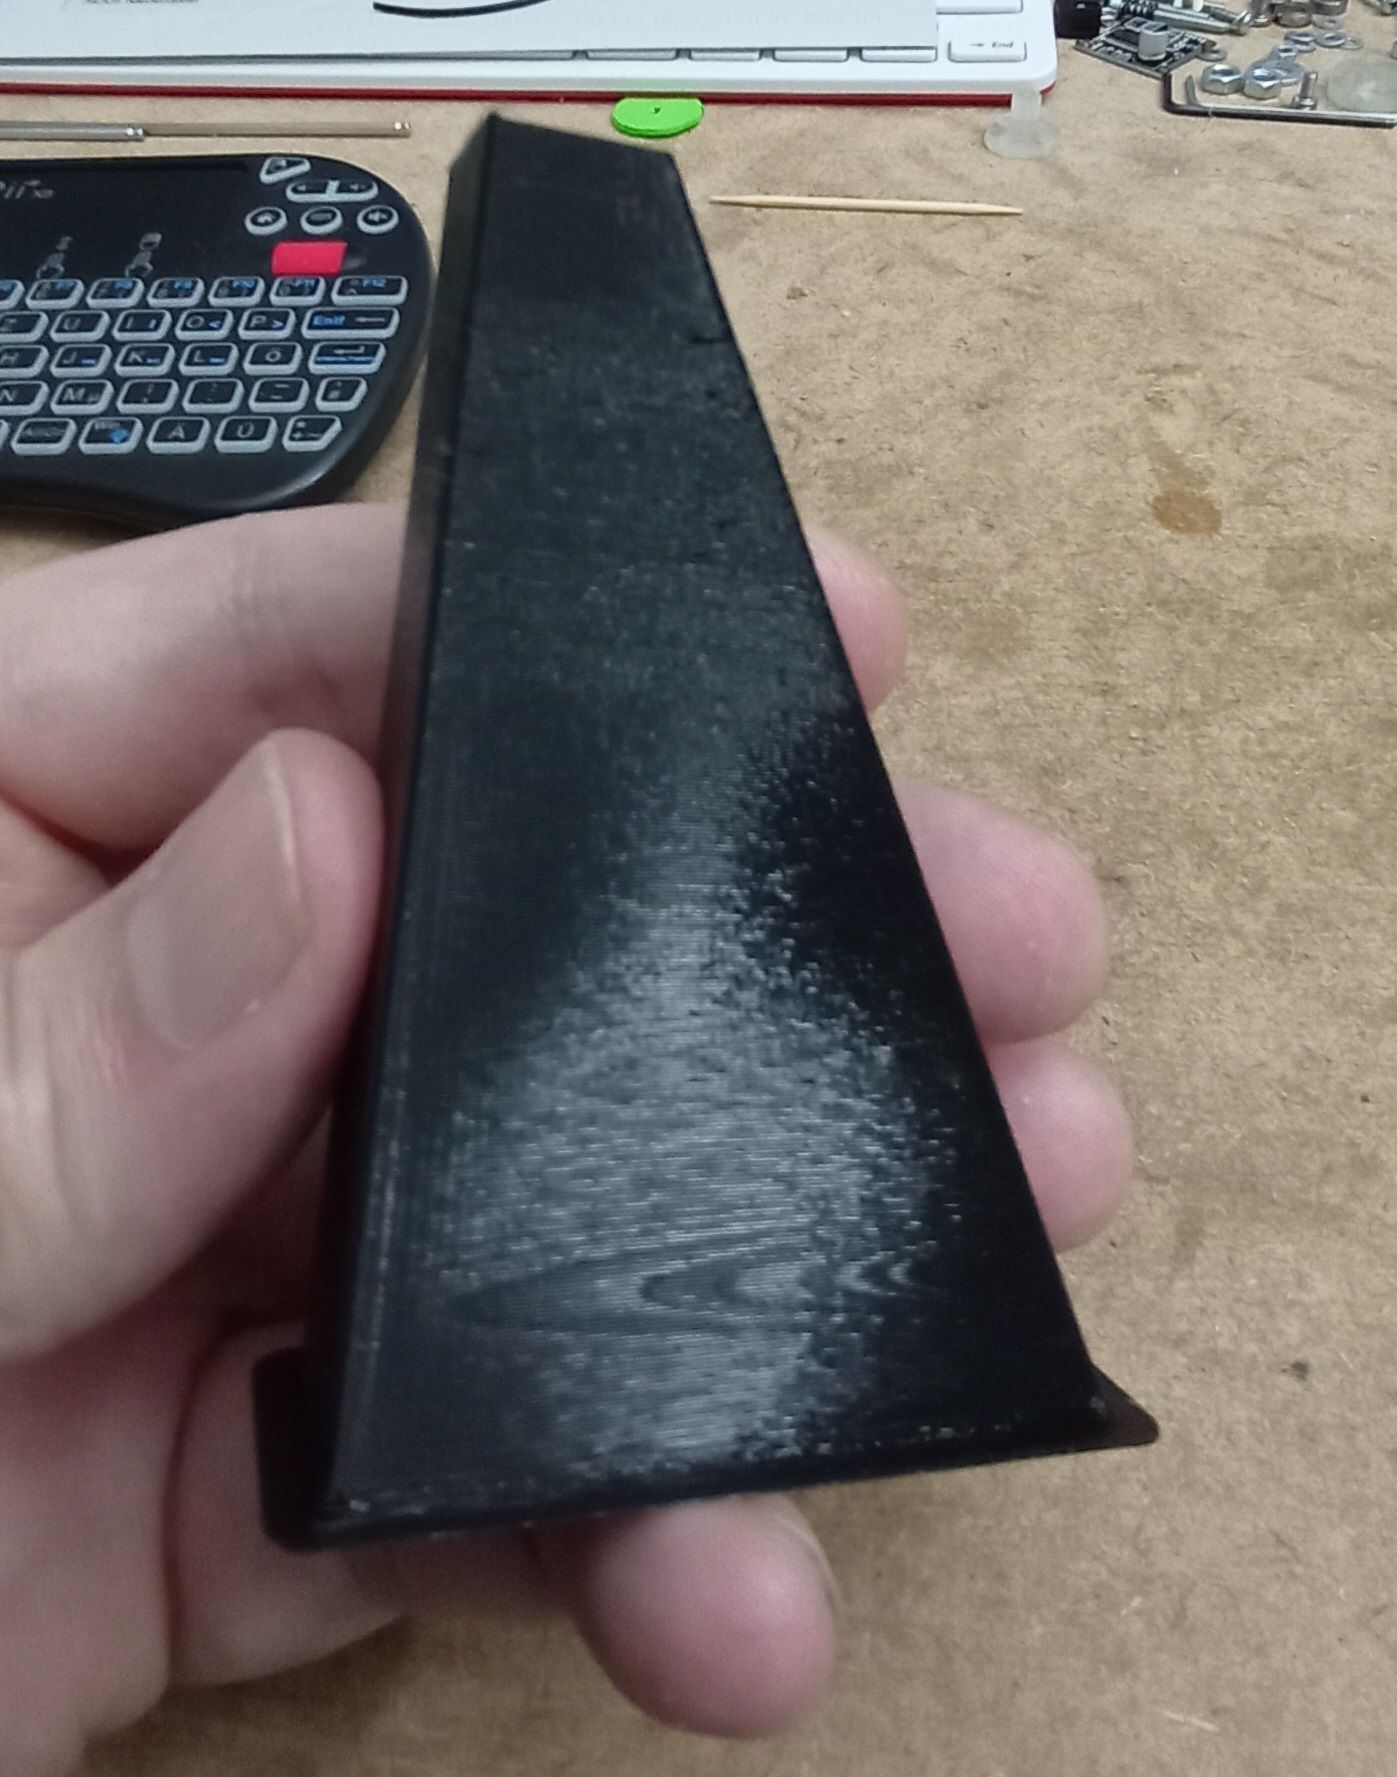
At the top third, the printspeed got so low, that the filament overheated. 10°C less temp and it was nice and shiny again.
-
#- (hash) printer with super simple gantryposted in Example setups and prints
Hi gents,
I started pondering the idea to build a hash-printer with the least amount of hardware. The video of the original design shows the typical shaft & dual belt approach we've seen on H-bots and cross-gantry printers to avoid racking.
But I want to use a dual roller constraint as I did on other occasions before. I wasn't sure if that would also work with two beams per axis, so I cobbled together a quick and dirty test rig.

To make it clearer how to wrap the Aramid fishing line around the four rollers I started with a drawing:
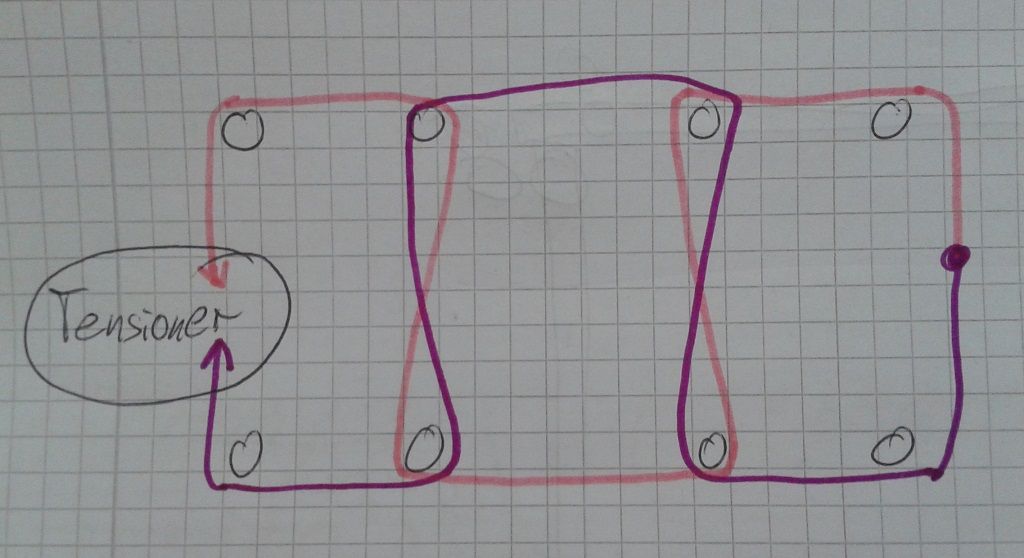
This is the Y-axis only, imagine two more extrusions horizontally to build a '#'.
And finally I made demo video to show how easy it is to move the beam from only one side without racking.
-
RE: Accelerometer Usageposted in Beta Firmware
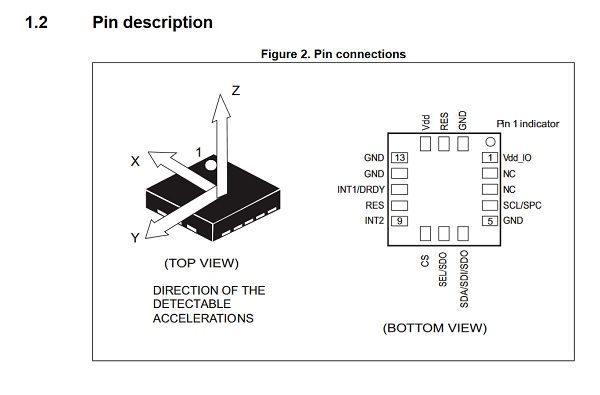
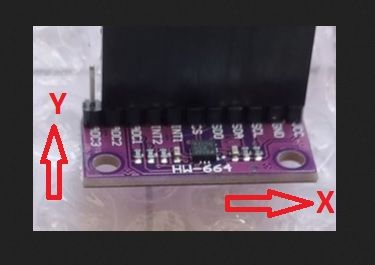
According to this picture
- positive X goes to the right
- positive Y goes to the back
- positive Z goes up
-
RE: Smart Effector including toolboard-capabilities?posted in Smart effector for delta printers
@dc42 said in Smart Effector including toolboard-capabilities?:
It's clear to me that the Orbiter could not be used with a Smart Effector made to the current dimensions. We would need to increase the rod spacing to at least 80mm in order to accommodate the various parts of the extruder. We are looking into this, however it would make it unsuitable for the smaller delta printers.

Hi dc42,
I just stumbled across this thread and wanted to guide you back to 2016 , when we discussed the cycloidal direct drive. (I still have it laying around)
I've made an 45 degree adapter for it, that suited the smart effector pretty well.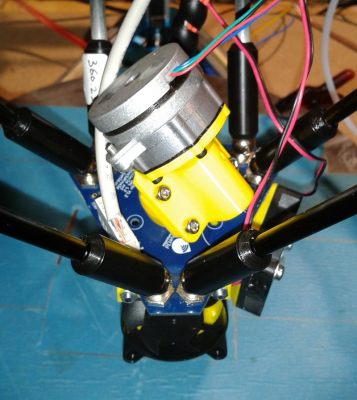
Another way to mount it, was the split motor/gearbox idea.
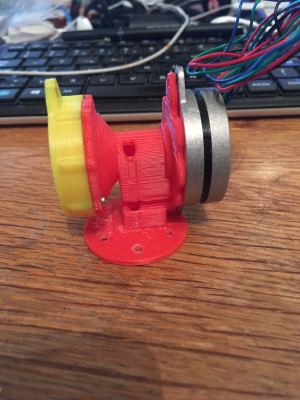
I could try to reuse my motor and design a BMG-drive for the Smart effector?
-
Display current back EMF for tuningposted in Duet Web Control wishlist
Hi devs,
based on the "extrusion volume" thread, I also think a back EMF calculator as DWC plugin would be helpful for tuning.
The required parameters are almost completely known for the calculation. It only misses coil resistance and inductivity (AFAIK)Since my Duet boards run on their own network, I don't have access to the EMF calculator at reprapfirmware.org
If we could integrate it as plugin and use 'live' values from the current object model/gcode file, we'd have a nice tuning tool
-
RE: Add 'pre-retract' and 'post-retract'posted in Firmware wishlist
@nikscha I like the idea. It's like the tool-change macros.
But there is also a problem when you retract / unretract within a toolchange.
Maybe you can solve your problem by renaming G10/G11 to G10.1 and G11.1 via postprocessing. Then you need only one macro for retraction (which also contains the real G10 move)
Latest posts made by o_lampe
-
RE: Sovol SV08 Multiple Motion System Upgrade.posted in My Duet controlled machine
@dwuk3d said in Sovol SV08 Multiple Motion System Upgrade.:
Z0, X1,Z1,Y,X2,Z2, U1,Z3,V,U2,Z4, Y2 , Which in RRF will be XYZUVABCDEFG
Just call it Alphabet kinematics , because there aren't many unused letters left

-
RE: Sovol SV08 Multiple Motion System Upgrade.posted in My Duet controlled machine
@dwuk3d In the end we'll see a conveyor belt bed with dozends of tools heads zipping around simultaneously...

But seriously: you could do the same split_the object_trick in a big scale manner.- Build two independent printers with 4 heads each
- place them above the looong conveyor belt with a certain gap
- print parts 1 + 3
- move the belt and print part 2 + 4
- move back and repeat
-
RE: Sovol SV08 Multiple Motion System Upgrade.posted in My Duet controlled machine
@dwuk3d As long as the belts along the crossbeam aren't aligned properly you won't see accurate positions anywhere else on the bed.
But it's good to have the theory behind alignement solved. -
RE: Sovol SV08 Multiple Motion System Upgrade.posted in My Duet controlled machine
I think I just had a bright moment regarding z-hop: Re-purposing Rc-car servo savers could be the answer to more torque and accuracy, whilst still be backlash-free.
I tried to find a good picture to show how they work and came up with this:

Twisting the servo arm while the output-side is fixed to the tool head would be translated to vertical lift (or drop if you want to use gravity to your advance).
They usually come with an adjustable spring which isn't shown here. -
RE: Sovol SV08 Multiple Motion System Upgrade.posted in My Duet controlled machine
@dwuk3d said in Sovol SV08 Multiple Motion System Upgrade.:
Thanks - looks interesting - especially the gearing you have added.
These spur gears were printed with a resin printer using anycubic's tough resin. They don't last for ages, but I can print a whole bunch at once.
There are a few user on this board using simpleFOC with it's GCode-compliant step/dir interface.
It's a bit of a learning curve to get used to it's PID behaviour... Their development & documentation status isn't as professional as Duet3D's, yet.
In the past, I've tagged some threads with sFOC or simpleFOC if you are interested. -
RE: Sovol SV08 Multiple Motion System Upgrade.posted in My Duet controlled machine
@dwuk3d said in Sovol SV08 Multiple Motion System Upgrade.:
Don't really understand what is happening with my NEMA8 motor.
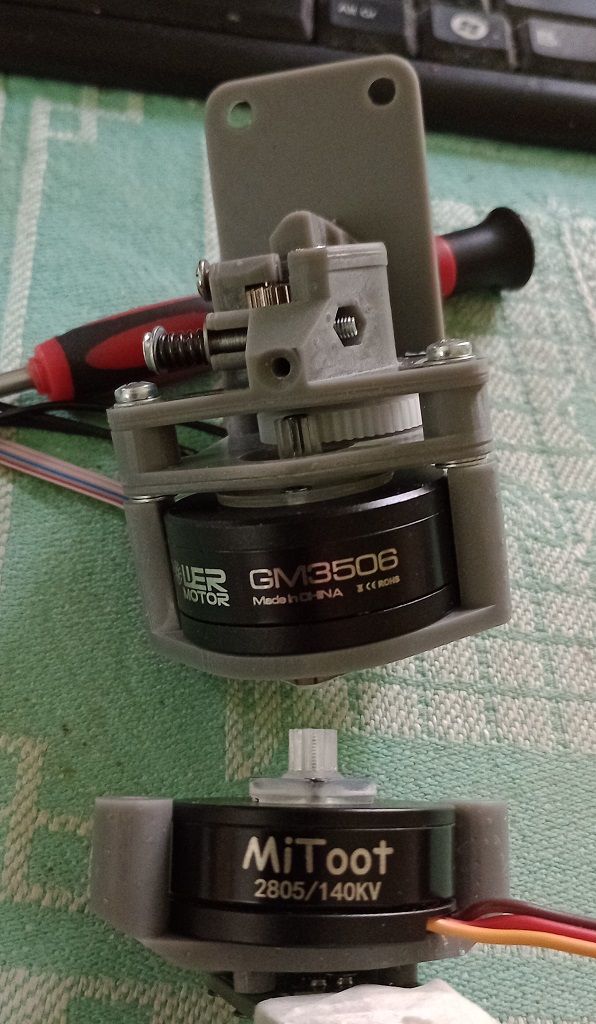
Their internal magnets might have degraded due to overheating? I noticed the same on some NEMA14 pancakes I used to use for extruders. They survived only when I reduced their rated current by 50%.
I replaced them with brushless gimbal motors and a selfmade simpleFOC-interface and the problem was gone.Torque/weight ratio improved a lot, too.
-
RE: Sovol SV08 Multiple Motion System Upgrade.posted in My Duet controlled machine
@dwuk3d The way you mounted the rear INDX tool bar will not work, because it blocks Y-motion of both IDEX arms. You'll need overlapping motion to have full access to the center of the bed.
You could turn around the rear IDEX arm and put the INDX tool bar to the very rear of the frame....
There would also be a problem with the number of filament-holders you've places on each tool bar unless you want 4 filament holders for each extruder + the center one available for both.Should Bondtech be aware of your virtual design, they might be convinced by an animated simulaton. If not, try to start a kickstarter campaign...
Edit: as a sidenote, if you had a moving bed (in Z) instead of a flying gantry you could even print while you change tools. That would be a huge timesafer
-
RE: Sovol SV08 Multiple Motion System Upgrade.posted in My Duet controlled machine
@dwuk3d The NEMA8s can be pretty quick (eg. 3000RPM vs ~300RPM of a NEMA17)
They also have a long leadscrew. You could place them vertically and use an 90° arm to translate speed into force (long leg /short leg ratio) The arms anchor point could be above the center of the package to reduce sideload to the linear rail. -
RE: Simultaneous dual extrusionposted in General Discussion
Why not define a "mixing extruder" from the XY-axes and the constant extruder? The mixing ratio would be fix and the current motion speed would also adjust extrusion speed.
BTW: an extrusion amount of eg. 4700mm wouldn't be even close to infinite. If you want to go the infinite screw route, you can define axes upto +/- 2^31 steps length. That would be enough to print a whole week.
-
RE: Sovol SV08 Multiple Motion System Upgrade.posted in My Duet controlled machine
@dwuk3d I played around with multicolor prints, but they all looked like (R)designed by Toys'R'us.
It was hard to find decent colors and mixing hotends where a fail, too.
