EXTRUSION PROBLEM WITH 1LC TOOLBOARD
-
I have never been able to have a good printing my new Voron 2.4.
The problem is that the two tested extruders, controlled by the 1LC.
Both tested extuders do not have the necessary force. I tried with an Afterburner and a 25mm NEMA 17, then I replaced it with the new Stealtburner with NEMA 14 with a reduction ratio of 50:1, but with both systems after a few seconds of testing the motor starts to lose steps and do not extrude. If I manually set 50mm of extrusion to 5mm/sec (very low), about half is extruded, then continuously loses steps and no longer extrudes. I tried to change more hotends, also using high flux hotend (Rapido Hotend HF) but nothing changes I also changed the power wire to a thick 14 AWG with no improvement.
Is it possible that the stepper driver has some power problem?
What tests could I do to fix the problem?My configuration is as follows:
- Duet 3 6HC V1.01
- Duet 3 Toolboard 1LC V.1.3
- Latest unstable firmware on both boards
MY CONFIG.G
; Note: Duet3 ( SBC RASPBERRY SD 64GB )
;
; ---------- GENERAL PREFERENCES ---------
G4 S2                                                  			; WAIT 2 SEC FOR 1LC
G90                                                					; absolute coordinates...
M83                                                					; relative extruder moves
M669 K1                                                 			; Select CoreXY mode
M564 S1 H1                                             			 	; Forbid axis movements when not homed
M575 P1 S1 B57600                              	   					; enable support for Paneldue display
M290 R0 S0                                                          ; reset babystepping
;
; ---------- DRIVES MAPPINGS ----------
;
;       Rear
;	| Z1 | Z2 |
;	-----+-----
;	| Z0 | Z3 |
;	-----+-----
;	   Front
;
M584 X4 Y5 Z0:1:2:3 E121.0											; set drive mapping +++ possible swap X and Y
M569 P0 S1      													; Z0 motor FL goes forwards
M569 P1 S0      													; Z1 motor RL goes backwards
M569 P2 S1      													; Z2 motor RR goes forwards
M569 P3 S0      													; Z3 motor FR goes backwards
M569 P4 S1 										    				; A motor goes forwards
M569 P5 S1 										    				; B motor goes forwards
M569 P121.0 S1      												; E1 motor Extruder goes forwards (scheda 1LC porta 121)
M671 X-67.5:-67.85:422.5:422.5 Y-10:443.8:443.8:-10 S10				; Define Z belts locations (Z0=Front_Left Z1, Z2, Z3...ecc) S10=mm di correzione massima
;
; ---------- DRIVES PARAMETERS ----------
M350 X32 Y32 Z32 E16 I1                            					; configure microstepping with interpolation
M92 X158.5 Y158.5 Z800 E993          	   							; set steps per mm (stealthburner)
M566 X800 Y800 Z60 E1000        	                                ; Set maximum instantaneous speed changes (mm/min)
M203 X25000 Y25000 Z9000 E1200 		                                ; Set maximum speeds (mm/min)
M201 X5000 Y5000 Z500 E3000     	                                ; Set maximum accelerations (mm/s^2)
M906 X2000 Y2000 Z1400 E900 I30                                     ; set motor currents (mA) and motor idle factor 30%
M84 S20                                                             ; riduzione potenza motori dopo 20sec
;
; ---------- AXIS LIMITS ----------
M208 X0 Y0 Z-0.10 S1 									    	    ; set axis minima (S1)
M208 X350 Y350 Z345 S0 								    			; set axis maxima (S0)
;
; ---------- ENDSTOP ---------
M574 Y2 S1 P"!io1.in"                              					; Configure enstop Y(2) posizione alta dello switch e pin !io1.in invertito
M574 X2 S1 P"!io2.in"                              					; Configure enstop x(2) posizione alta dello switch e pin !io2.in invertito
; M591 P2 C"121.io1.in" S1 D0     									; filament monitor connected to E0_stop su scheda espansione 1LC porta 121
;
; ---------- Z-PROBE ----------
M558 P8 C"!121.io1.in" H10 F600 T5000				    			; set Z probe type inductive (P8),  altezza tastatura (H10), velocità tastatura mm/min (F600), velocità di spostamento mm/min (T6000) su scheda espansione 1LC porta 121
G31 P500 X0 Y24 Z2.42                          					    ; set Z probe trigger value, PIU' ALTO E' Z PIU' SI AVVICINA AL LETTO
M557 X40:315 Y40:315 S55						   					; define mesh grid (GRIGLIA maglia 6 x 6 con 55mm di spazio) EVITA I MAGNETI
;
; ---------- Z-PROBE (BL-TOUCH) ----------
; M950 S0 C"121.io0.out"                           					; create servo pin 0 for BLTouch
; M558 P9 C"121.io0.in" H10 F800 T5000              				; set Z probe type to bltouch(P9) and the dive height(H10) + speeds (F120 + F5000)
; G31 P500 X0 Y24 Z2.76                             				; set Z probe trigger value, PIU' ALTO E' Z PIU' SI AVVICINA AL LETTO
; M557 X5:340 Y24:350 S60							   				; define mesh grid (GRIGLIA maglia 5 x 5 con 63mm di spazio)
;
; ----------- HO - HEATERS BED ----------
M308 S0 P"temp0" Y"thermistor" T100000 B4138 A"LETTO"   			; configure sensor 0 as thermistor on pin temp0
M950 H0 C"out1" T0                                 					; create bed heater output on out1 and map it to sensor 0
M307 H0 R0.961 K0.467:0.000 D3.05 E1.35 S1.00 B0					; 28/05/22 DOPO AUTOTARATURA LETTO CON (M303 H0 P1 S90)
M140 H0                                            					; map heated bed to heater 0
;
; ----------- H1 - HEATERS NOZZLE ----------
;
M308 S1 P"121.temp0" Y"thermistor" T100000 B4138 A"ESTRUSORE"		; Configure sensor 1 as thermistor on pin temp1
M950 H1 C"121.out0" T1                                 				; Create nozzle heater output on out0 su scheda espansione 1LC porta 121 and map it to sensor 1
M307 H1 R4.216 K0.327:0.000 D8.25 E1.35 S1.00 B0 V29.4			    ; DOPO AUTOTARATURA NOZZLE CON (M303 H1 P1 S250) il 05/06/23.
M143 H1 S275                                       					; set temperature limit for heater 1 to 275C
;
; ---------- TOOLS ----------
M563 P0 S"TOOLS-0" D0.5 H1 F0                  		                ; DEFINE TOOL 0 =>  P0=Tool 0,  S"..."=Tool name, D0.5=drive 0.5,  H1=heather 1,  F0=fan 0.
G10 P0 X0 Y0 Z0                                    		            ; set tool 0 axis offsets
G10 P0 R0 S0                                       		            ; set initial tool 0 active and standby temperatures to 0C
;
;	---------- FAN 0 VENTOLA RAFFR. STAMPA PWM (out4) 24v ----------
M950 F0 C"121.out2" Q500							                ; Fan 0 su 121.out2, use PWM, using 121.out2
M106 P0 C"VENTOLA FILO" S0.0 H-1                     				; set FAN_0 name and value.
;
; ---------- FAN 1 VENTOLA HOTEND (out8) 24v ----------
M950 F1 C"121.out1" Q500							                ; Fan 0 su 121.out2, use PWM, using 121.out2
M106 P1 C"HOTEND" H1 L0.35 X0.9 B0.3 T60:250  	                    ; PARAMETRICA Termostatica ( da L=10% a X=30% con temp. da 60°C a 250°C )
;
; ---------- FAN 2 VENTOLA MCU PWM (out5) 24v ---------
M308 S3 Y"mcu-temp" A"MCU" 						   					; configure sensor 3 as thermistor for MCU
M950 F2 C"!out5+out5.tach" 											; Fan 2 su out5, use PWM (needs ! inverted), using out5.tach
M106 P2 C"VENTOLA MCU" L0.1 X0.8 B0.1 T26:35 H3		    			; set FAN_2 value  T26:32°C  velocità ventola L-10% X-80%
;
; ---------- FAN 3 VENTOLA PWM RASPBERRY (out6) 24v ---------
M308 S4 P"temp2" Y"thermistor" T100000 B4138 A"RASPBERRY" 			; Configura il sensore 4 (S4) come riscaldatore sul pin temp2 con nome RASPBERRY
M950 F3 C"!out6+out6.tach" 											; Fan 3 su out6, use PWM (needs ! inverted), using out6.tach
M106 P3 C"VENTOLA RASPBERRY" L0.1 X1.0 B0.9 T35:45 H4				; set FAN_3 value  T35:45°C  velocità ventola L-10% X-100%
;
; ---------- PORT 1 RELE' ACCENSIONE (io4.out) IO PORT PWM ----------
M950 P1 C"io4.out" Q500												; allocate GPIO PORT.1 to io4.out at 500Hz
; M42 P1 S0.0  														; Printer OFF set 0% PWM on GPIO port 1
; M42 P1 S1.0  														; Printer ON set 100% PWM on GPIO port 1
;
; ---------- ACCELEROMETRO ----------
M955 P121.0 I10                                         			; ACCELEROMETRO SU SCHEDA 1LC (I10 = orientamento scheda)
M593 P"ZVDDD" F40										            ; parametri riduzione risonanza
;
M950 J5 C"121.button0"         						    		    ; Crea pin 5 su porta 121.button0 della scheda 1LC
M581 P5 T2 S1 R0													; P5=pin 5 creato con M950 (J5), T2=Trigger logico a cui associare gli ingressi, S1=funziona da inattivo ad attivo, R0=attivo in ogni momento
;  	Qualsiasi numero di trigger # maggiore di 1 provoca l'esecuzione del file della macro sys/trigger2.g (T2)
M950 J6 C"121.button1"                                              ; Crea trigger n°6 su porta "121.button0"
M581 P6 T3 S1 R0                                                    ; Crea pin 56 su porta 121.button1 della scheda 1LC
;
; ---------- NEOLED "0" (PORTA LED DEDICATA) ----------
M950 E0 C"led" T1  													; Crea PIN "led" striscia LED E0 T1=RGB
M98 P"0:/macros/5-NEOLED-WHITE-20P"								    ; Esegui la MACRO "7C-NEOLED ITALIA.g"
; M950 E1 C"io8.out" T1  											; Crea PIN "io8.out" striscia LED E1 T1=RGB
; M150 R255 U255 B255 P90 S25 F0									; Luce bianca per 25 led potenza 90 su 255
; M150 R0 U0 B255 P200 S24 F0										; Set luce BLU per 24 LED
;
; ---------- NEOLED "1" (PORTA IO8 OUT) DA TESTARE ----------
M950 E1 C"io8.out" T1  											    ; Crea PIN "io8.out" striscia LED E1 T1=RGB
M150 E1 R255 U255 B255 P90 S1 F0									; Luce bianca per 1 led potenza 90 su 255
;
; ---------- MISCELLANEUS ----------
M912 P0 S-1									   					    ; parametro per tarare la temperatura della MCU (-1°C)
; M911 S24.5 R24.9 P"M913 X0 Y0 G91 M83 G1 Z3 E-2 F500" 			; Autosalvataggio stampa per mancanza di corrente, sospende a 25.0v e riparte a 25.8v
M300 S2500 P3000								   					; Emette suono a S=2500Hz per P=3 secondi
T0                                             	        			; select first tool ACTIVE
;
; ===================================================================================================================================
;
DIAGNOSTIC 1LC
25/8/2023, 21:18:19 m122 b121 Diagnostics for board 121: Duet TOOL1LC rev 1.1 or later firmware version 3.5.0-beta.4 (2023-06-08 16:22:30) Bootloader ID: SAMC21 bootloader version 2.4 (2021-12-10) All averaging filters OK Never used RAM 1648, free system stack 88 words Tasks: Move(3,nWait,0.0%,119) HEAT(2,nWait,4.4%,57) CanAsync(5,nWait,0.0%,54) CanRecv(3,nWait,0.1%,75) CanClock(5,nWait,0.2%,66) ACCEL(3,nWait,0.0%,53) TMC(2,delaying,29.3%,57) MAIN(1,running,18.2%,336) IDLE(0,ready,0.0%,27) AIN(2,delaying,47.8%,142), total 100.0% Last reset 03:44:16 ago, cause: software Last software reset data not available Driver 0: pos 0, 993.0 steps/mm, standstill, SG min 0, read errors 0, write errors 0, ifcnt 42, reads 21147, writes 2, timeouts 2, DMA errors 0, CC errors 0, failedOp 0x72, steps req 0 done 49650 Moves scheduled 17, completed 17, in progress 0, hiccups 0, step errors 0, maxPrep 317, maxOverdue 0, maxInc 0, mcErrs 0, gcmErrs 0, ebfmin 0.00, ebfmax 0.00 Peak sync jitter -1/5, peak Rx sync delay 217, resyncs 0/0, no timer interrupt scheduled VIN voltage: min 29.9, current 30.1, max 30.1 MCU temperature: min 40.7C, current 46.1C, max 50.3C Last sensors broadcast 0x00000002 found 1 233 ticks ago, 0 ordering errs, loop time 1 CAN messages queued 255153, send timeouts 0, received 114818, lost 0, free buffers 18, min 18, error reg 0 dup 0, oos 0/0/0/0, bm 0, wbm 0, rxMotionDelay 298, adv 37112/37112 Accelerometer: LIS3DH, status: 00 I2C bus errors 0, naks 0, other errors 0 -
@Gianluca Are you able to temporarily extend the extruder motor wiring such that you can connect it to one of the spare 6HC drivers? That would be one to check if it's a driver problem.
-
@deckingman
Yes, good idea.
Unfortunately on the 6HC card I have all the drivers busy, but I temporarily assign one of the 4 Z axes to do a static extrusion test.
Update after test...
Thanks! -
@deckingman said in EXTRUSION PROBLEM WITH 1LC TOOLBOARD:
@Gianluca Are you able to temporarily extend the extruder motor wiring such that you can connect it to one of the spare 6HC drivers? That would be one to check if it's a driver problem.
I did the test using the 6HC card driver and it extrudes continuously at 31.6mm3/sec, I couldn't make a print because I used a Z axis motor driver as the E0 extruder.
I went back to the original configuration with 1LC toolboard, I updated the step/mm which was wrong and I did an extrusion test, the system always reaches 31.6mm3/sec (13.5mm/sec)
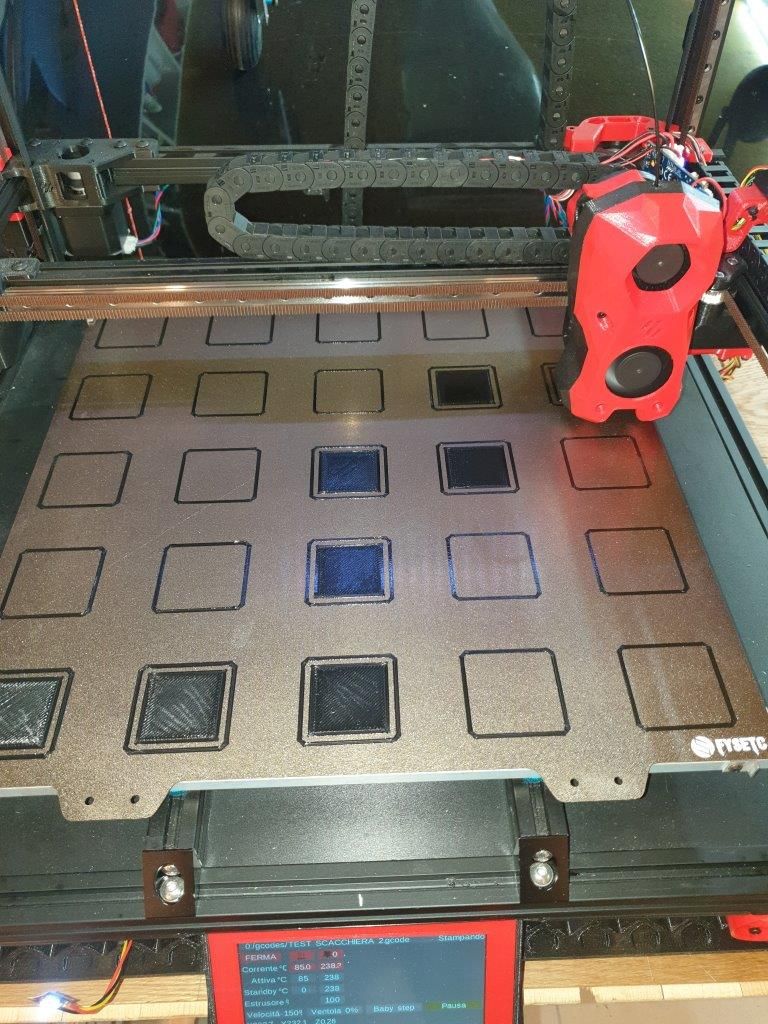
I tried to print a leveling test, but after a few minutes it stopped extruding.I don't know what to do anymore, I spent almost 2000€ buying the best components available and I still have to make a decent print...
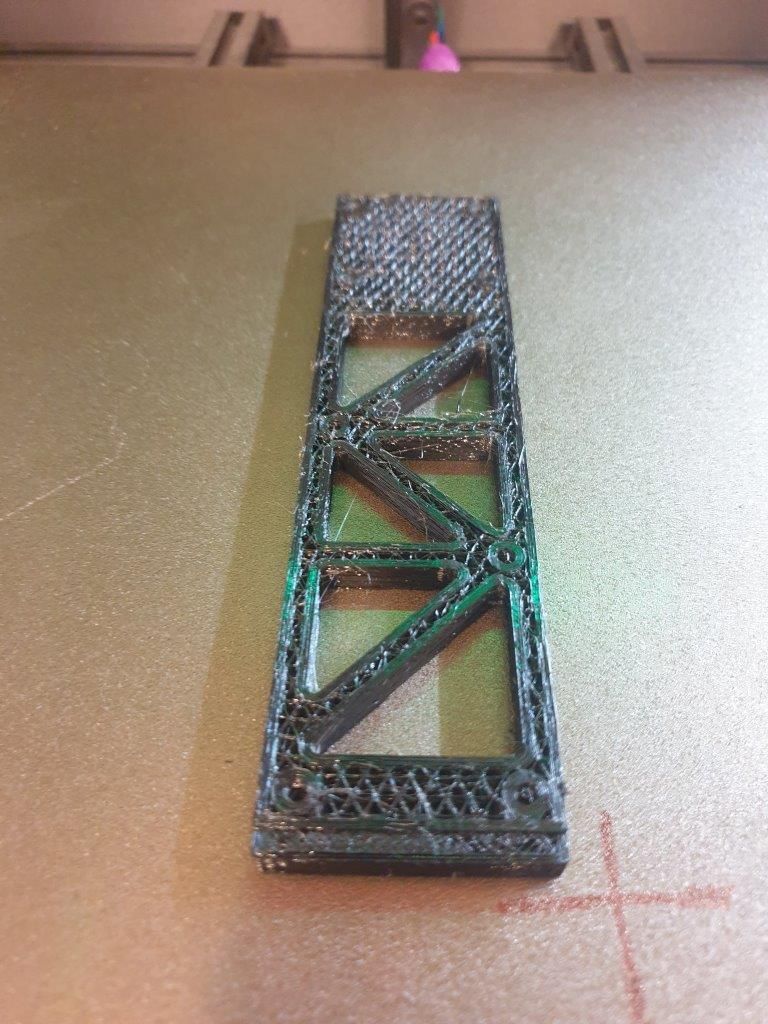
I am attaching some photos of the result. (there is clearly an under extrusion)


-
@Gianluca OK, so it will extrude at 13.5 mm/sec when the print head is clear of the bed yes? But when you attempt a print, it under extrudes yes? In which case, the answer must be that the nozzle is too close to the bed when you start printing. i.e. the build surface itself is blocking the nozzle because the first layer height is too small. You don't say what sort of probe you use for homing Z but it seems likely that you need to increase the Z offset.
As a quick test, run your test print again but this time, use baby stepping to move the bed away from the nozzle by 0.2 to 0.3 mm.
-
@deckingman said in EXTRUSION PROBLEM WITH 1LC TOOLBOARD:
@Gianluca OK, so it will extrude at 13.5 mm/sec when the print head is clear of the bed yes? But when you attempt a print, it under extrudes yes? In which case, the answer must be that the nozzle is too close to the bed when you start printing. i.e. the build surface itself is blocking the nozzle because the first layer height is too small. You don't say what sort of probe you use for homing Z but it seems likely that you need to increase the Z offset.
As a quick test, run your test print again but this time, use baby stepping to move the bed away from the nozzle by 0.2 to 0.3 mm.
Thanks for your suggestions and sorry for my English...
I'm not a professional printer but this is the fourth printer I've built. I know the basic knowledge well.
The bed is perfectly leveled both with the G29 mesh and also on the 4 Z axes.
Before the test print the Z offset was correct, the first layers printed before not extruding anymore, are 0.25mm thick.
I can confirm also that the print nozzle was not clogged.
After it no longer extruded I tried to extrude from a standstill and it extruded nothing, as if the stepper had little power or the driver did not provide the right power.
So far I have replaced 4 stepper motors but none have solved the problem.
I have a strong suspicion that the toolboard driver just gets hot and loses all power... -
@Gianluca I'm confused. I thought you said that you tried extruding using a driver on the 6HC which was fine, then you tried extruding using the tool board driver and that was also fine. Is that not the case?
You also just said that the first layer prints fine but the pictures you posted clearly show that is not the case. So I'm confused.... -
There is no doubt in my mind that you are trying to print WAY too close to the bed. I wouldn't be surprised if the 'no longer extrudes' is because the nozzle got clogged because it was too close to the bed or the extruder wore a nice little hollow in the filament from not being able to extrude and now it can't get past that divot in the filament. As was suggested, lift the nozzle by 0.2 to 0.3 mm.
BTW, just looking at the skirt I can see that you are too close .... you should see a nice smooth line with no artifacts on the outside edges. If your line does not have smooth outside edges then you were squishing the molten filament past the land on the nozzle. -
@jens55 and @deckingman
Unfortunately I have problems with English, and I can't explain myself well.
I can assure you that the Z offset is correct (I'm very careful about this).
When I stopped printing in the photo, after it no longer extruded, I lifted my head and tried extruding in free air (PETG at 240°) and the motor had no strength to extrude! this excludes the print height.
unfortunately my voron 2.4 has seven stepper driver and I can't make a print only with the main board...
Again I suspect that as the driver gets hot it loses power.
I feed the nema 14 at 1.0A and it doesn't heat up (I can touch it safely).
I think I'll buy a Duet 3 3HC and take off the little toolboar, which has never trusted me. -
@Gianluca Why not try the test that people have suggested? Use babystepping to raise your nozzle a little and see if it makes any difference. Testing for extrusion working after your print has failed could fail because of a nozzle jam or because the extruder has ground down the filament.
-
@gloomyandy
Yes, I will do other tests, but I assure you that with the test in the air, helping the extrusion by pushing the wire by hand, it extrudes easily. When you don't help the filament, it starts to lose steps (0mm of extrusion)...
I immediately tried to pass the nozzle with a Ø0.4mm tip and it was already free.
I use a Phaetus Rapido Plus and have never had a jam... -
@Gianluca You said earlier that if you ran the toolboard with it printing in air there was no problem? Now I'm as confused as Deckingman.
-
@gloomyandy
I try to explain myself better.
Yes, when the printer is cold and I test it in the air, it extrudes normally, when I start a real print, it stops extruding after a few minutes/seconds. It looks like a loss of power due to heat, but the engine is not.
As soon as the print is done, I immediately redo the extrusion tests in the air, it does not extrude... -
@Gianluca I'd suggest that you run two tests....
- Babystep up 5mm or so upwards, then run the test print so that the extrusion is into air. If it is still extruding at then end of the print then I would say that you do not have a driver/heating problem.
- Babystep back down until you are 0.2 or 0.3mm above zero (as suggested above) and try the print again.
-
@gloomyandy said in EXTRUSION PROBLEM WITH 1LC TOOLBOARD:
@Gianluca I'd suggest that you run two tests....
- Babystep up 5mm or so upwards, then run the test print so that the extrusion is into air. If it is still extruding at then end of the print then I would say that you do not have a driver/heating problem.
- Babystep back down until you are 0.2 or 0.3mm above zero (as suggested above) and try the print again.
Yes, I like point 1, I try it right away, then I move on to the second test...
-
@Gianluca This sounds very similar to the issue I am having. At times, at the beginning of the print, it acts as if the extruder motor is being under driven by the 1LC. If I turn off the printer, and restart, it extrudes normally again. I've had no luck troubleshooting it. It only occurs about 5-10% of the times I start a print.
-
While this is probably not relevant in this case, I recently ran into a situation where I had an extruder with low power in one direction and normal power in the reverse direction. It took me way too long (and a replacement 1LC board) to figure out that, while executing a particular macro, I set the speed way too high in one direction which caused all kinds of mayhem.
Just thought I would mention it since it took forever to find the extra '0' in the macro file <sigh>
-
@jens55 said in EXTRUSION PROBLEM WITH 1LC TOOLBOARD:
While this is probably not relevant in this case, I recently ran into a situation where I had an extruder with low power in one direction and normal power in the reverse direction. It took me way too long (and a replacement 1LC board) to figure out that, while executing a particular macro, I set the speed way too high in one direction which caused all kinds of mayhem.
Just thought I would mention it since it took forever to find the extra '0' in the macro file <sigh>
Yes, thank you, I had read your post and in fact it allowed me to correct some too high step/mm errors (not macro errors) which distorted the extrusion tests.
Even with the correct parameters the problem remained. -
@Gianluca said in EXTRUSION PROBLEM WITH 1LC TOOLBOARD:
@gloomyandy said in EXTRUSION PROBLEM WITH 1LC TOOLBOARD:
@Gianluca I'd suggest that you run two tests....
- Babystep up 5mm or so upwards, then run the test print so that the extrusion is into air. If it is still extruding at then end of the print then I would say that you do not have a driver/heating problem.
- Babystep back down until you are 0.2 or 0.3mm above zero (as suggested above) and try the print again.
Yes, I like point 1, I try it right away, then I move on to the second test...
I did some tests and it seems to be better.
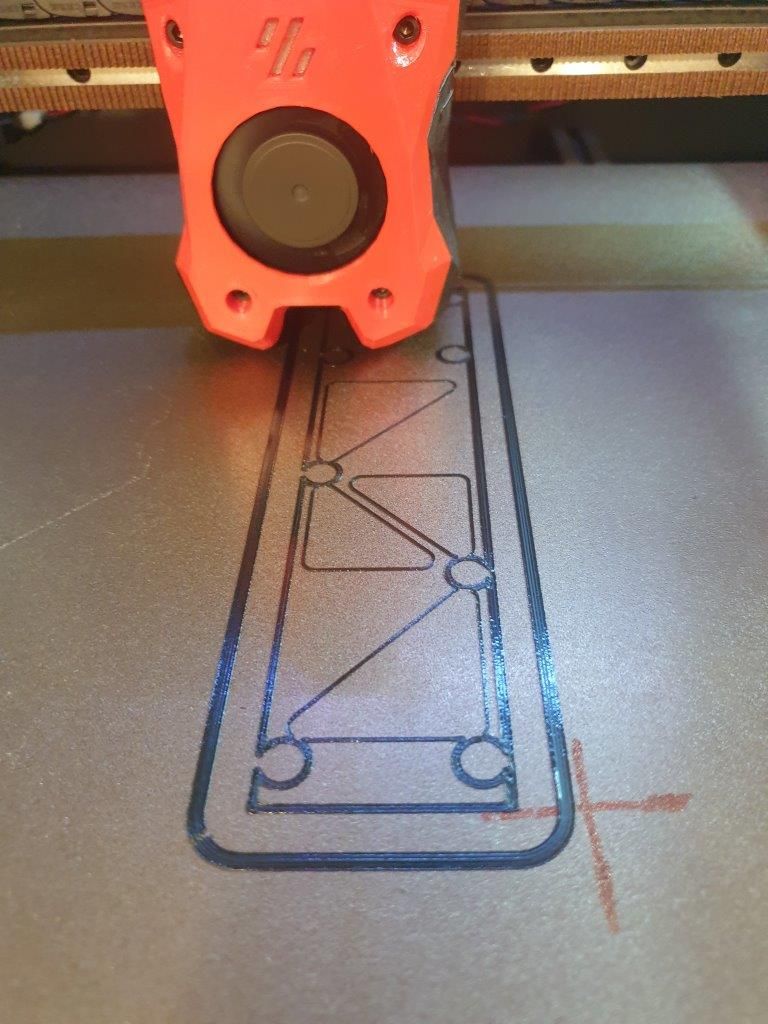
- the first photo shows the aborted print due to filament flow interruption. After a restart of the printer, an extrusion test in air was still performed without problems...
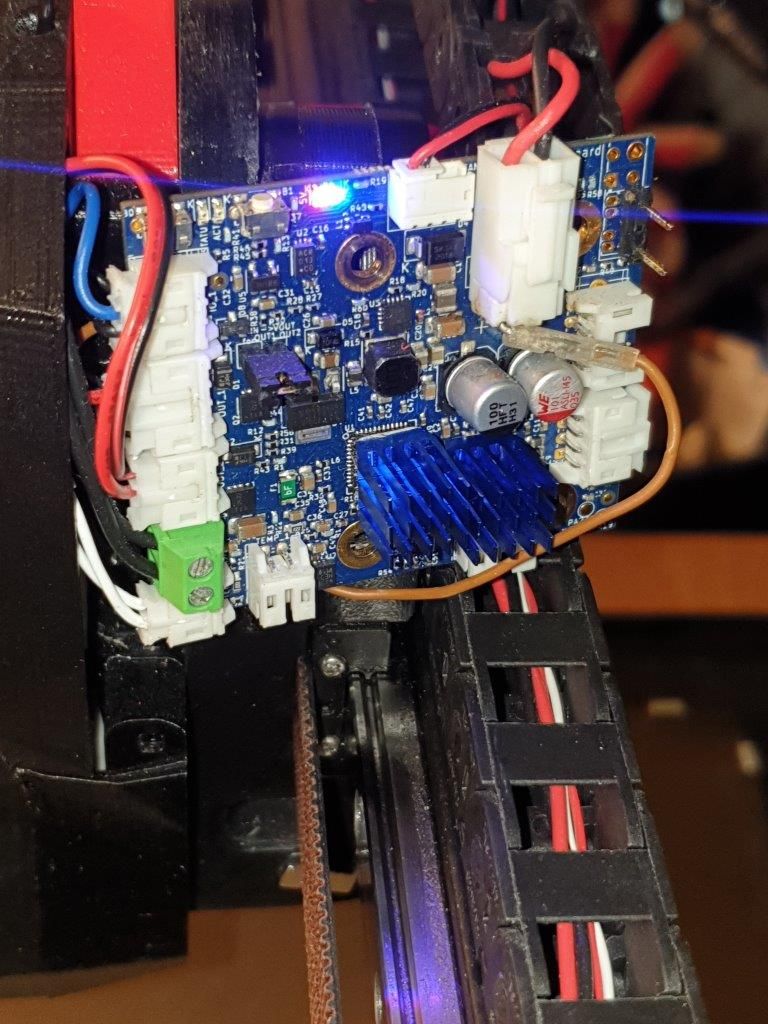
- the second and third photo shows the next print where I reduced the power of the extruder cooling fan from 100% to 70% and I put two heatsinks on the MCU and on the driver.
- the Z offset was already perfect. It can be seen that the first layer is extruded correctly without smudges and the engine now heats up well (about 65-70°C) before putting the heatsink on, the engine didn't heat up!
I've done other small prints as well and everything seems to be going much better.
Note: the stepper is a nema 14 it is a 1.0A Fysetc and I make it work at 1.0A because if I bring it (as it would be correct) to about 80% of the rated current, the problem reappears...
I remain of the idea that there is a heating problem of the 1LC, and I will also put a small 30mm cooling fan on the toolboard...


-
In pinting now... definitely much better...
