my delta printer seems to have a mind of its own
-
I have a Kossel XXL delta and I have been trying to get it right for over a week now
but it seems to have a mind of its ownthe auto delta calibration won't touch the bed no matter what I set it I now have my Z set to -5 but it still won't go down. the endstop hit just says yes most of the time.
also, the home all option sometimes works then sometimes find the end stops lowers down then shoots off 20mm or so in one direction.
i just can't get it to print anything correctly. if i do manage to get a level and start a print something always messes it up whether it be it starts printing off center or it just doesn't touch the bed. and once it just stopped and stabbed my print.
it seems to have a mind if its own noting is constantSoftware Information
Firmware Name: RepRapFirmware for Duet 2 WiFi/Ethernet
Firmware Electronics: Duet WiFi 1.02 or later
Firmware Version: 2.01(RTOS) (2018-07-26b2)
WiFi Server Version: 1.21
Web Interface Version: 1.21.2-dc42Config.g
*; generated by RepRapFirmware Configuration Tool on Thu Jul 19 2018 15:05:44 GMT+0100 (British Summer Time)
; General preferences
G90 ; Send absolute coordinates...
M83 ; ...but relative extruder moves
M555 P1 ; Set firmware compatibility to look like RepRapFirmare;*** The homed height is deliberately set too high in the following - you will adjust it during calibration.
M665 R200 L400.30 B120 H413 ; Set delta radius, diagonal rod length, printable radius and homed height
M666 X-10 Y-7 Z-10 ; Put your endstop adjustments here, or let auto calibration find them; Network
M550 PDelta Printer ; Set machine name
M552 S1 ; Enable network
;*** Access point is configured manually via M587
M586 P0 S1 ; Enable HTTP
M586 P1 S0 ; Disable FTP
M586 P2 S0 ; Disable Telnet; Drives
M569 P0 S1 ; Drive 0 goes forwards
M569 P1 S1 ; Drive 1 goes forwards
M569 P2 S1 ; Drive 2 goes forwards
M569 P3 S0 ; Drive 3 goes forwards
M350 X16 Y16 Z16 I1
M350 E8 ; Configure microstepping with interpolation
M92 X80 Y80 Z80 E1900 ; Set steps per mm
M566 X1000 Y1000 Z1000 E6 ; Set maximum instantaneous speed changes (mm/min)
M203 X18000 Y18000 Z18000 E2400 ; Set maximum speeds (mm/min)
M201 X1800 Y1800 Z50 E50 ; Set accelerations (mm/s^2)
M906 X1200 Y800 Z800 E400 I30 ; Set motor currents (mA) and motor idle factor in per cent
M84 S30 ; Set idle timeout
M579 X0.966 Y0.978; Axis Limits
M208 Z-5 S1 ; Set minimum Z; Endstops
M574 X2 Y2 Z2 S0 ; Set active high endstops; Z-Probe
M558 P5 R0.5 H5 F1200 T6000 ; Set Z probe type to effector and the dive height + speeds
G31 P100 X0 Y0 Z-0.256 ; Set Z probe trigger value, offset and trigger height
M557 R140 S20 ; Define mesh grid; Heaters
M305 P0 T100000 B4725 C7.060000e-8 R4700 ; Set thermistor + ADC parameters for heater 0
M143 H0 S120 ; Set temperature limit for heater 0 to 120C
M305 P1 T100000 B4725 C7.060000e-8 R4700 ; Set thermistor + ADC parameters for heater 1
M143 H1 S300 ; Set temperature limit for heater 1 to 300C; Fans
M106 P0 S1 I0 F500 H-0 ; Set fan 0 value, PWM signal inversion and frequency. Thermostatic control is turned off
M106 P1 S1 I0 F500 H1 T45 ; Set fan 0 value, PWM signal inversion and frequency. Thermostatic control is turned on
M106 P2 S1 I0 F500 H1 T45 ; Set fan 0 value, PWM signal inversion and frequency. Thermostatic control is turned on; Tools
M563 P0 D0 H1 ; Define tool 0
G10 P0 X0 Y0 Z0 ; Set tool 0 axis offsets
G10 P0 R0 S0 ; Set initial tool 0 active and standby temperatures to 0C; Automatic power saving
M911 S22 R23 P"M913 X0 Y0 G91 M83 G1 Z3 E-5 F1000" ; Set voltage thresholds and actions to run on power loss; Custom settings are not configured*
Bed.g
; bed.g
; called to perform automatic delta calibration via G32
;
; generated by RepRapFirmware Configuration Tool on Thu Jul 19 2018 15:05:44 GMT+0100 (British Summer Time)
M561 ; clear any bed transform
; Probe the bed at 3 peripheral and 0 halfway points, and perform 3-factor auto compensation
; Before running this, you should have set up your Z-probe trigger height to suit your build, in the G31 command in config.g.
G30 P0 X0 Y110 H0 Z-99999
G30 P1 X0 Y-110 H0 Z-99999
G30 P2 X110 Y0 H0 Z-99999
G30 P3 X-110 Y0 H0 Z-99999
G30 P4 X-90 Y20 H0 Z-99999
G30 P5 X-90 Y20 H0 Z-99999
G30 P0 X0 Y0 H0 Z-99999 S6
; Use S-1 for measurements only, without calculations. Use S4 for endstop heights and Z-height only. Use S6 for full 6 factors
; If your Z probe has significantly different trigger heights depending on XY position, adjust the H parameters in the G30 commands accordingly. The value of each H parameter should be (trigger height at that XY position) - (trigger height at centre of bed) -
@dmkmedia said in my delta printer seems to have a mind of its own:
the auto delta calibration won't touch the bed no matter what I set it I now have my Z set to -5 but it still won't go down. the endstop hit just says yes most of the time.
The fix for that is to increase the H parameter in M558 until you have completed first-time calibration, as recommended at https://duet3d.dozuki.com/Wiki/Calibrating_a_delta_printer. You could also check the H parameter in your M665 command, which I suspect is much too low.
also, the home all option sometimes works then sometimes find the end stops lowers down then shoots off 20mm or so in one direction.
It sounds like one of the carriages doesn't always reach the endstop. See this bit of the FAQ page https://duet3d.dozuki.com/Wiki/FAQ#Section_When_I_try_to_home_my_printer_sometimes_the_carriage_or_carriages_move_only_part_of_the_way_towards_the_homing_switches_and_I_have_to_command_it_to_home_again_to_make_it_go_all_the_way.
-
@dc42 said in my delta printer seems to have a mind of its own:
It sounds like one of the carriages doesn't always reach the endstop. See this bit of the FAQ page
they do hit the endstops and i have watched them connect i click go to home repeatedly and it still does it until a turn it off and back on then all is ok. until the next time, it starts to do it
I have now set the M558
M558 P5 R0.5 H30 F1200 T6000
and still it fails to touch the bed on some of the tries here is a video i start at
X,0 Y,0 Z,0
as shown on the video
https://youtu.be/01zD6HJANLA
at 39 seconds is the one where it goes nowhere near the bedbut its totally random the one after this it didn't touch in 3 places
-
It might just be a perspective trick, but is the effector level at all times in that video? It looks to me like it's tilting, based on the way the bubble in the spirit level is moving. Are you using the Duet3D PCB magnetic carriage adapters?
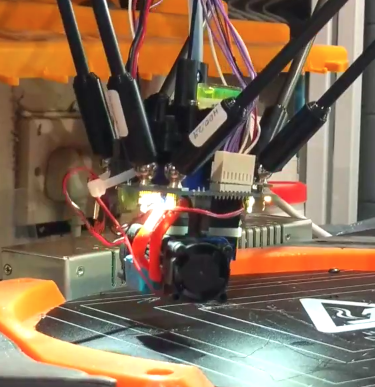
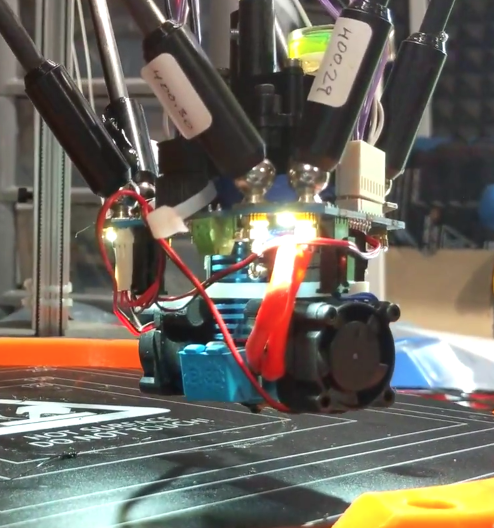
Also, difficult to tell in the video, but is the effector registering a hit when it stops in mid-air at 40 seconds?
adavidm
-
I agree with adavidm, you may be getting a false trigger. When it stops before reaching the bed, does the green LED on the effector flash?
If yes -> false triggering due to too much vibration, or possibly a faulty effector. Please run M350 to check that you are running x16 microstepping with interpolation enabled. From the video, your machine does sound a little noisy when probing, so perhaps you are using lower microstepping, or no interpolation.
If no -> check that the connections between the 8-way connector on the effector and the Duet are sound.
-
The effector IS tilting. It is very clear when the video is played several times. This indicates a problem with the mechanics. Nothing will work until this is cleared up.
Please post a photo of the carriages. There is one very blurry frame where the carriages show... and there seems to be no sign of the carriage adapters. They are the rectangular things in this photo.
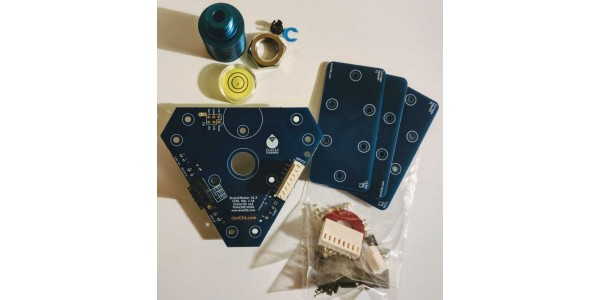
-
@danal said in my delta printer seems to have a mind of its own:
The effector IS tilting. It is very clear when the video is played several times. This indicates a problem with the mechanics. Nothing will work until this is cleared up.
Please post a photo of the carriages. There is one very blurry frame where the carriages show... and there seems to be no sign of the carriage adapters. They are the rectangular things in this photo.

They are not fitted as they would not fit to the carriages so I printed one with the measurements on the site with one that would fit
-
@adavidm it measures a hit when it's sitting still on and off.
-
@dc42 as per config file above
M350 X16 Y16 Z16 I1
M350 E8 ; Configure microstepping with interpolation -
Could it be the tower is too tall at 1000mm
-
@dmkmedia said in my delta printer seems to have a mind of its own:
Could it be the tower is too tall at 1000mm
I have a working delta with 1500MM towers (that have 1000MM linear slides) and 700mm Hayden Huntley arms. At this instant, that printer is powered off due to the room that it is in being flooded (long story), so I can't easily retrieve the config.
Just wanted you to know that printers that big or bigger do work.
-
And, I believe you have at least two problems to clear up: False trigger (which others can help you with) and a mechanical problem that is tilting your effector. Until the effector tilt is fixed, nothing else is going to work correctly.
If you measure between a pair of diagonal rods, near the effector, is this the EXACT same as a measure between the rods near the carriage?
Sorry for crappy backlit photos... but they will get the idea across.
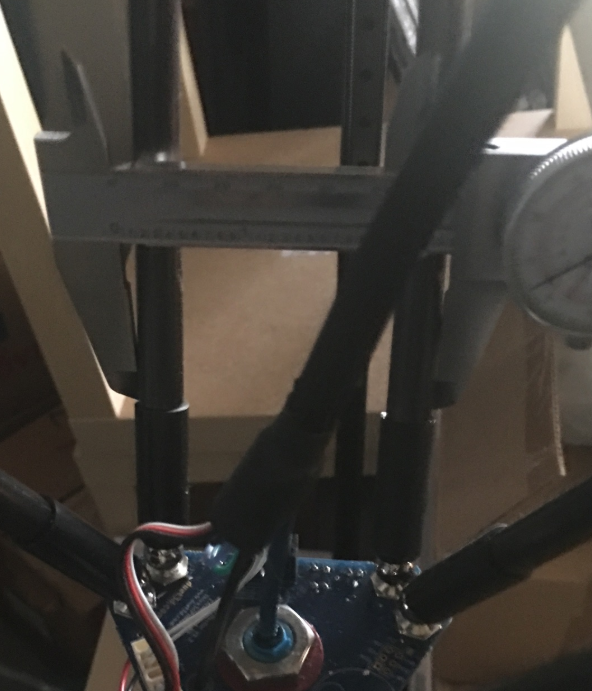
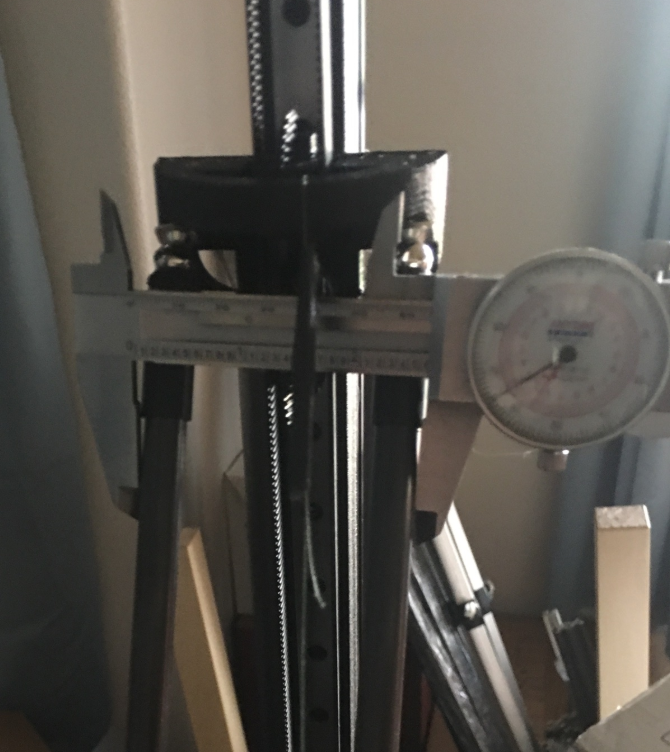
-
@dmkmedia said in my delta printer seems to have a mind of its own:
They are not fitted as they would not fit to the carriages so I printed one with the measurements on the site with one that would fit
As others have said, it's almost certainly the source of the tilt and you must fix this before going any further. the rod pairs need to be absolutely parallel for the effector to stay level. One of the clever aspects of the Smart Effector design was in using the excellent precision of a manufactured PCB to ensure that the Mag ball holes are perfectly spaced.
If you are getting false readings from the strain gauge on the Smart Effector, that's going to prevent auto calibration from working. Worth double-checking crimps and any other connections, just in case you are getting an intermittent connection fault.
For now, I'd concentrate on the tilt issue. If you can take a clear photo of your carriage mounts, maybe someone can offer advice on how to get the PCB adaptor to fit.
adavidm