Alternative Carriage Adapters
-
Unfortunately not, you would need to change to 2020. Are you sure your mini Kossel has 2015, from memory mine had 20*20 as those are standard for mounting on rails.
-
I suspect he may have IGUS Rails tony which are 20x15 you could print a jig and then drill 2 extra holes in the Carriage PCB's I believe they are totally passive so you won't hurt anything
-
Yes that's an option although the holes at 15 would be very close to the originals at 20. (centers 5mm apart hole radius 1.5mm, only 2mm of PCB between holes).
-
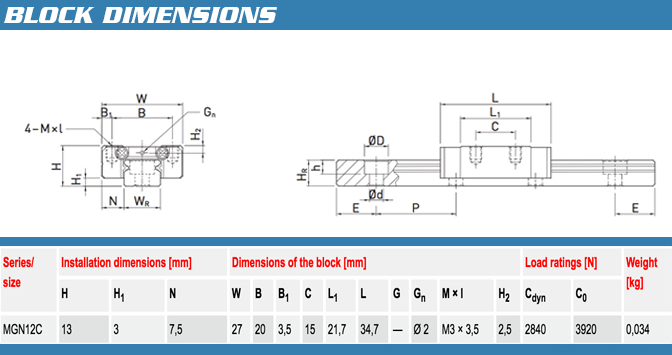
mgn12c are 20*15

-
Sadly Igus doesn't offer the standard "long body" carriages that other manufacturers do.
-
Igus doesn't offer the standard "long body" carriages
dc42, what do you think on hiwin QHH15CA carriage?
https://motioncontrolsystems.hiwin.com/configurator/qh-series–-interchangeable-type---block -
I haven't used them so I can't comment.
-
I was able to modify the file in KiCAD and they look to be about $20 from OSHPark but the cost of the carbon arms has kind of put me off this upgrade for now. I got my rails during the Misumi 3D Printing promotion so I'm not sure what brand they are anymore but they are 20x15.
-
I got my rails during the Misumi 3D Printing promotion so I'm not sure what brand they are anymore but they are 20x15.
You could buy long-body carriages to fit the same rails, but you need to be careful when fitting them.
-
Before I got my Delta Smart Effector, I was using a modified version of this Thing:
https://www.thingiverse.com/thing:932959
As delivered, it has 20x20 screw spacing; but I had to modify it for 20x16 spacing to attach to the sliders I'm using, which I accomplished by editing the "for (y = [-10, 10])" line to "for (y = [-3, 13])". I made a few other tweaks, too.
When I got my Smart Effector, I needed to change the ball stud spacing to 55mm, which is done via the rodSeparation and ballStudDistance variables (they're semi-redundant). I'm now using my modified version of this Thing with my Smart Effector, without the carriage pieces provided with the Smart Effector. This seems to work fine – or at least, as well as can be expected. (There's a bit too much play in my carriage, and printing parts like these, rather than using manufactured parts, might be a contributing factor.)
In any event, you should be able to make similar changes, just with a tiny change for 20x15 spacing. If you're not comfortable with OpenSCAD, I could do this for you and send you the files; PM me if you want this. Note that I can't promise how whatever I produce would mate with your slider; it might be awkwardly high or low. If you do it yourself, you can adjust the y range in that "for" statement to get it to fit the way you want.