Tool Calibration Station E3D Toolchanger
-
Hi together,
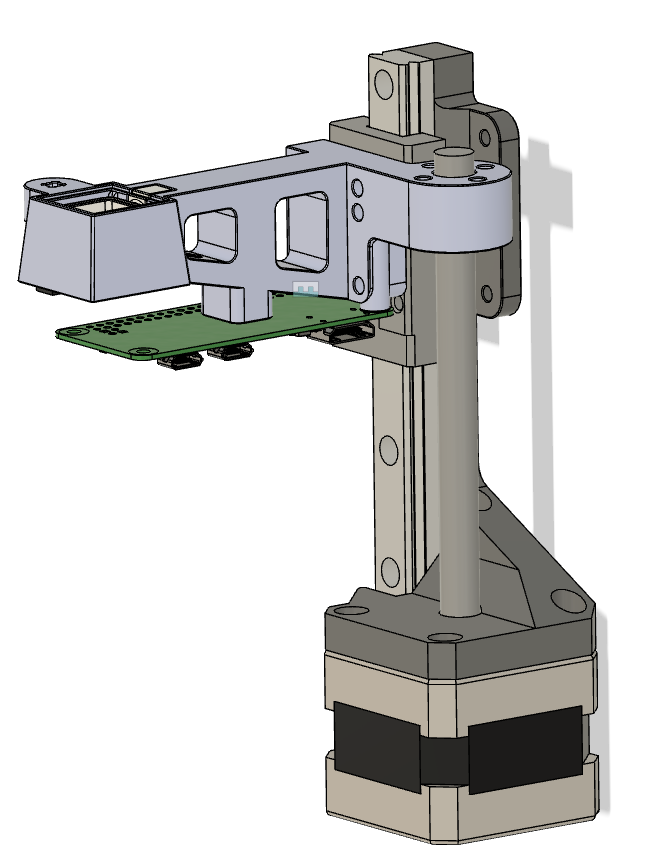
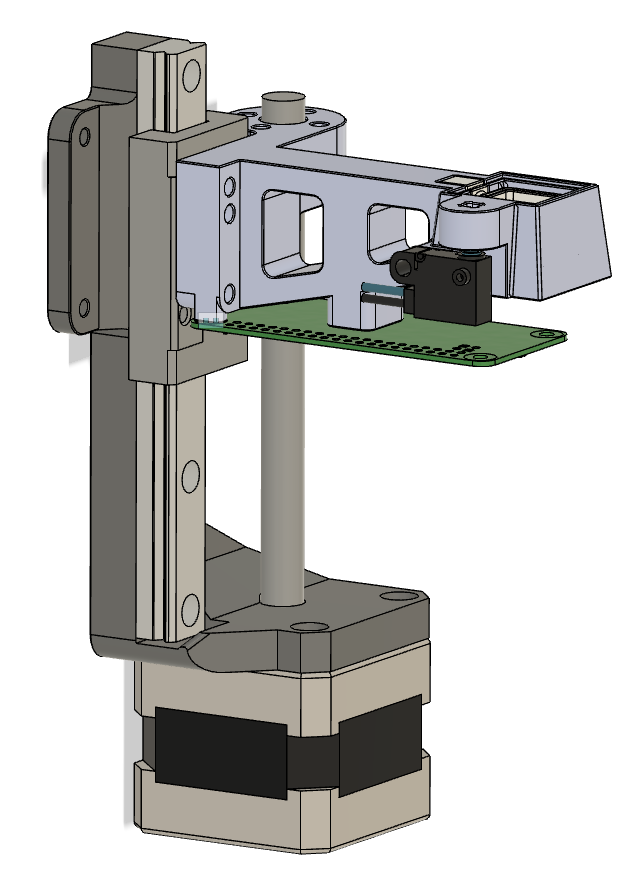
I have designed a tool calibration station for the E3D tool changer. It is equiped with a raspberry pi zero/camera and a hight sensor (guided platform which press a micro switch). The whole station is guided by a linear rail and driven by a stepper motor (equal to Greg's adjustable brush)
I already switched over to rrf 3.01 with conditional gcode.
I know want to set the tool offset by running a macro.
First point I need to know is how I can use the micro switch to probe the tool hight.
Let's call my tool calibration axis W axis. Then I have to move the W axis until the endstop is pressed. But I don't know how to do this? May @dc42 can help me?Later I can do some mathematics to calculate the tool offset with the actual W axis position. This should be easily possible with the conditional gcodes.
The second point I want the realize is that I put the nozzle above the camera, center it and press a macro button then the XY offset of the tool is set. But this I think is more easily and could be realized also with the new gcodes.
Is there a object model for the tool offset? -
Having a separate station is a great idea.
Regarding all the commands required to make it work: See the commands in the "tool align" and/or "zonly" script here:
Ignore the python... just look a the gcode and read here about the commands and options, such as G1 H2, and work those into conditional Gcode. More doc on the Gcode here:
*****************************
Regarding your camera... do you intend to use machine vision? Or human alignment to an overlay on the image, such as a crosshair or a circle? For either one of those, you will probably want 'openCV' on your Pi. Almost every install instruction on the internet has you put openCV in a virtual environment, so that you can run multiple releases of opencv. This is a huge hassle. And we really only want one release.
Therefore, there is a 'direct install' script called "installOpenCV.sh" here:
https://github.com/DanalEstes/DuetPython
There are also several sample scripts showing different levels of Machine Vision, or Human Alignment, or ...
*****************************
None of the above is EXACTLY what you seek. At the same time, all the pieces you need to create what you seek are in the above. Please be sure and read the 'readme' in both repositories.
-
Oh, and pics? We need pics of your station!!! GREAT idea.
-
@Danal said in Tool Calibration Station E3D Toolchanger:
Having a separate station is a great idea.
Regarding all the commands required to make it work: See the commands in the "tool align" and/or "zonly" script here:
Ignore the python... just look a the gcode and read here about the commands and options, such as G1 H2, and work those into conditional Gcode. More doc on the Gcode here:
*****************************
Regarding your camera... do you intend to use machine vision? Or human alignment to an overlay on the image, such as a crosshair or a circle? For either one of those, you will probably want 'openCV' on your Pi. Almost every install instruction on the internet has you put openCV in a virtual environment, so that you can run multiple releases of opencv. This is a huge hassle. And we really only want one release.
Therefore, there is a 'direct install' script called "installOpenCV.sh" here:
https://github.com/DanalEstes/DuetPython
There are also several sample scripts showing different levels of Machine Vision, or Human Alignment, or ...
*****************************
None of the above is EXACTLY what you seek. At the same time, all the pieces you need to create what you seek are in the above. Please be sure and read the 'readme' in both repositories.
So with the G1 Hx commands I just can Home the axis and set it to the axis limits. H2 mean it does ignore the Endstop, H1 set to M208 axis limit and H3 overrides the M208 limit.
This is the Station:
I also planed a place a LED inside to illuminate the Nozzle. The camera itself is protected by a small piece of glass, which can be purchased from laboratory equipment


-
@smoki3 This is awesome! I'll be following this concept.
-
@smoki3 said in Tool Calibration Station E3D Toolchanger:
So with the G1 Hx commands I just can Home the axis and set it to the axis limits. H2 mean it does ignore the Endstop, H1 set to M208 axis limit and H3 overrides the M208 limit.
H3 in particular moves until it hits an endstop, and will move even if not "homed". Capture the position when it stops.
H3 also has the side effect of resetting the axis limit, so be sure and reset it.
-
So the tool (nozzle) touches the glass to click the switch? Given that we want the tool to be hot (this does change Z), will there be a problem with plastic on the glass?
-
No the glass just keep the camera clean. Above there will be a small metal platform which presses the Microswitch.
I think to do it with G1 H3 isn't a good idea. I will try to test the tool probe command M585.
UPDATE:
I found this command: G38.2 to G38.5: Straight ProbeThis sounds interesting but is described very detailed.
-
G38 series, at the moment, can only work with a Z axis endstop, or Z axis probe. I'm not a million percent clear where your station goes... but... I suspect that your Z axis will still need a switch separate from the station's probe.
Multi probe support looks like it is coming soon (the K parameter on the probe definition) but it is certainly not there yet.
You COULD re-define the endstop/probe while using the station, and define it back to Z when finished with the station. Having done this in the past, anything that causes the "define back to z" to be skipped will lead to a physical Z crash at the next home.
That's why I chose G1 H3, even with its other side effects. Lesser of two evils.
-
And... if the metal platform clicks the switch, and the nozzle tip is visible to the camera, I am inferring that the nozzle TIP is not what hits the metal and switch?
If that statement is true, how does this calibrate for different length nozzles?
-
@Danal said in Tool Calibration Station E3D Toolchanger:
And... if the metal platform clicks the switch, and the nozzle tip is visible to the camera, I am inferring that the nozzle TIP is not what hits the metal and switch?
If that statement is true, how does this calibrate for different length nozzles?
So the calibration of the z axis is independent from the XY axis. You calibrate the Z Axis, the you place the nozzle above the camera und calibrate XY Offset.
Ate you sure that the G38 is not working with multiple probes? According to documentation it is working. I have to wait for my new rpi zero then I can wire everything and test the gcode
-
@smoki3 said in Tool Calibration Station E3D Toolchanger:
According to documentation it is working.
It will need a lot of experimentation. I did some when developing those macros... but... several x.x.X have passed, and the use cases are a tiny bit different.
Keep us posted!
-
So I made some process today.
I connected my probe.
It works pretty fine with G38.2. So it should be easy now to calculate the Z Offset.I also made some reliable test.
22.2.2020, 09:08:07	M409 K"move.axes[4]"
{"key":"move.axes[4]","flags":"","result":{"acceleration":400.0,"babystep":0,"drivers":["4"],"homed":true,"jerk":8.0,"letter":"V","machinePosition":27.392,"max":34.0,"min":0,"speed":1200.0,"userPosition":27.392,"visible":true,"workplaceOffsets":[0,0,0,0,0,0,0,0,0]}}

22.2.2020, 09:07:53	M409 K"move.axes[4]"
{"key":"move.axes[4]","flags":"","result":{"acceleration":400.0,"babystep":0,"drivers":["4"],"homed":true,"jerk":8.0,"letter":"V","machinePosition":27.390,"max":34.0,"min":0,"speed":1200.0,"userPosition":27.390,"visible":true,"workplaceOffsets":[0,0,0,0,0,0,0,0,0]}}

22.2.2020, 09:07:39	M409 K"move.axes[4]"
{"key":"move.axes[4]","flags":"","result":{"acceleration":400.0,"babystep":0,"drivers":["4"],"homed":true,"jerk":8.0,"letter":"V","machinePosition":27.392,"max":34.0,"min":0,"speed":1200.0,"userPosition":27.392,"visible":true,"workplaceOffsets":[0,0,0,0,0,0,0,0,0]}}
Looks like the repeatability is very good just a deviation of 0.002mm.
But I also noticed some issues:
I can not probe my titan aero on the tool changer due to the too short axis. I have the same issue on Gregs brush station. So I have to redesign the arm a bit to bring every thing more upwards.I wrote a short macro:
G1 X-29.5 Y124 F30000
G38.2 P1 V34

G10 P{state.currentTool} Z{move.axes[4].machinePosition-44.23}

G91
G1 V-2 F1000
G90
With this the tool offset is applied.
-
So next problem:
M500 doesn't save the tool offset. It there a way to save it?
-
I usually take a copy of the output from M307 and then manually edit the config override with the correct values.
-
@jay_s_uk said in Tool Calibration Station E3D Toolchanger:
I usually take a copy of the output from M307 and then manually edit the config override with the correct values.
To copy manually isnt what I understand from a automatic probe.
Anyway M307 reports just the Heating parameter and not the tool offset. These a reported with G10 Px. But I need to save it
-
@smoki3 sorry, of course it is.
I don't think tool offsets are currently supported by M500.You'd have to request it to be added by dc42 or look at writing some conditional gcode when variables are implemented in 3.02
-
The S-2 option of the G30 command at https://duet3d.dozuki.com/Wiki/Gcode?revisionid=HEAD#Section_G30_Single_Z_Probe may be what you need. If you use G30 S-2 to set the tool Z offset, then a subsequent M500 will save the offset in config-override.g. You can also save it explicitly using M500 P10.
-
@dc42 I get the tooloffset applied with meta commands easily. I just want to save it to config override.
Will try it tomorrow with M500 P10 -
What is the 44.23 constant?
Or, same question phrased another way: Is it possible to have the station calibrate itself?