IDEX BOTH ON CORE XY
-
@o_lampe Prints now working quite well - have attached link to a video containing two full prints.
-
@dwuk Seems to work already!

But around 32:00 I saw a potential improvement. Your post processor seems to print some tracks "from the far end" which adds unnessesary travel moves. A small routine that checks for shortest travel move would help here.
Other than that, I think the result will look even better with two tools. It would avoid oozing during travel moves.
Maybe add the option to do the top infill layer in one go?A bit of concern is the mesh-bed compensation: That printer seems to be aligned badly. Just for fun you could try to print without mesh leveling. It'll give you a good taste of things to come with 2+2 tools. (not being able to use mesh levelling was the major reason I disassembled my hashPrinter)
-
@o_lampe Thanks - agree that there is a lot of room for optimisation of travel moves etc. as you suggest.
I haven't even implemented any additional z hopping or retractions for long moves yet either - which should further improve the results.
Will add in option for top surface to be single threaded - and possibly bottom too - although it is hard to notice the gaps on the bottom.
Will look into the mesh levelling. I usually only enable bed levelling very occasionally - and didn't for those test prints - so will do a rerun with levelling on.
Will see if it makes a difference when I do the next tests.
Will also do side by side tests with portioned and non partitioned prints too - Maybe in a colour where it is easier to see the detail.
Re mesh levelling for 2/4 tools - I would like to find a way for auto levelling and alignment to work - especially once I have given the ability for each of the heads to be independently lifted for Z hopping etc.
-
Probably an idea too far -
Would really like to print the occasional object around 600m long - but don't really want a massive printer - so a 350mm bed probably a good compromise..
Did think about extending the whole frame - but had another idea - occasional moving bed - most printing would be done with the CoreXY 350x350 non moving bed (with up to 4 print heads in parallel) - but up to three times a layer the whole bed could be moved back or forward in 115mm steps.
This could combine quite nicely with the parallel printing capability - as 6 x 115mm segments would cover the whole double bed length - and would mean there is no risk of head clashes.
Could potentially combine quite nicely with some sort of auto eject system too if the two build plates were kept separate.
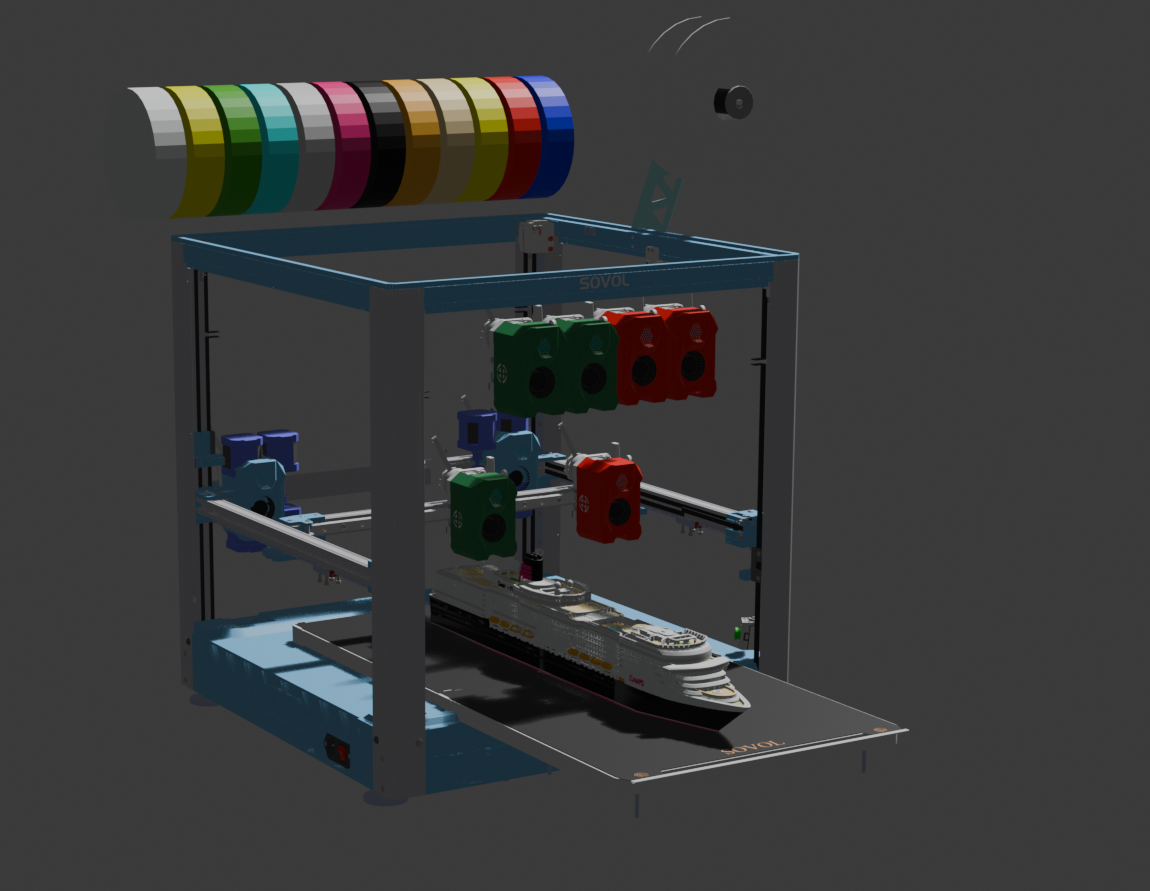
The whole system will likely then have 3 levels of colour change:
- Fast change for 2-4 colours - using double gantry IDEX
- Efficient change - using 4 more tool changer heads - possibly with different nozzle sizes too.
- tool changer could also be used to offload one of the front IDEX heads - for really fast single head printing.
- Slow change - using a AMS/MMY multiplexer with 16+ less frequently used colours
-
@dwuk said in IDEX BOTH ON CORE XY:
I usually only enable bed levelling very occasionally - and didn't for those test prints
The camera gave a different impression? I could clearly see the edge of the bed moving up/down. But maybe it's the cameramount moving....
-
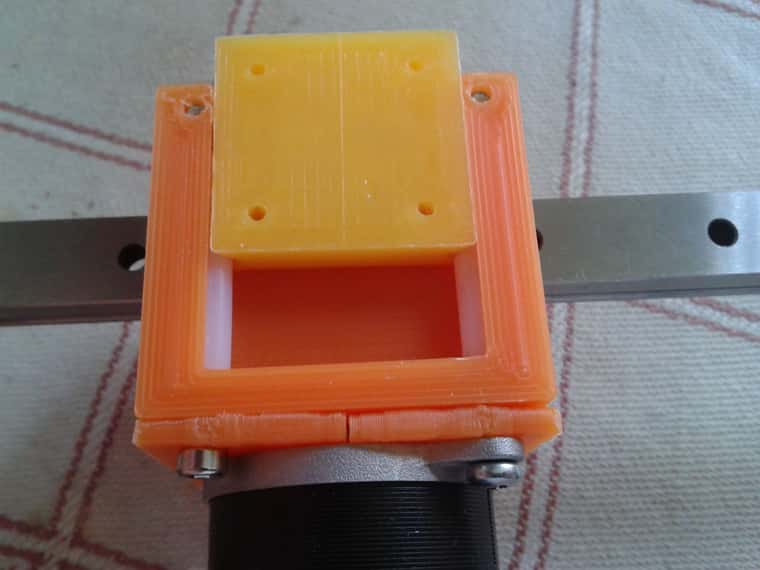
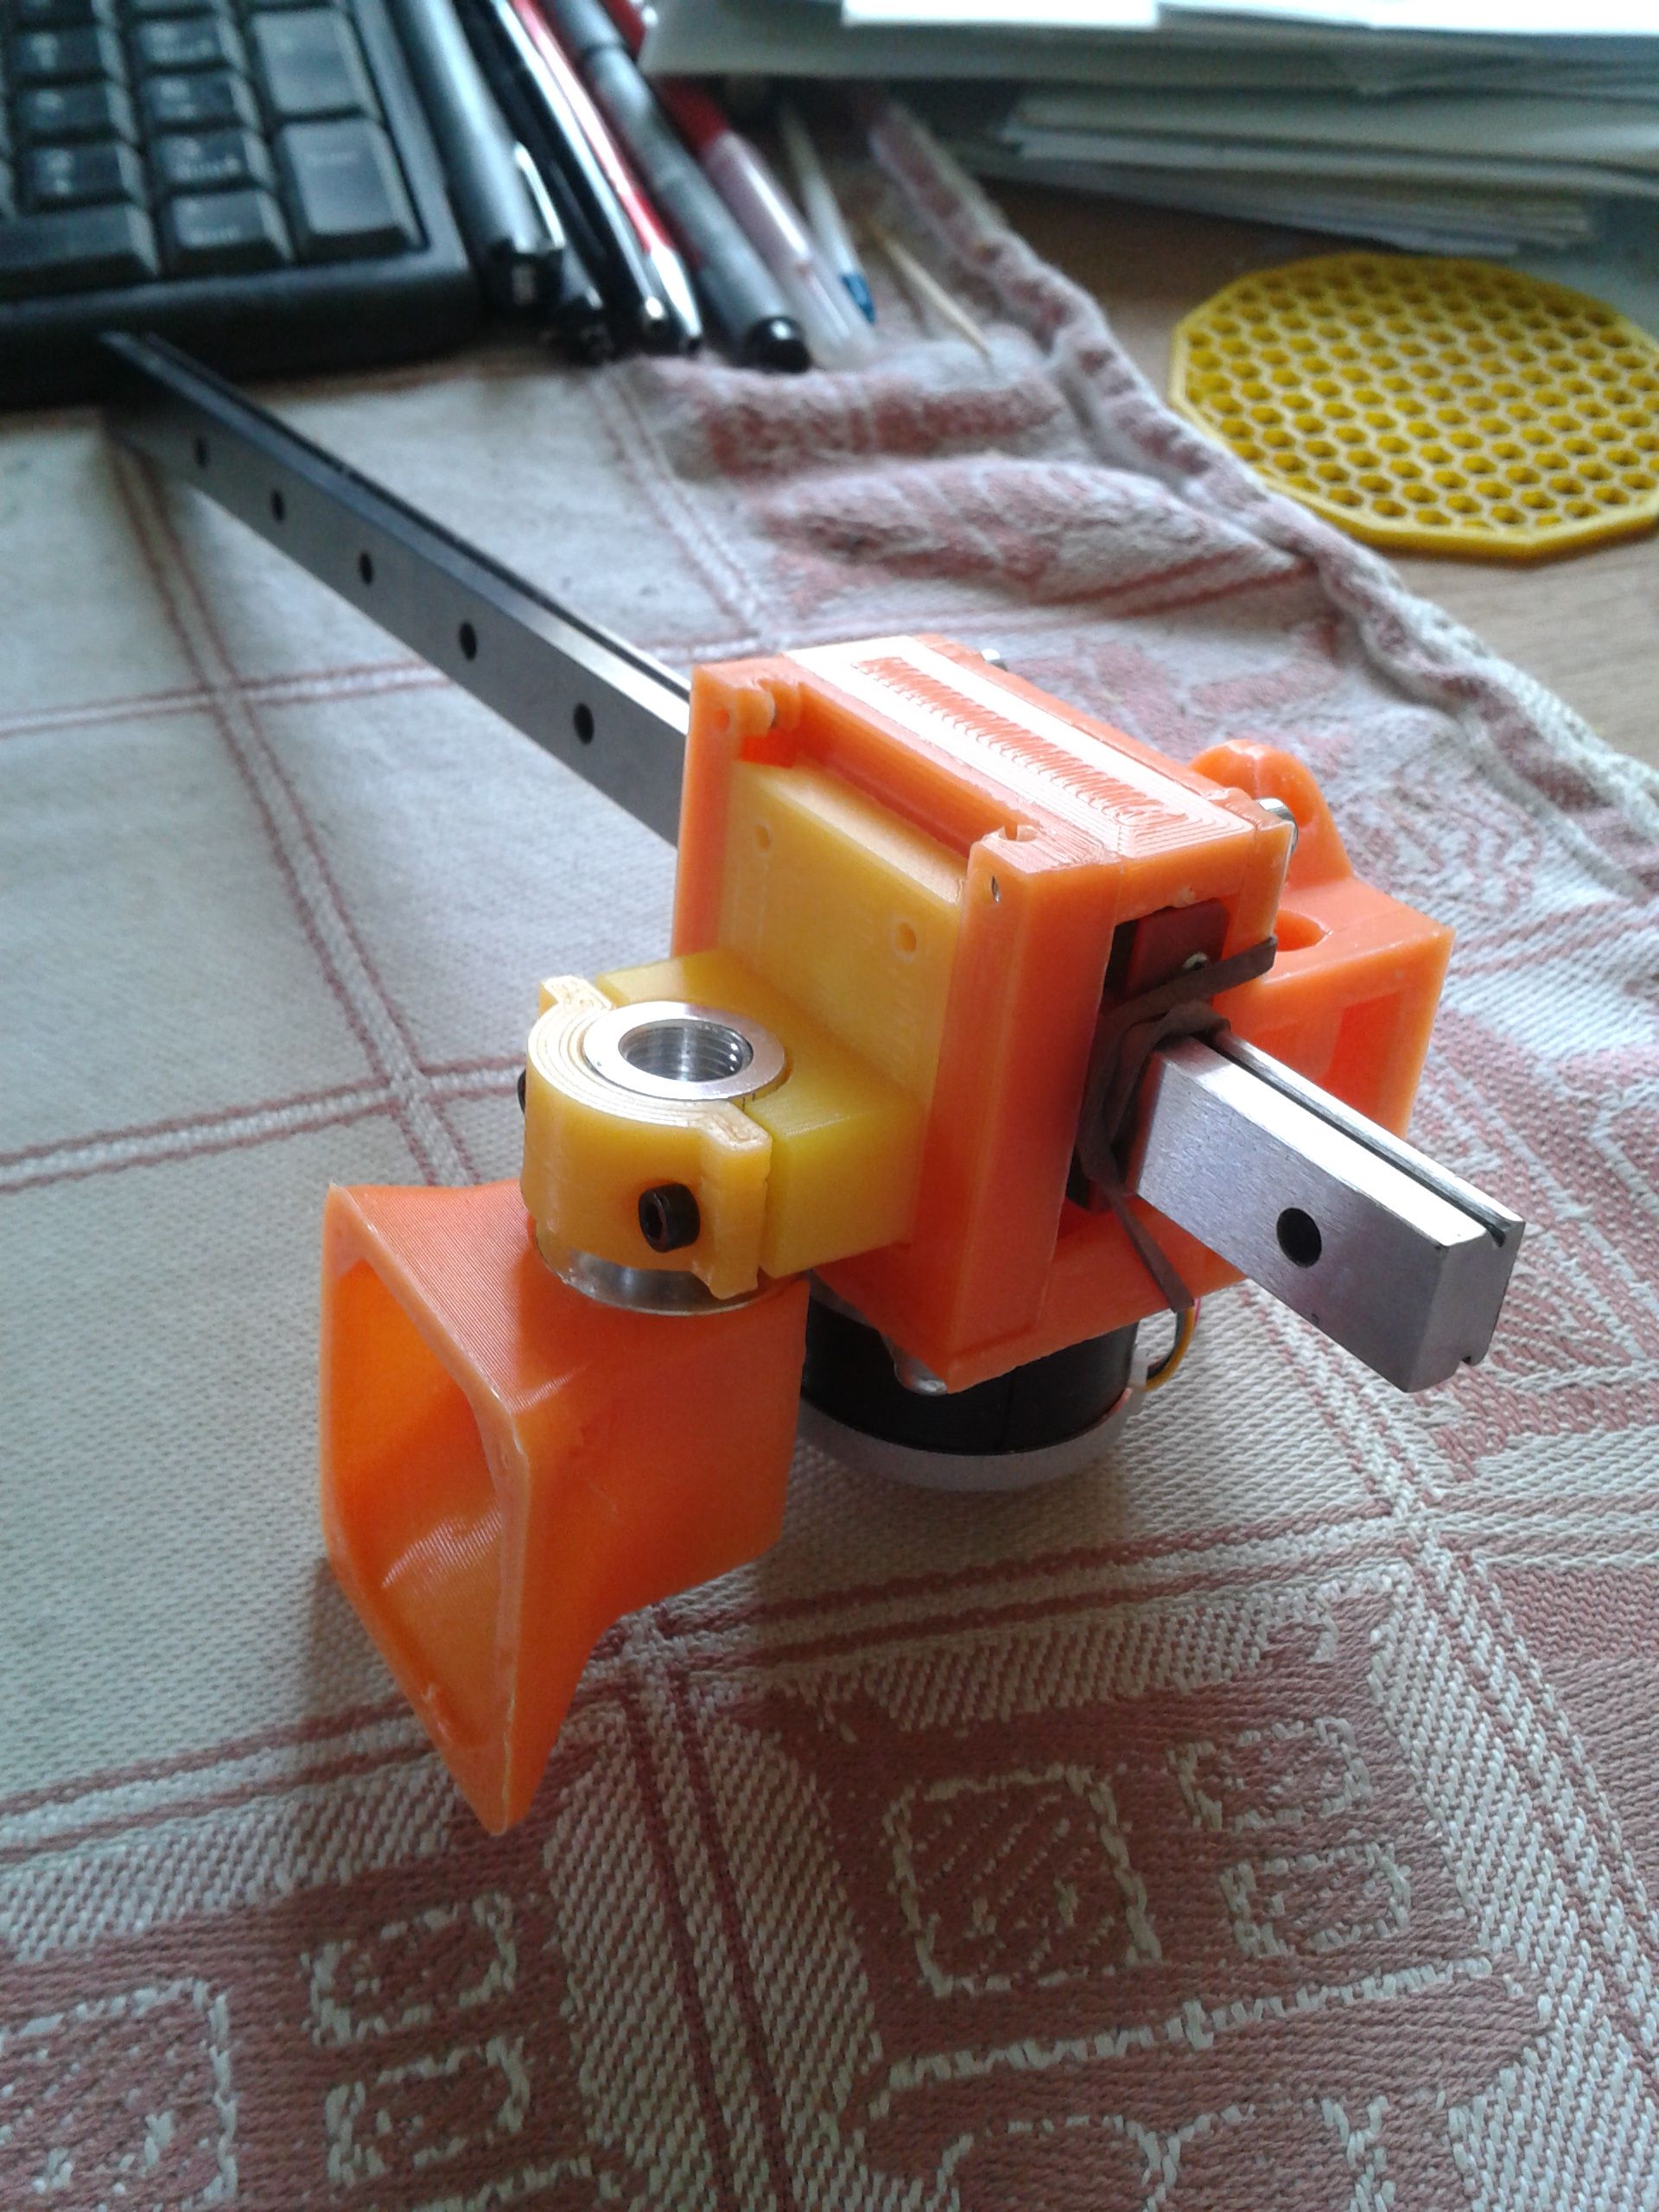
@dwuk Regarding Z-hop: I made a dovetail(ish) hotend mount for a different project and it was meant to adjust z-height for each toolhead individually. A motorized version with a small geared N20 motor was in the making, but the FW didn't have means to poll the heightmap for dual head printing (2021). Also driving dc motors with encoder was experimental, now it would be much easier with the step/dir interface of simpleFOC.
-
@o_lampe Interesting. When I say I don't run bed levelling - I mean't I don't enable the re-mesh - (where it goes and does lots of bed probing every time).
I think in that case what the Bambu Lab printers do is just a small number of taps to check that the mesh seems roughly the same. If it is they just use the stored mesh.
If the taps show a big difference then I think they do then re-mesh anyway.
It might be possible I guess to completely turn off the use of a mesh - via changing the start gcode.
-
@dwuk There are two different methods:
G32 = calibrating the bed tilt, by probing next to the leadscrews
G29 = using a probing grid or continuous probing to create a mesh -
@o_lampe Interesting - will have to do something like that.
I got the idea to enable Z Hopping and therefore the ability to more independently print on the second gantry from @8MEKAN8 commenting on this video
https://youtu.be/WbJ0lNdXzsI?si=LUPyYutux6sHN9HcIt looks like the Voron Tap might be a possible solution - although it might not be accurate enough to take into account mesh adjustments if it just uses a servo.
The other idea I had was to completely double up the flying Z gantry - with one on top of the other - with its own 4x Z axis motors - with the extruders on the top gantry being longer - so that they can fit through.
In the first instance I am going to try adding a 2nd gantry to the basic printer - probably without any Z hopping - so it will only be able to mirror or duplicate the first gantry - and just try out how much the extra weight affects performance and speed.
Then if it works ok will add the Z hopping to one of the extruders - so that I can try some parallel printing.
-
@o_lampe There are five few different G29's in the start GCODE - with what looks like some sort of conditional logic that is done by the printer -(rather than the slicer) using M1002's -
-
@dwuk said in IDEX BOTH ON CORE XY:
It looks like the Voron Tap might be a possible solution - although it might not be accurate enough to take into account mesh adjustments if it just uses a servo.
Yes, a servo wouldn't be the best option for mesh levelling. But there is another problem: You'd have to calculate the z-adjustment of the "mini-z axis" based on the current XY position of the other tool (which uses the classic mesh leveling) or have a mini-z axis on every tool.
Unfortunately RRF allows only one z-plane and it doesn't provide "realtime" XY coordinates.
You could direct the real z-motion to the main steppers (during layer change, homing etc.) and redirect the z-adjustments to the mini-z axes.
Your post processor can easily detect, which is which:
If there's no E(xtrusion) value in the gcode line it's a real z-move
If you see a retraction/unretraction gcode with z-hop or a gcode line with extrusion, it's a mini-z thing. -
@o_lampe agreed - will certainly try and pursue accurate independent Z adjustments for each print head. Both for z hopping and will also add mesh adjustment.
Whilst ideally done by the firmware I guess it should be possible to take in for example 49 mesh probing adjustment points and apply them to the gcode for each print head - if necessary splitting long extrusion moves into smaller chunks if they span a bad area of the mesh.
Auto mesh adjustments in the firmware would need to be turned off.
Should be possible to test this out on my single headed printer.
I presume the mesh adjusting would need to reduce as the height increases.
-
@dwuk Better version of my Sovol SV08 video - with a surprise 'revolutionary' mode at the end.
IDEX Part 14 - SOVOL SV08 Upgrade ideas
-
Updated post - after better understanding.
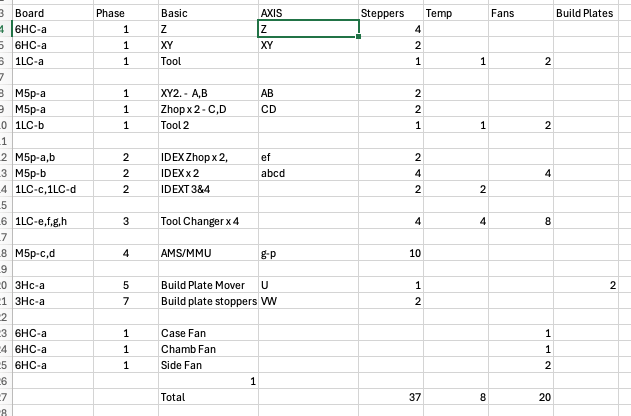
Have started to spec up the electrics I am going to need for my proposed system - and the numbers of steppers is getting rather high.
Looking at Duet Hardware it looks like I need a separate driver board for each extruder - presumably a 1LC - at about £43.50 each. - Will need 8 of those in the end - but only 4 initially.
Then the AXIS drivers, plus extra Gantry etc - it looks like I am going to need a controlling £225 - 6HC board for the first 6 motors - with £112 Mini 5's for each set of 5 further motors. With finally I might be able to get away with a 3HC for the last 3 motors in phase 5.
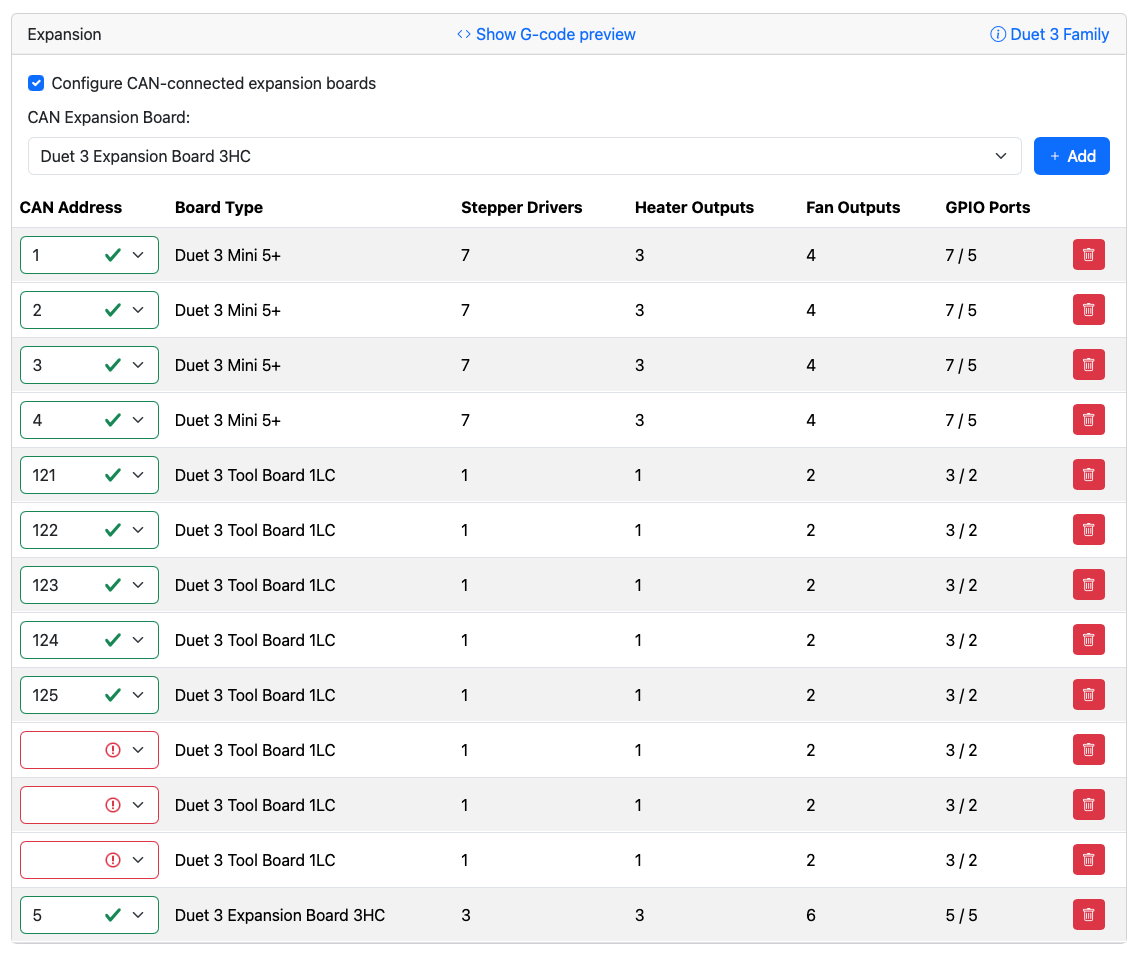
Is that correct - can I have for example a 6HC controlling 4 x Mini5 boards + a 3HC in the same system collaborating with each other?
Illustration here - with the -a,-b etc. suffixes are extra board instances required.
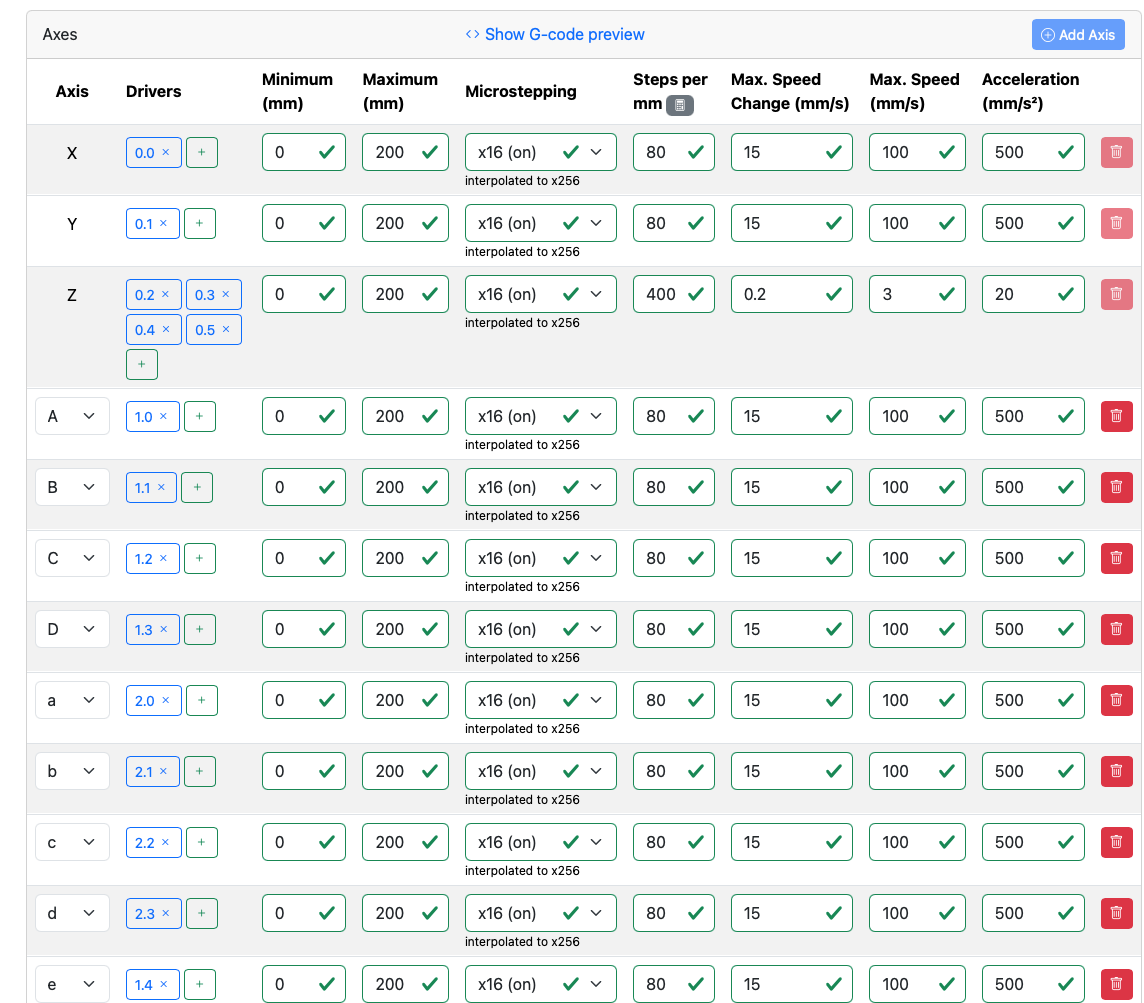
Have tried putting some of it into the system config tool - but am hitting some limits.


-
@dwuk Seems you've reached the end of the Duet3 galaxy...
AFAIK there is no toolchanging system which keeps the extruder motor and only replaces the extruder.
Although you can use a MMU like enraged rabbit.My hashprinter was happy with 11 stepper drivers on a Duet2 (5+2) with DUEX5.
But Duet2 isn't ready for dual g-code streams. Maybe a post processor can make it happen, if it puts all moves in one file. -
@o_lampe hopefully Im not at the limits. It looks like a 6hc supports 16 extruders. The Mini5+ only supports 5 - so im hoping that it is what is affecting the configurator.
I may have to not use tool boards for some of the ectuders if that is what is causing the issue. They are quite expensive too.
I think I can get 7 steppers per mini5 too which will help.
Agree though that a tool changer which just switches the nozzle/hot end rather than the whole motor/extruder is attractive in terms of efficiency of parts as well as saving on stepper driver requirements.
Watched an interesting video recently by 'engineers grow' suggesting a way where this might be possible, or you can always cut the filament - and then swap the hot end like the swapper3d.
Re achieving multiple gantries on a non duet 6hc - I certainly think it is going to be possible (but maybe not as efficientky) by gcode post processing and combining both gantry moves into single g0/g1s for example. Or just using two independent controller boards which are controlled and synced externally.
SV08 arrived yesterday and working well.
Next stage now is to swap its normal single extruder operation over to a Duet3 6hc/while I am working on the design of the 2nd gantry,
Not sure whether to use a 1lc or Mini5+ to drive the extruder.Probably best to use a mini5+ as 13 steppers is enough to get both gantries and 2 extruders fully working.
Whilst 1lc's are attractive in terms of wiring I think the need for z hopper stepper drivers makes them less useful.
-
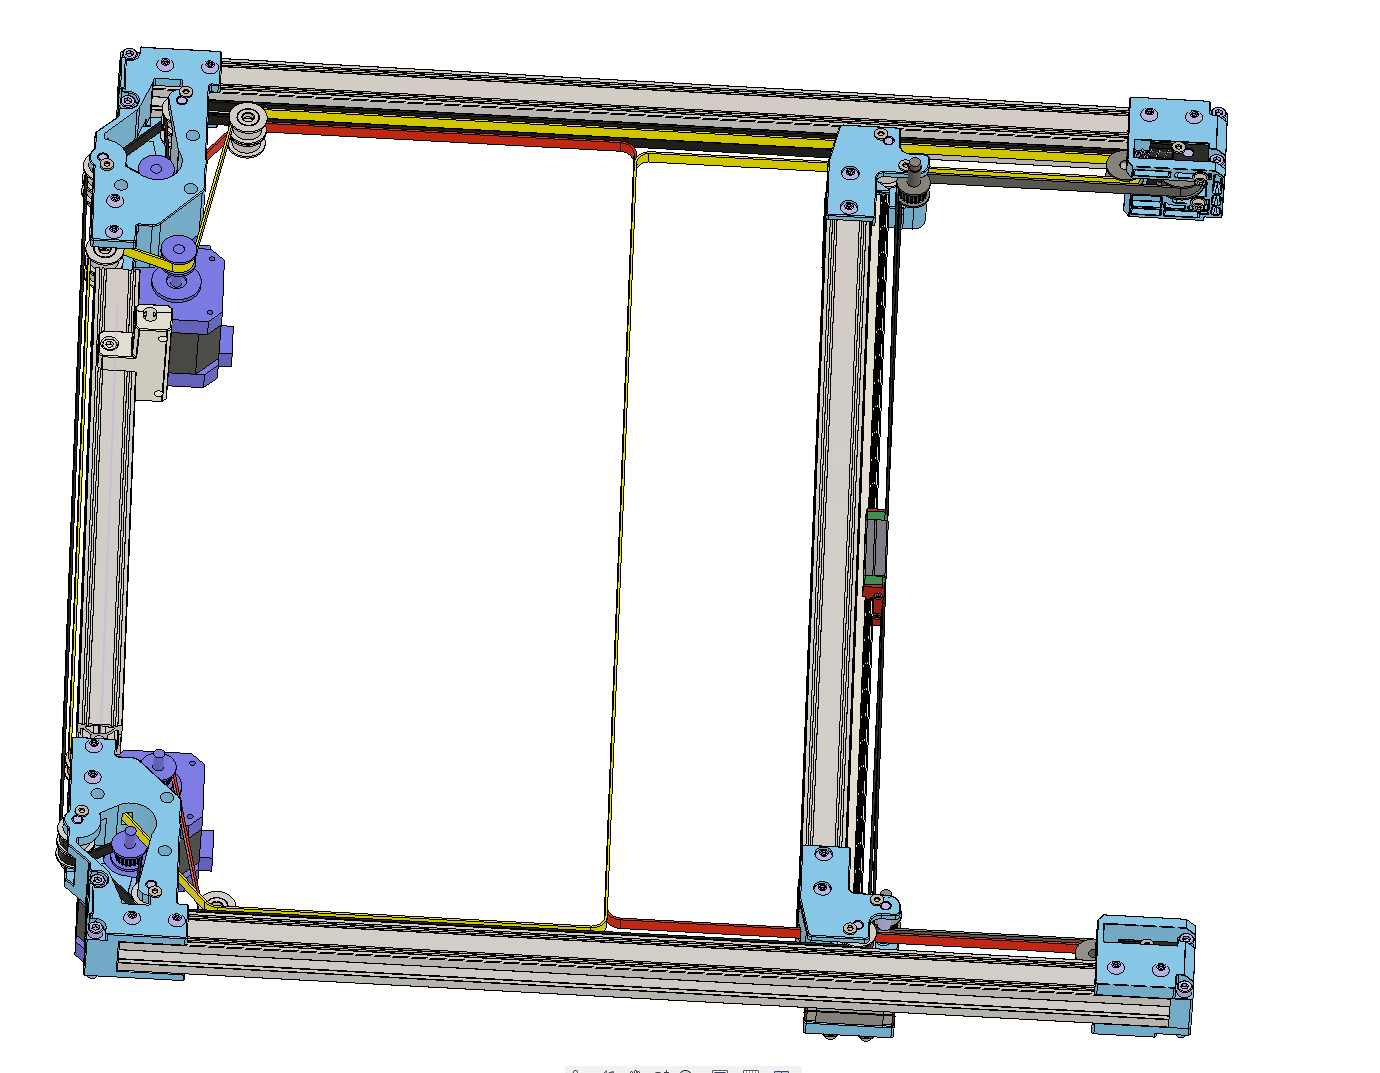
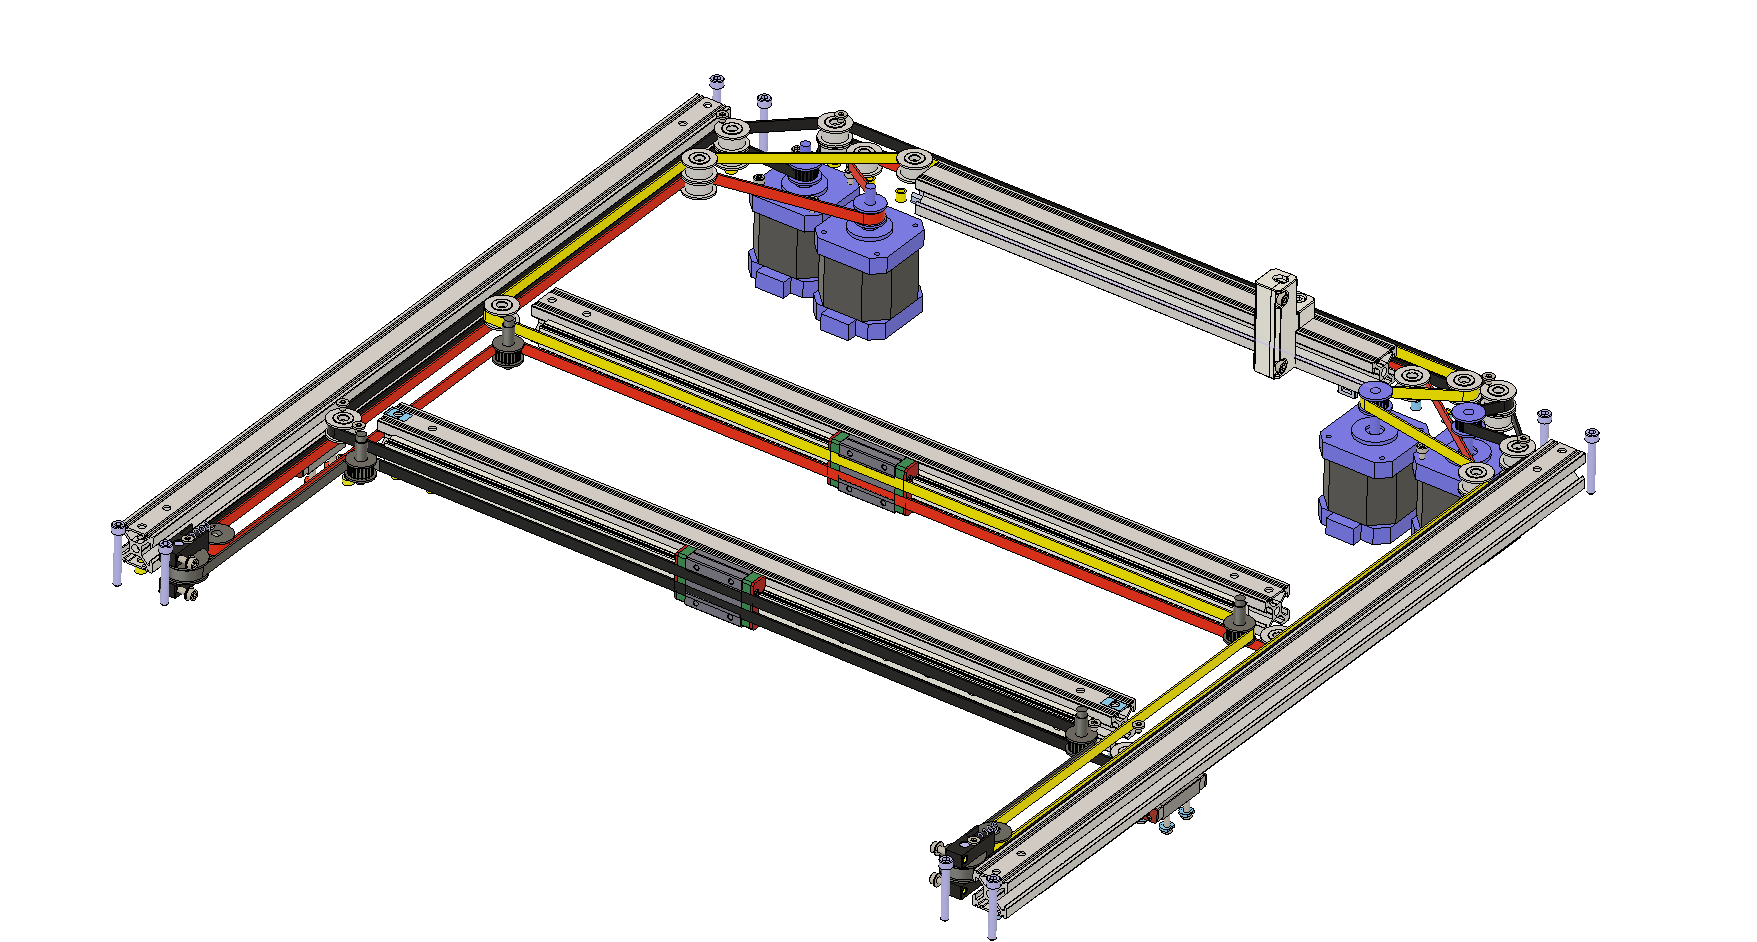
First attempt at redesign of flying gantry to accommodate 2nd Y gantry
2nd Gantry would go at the back, with belts running 2.5mm inside the existing belts.
Would need to change the front idlers from 13mm to 18mm (if I can source some) - and shift a few of the pulleys inwards for the existing gantry.
Would lose a small amount of the build area.
New belts are in Red and Yellow
New drive motors inside the existing ones.
 ![Screenshot 2025-01-08 at 12.03.58.png]
Updated with more detail and better routing around steppers
-
@dwuk said in IDEX BOTH ON CORE XY:
SV08 arrived yesterday and working well.
Next stage now is to swap its normal single extruder operation over to a Duet3 6hc
Maybe now is the right time to start your own build thread? There you can reference your first entry from this thread, for people who want to read the whole prequel
-
@o_lampe Good suggestion - I was wondering if it would be better to be on a separate post.
I was expecting to get some feedback on Duet Board choices - but maybe it is too buried down in the detail - so will create a new post or two - with some specific questions about board choices.
I did think I would try starting one of the Sovol community group too - but it hasn't got much response yet
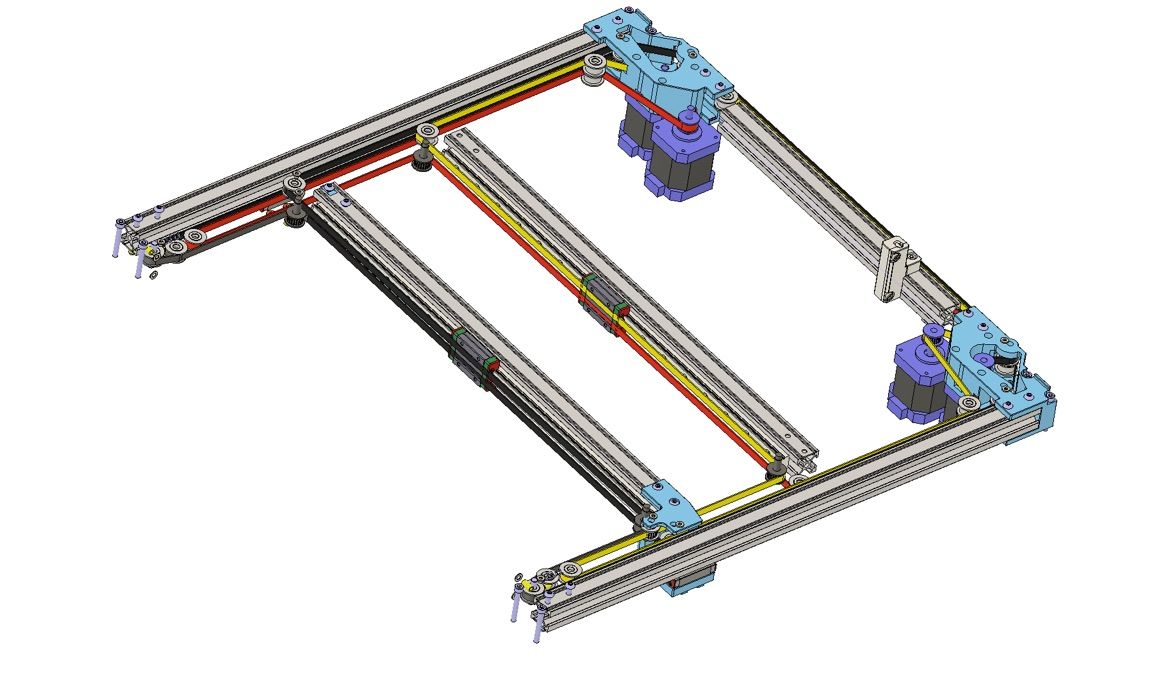
https://forum.sovol3d.com/t/sv08-double-gantry-parallel-printing-idex-project/6504/2?u=ukdavewoodPS/. Couldn't find any easy source of 18mm idler pulleys - so made a further redesign at the front to remove the need.
Have ordered basic parts that I won't be able to salvage from the two IDEX printers I have hardly turned on since I got my BambuLab X1Cs.Next stage of the design is the Z hoppers.
-
@o_lampe Separate thread now created - over here
https://forum.duet3d.com/post/349140Would be interested in your thoughts on how do to the Z hoppers.