Help for heated printing table
-
You pretty well need to apply the heater to the aluminum plate in order to get good heat transfer. You might get away with using (like you are) a backing plate and some heat conducting material but I would think that would likely not be a workable solution (but I never tried it). Based on the height map I am thinking that the issue isn't the fact that the heater was glued on but that you build plate is just too thin.
How does the BuildTak printing surface attach to the build plate? Is it glued on and is there a possibility that you have an air bubble between it and the aluminum plate or could it be that the adhesive of the BuildTak (if used) has failed and the sheet has started to curl up at the edges? I have a build surface that has a thick surface of PEI attached to it and if I go above about 100C on the build plate the PEI starts curling up on the edges because the glue looses adhesion.
In my case, the PEI is applied to a glass plate that sits on top of the aluminum bed.
If the distortion is the bed rather than the BuildTak then your obvious solution is to replace the aluminum build plate.
I just brought in a steel flex plate system for a 300x300 printer and my intention is to apply the magnetic surface to a glass plate rather than to the aluminum because some things (afaik) just don't play nice with some print surfaces and if the print surface is applied to a glass plate I can easily change the print surface.
I have been using straight glass up to this point so take the above with several grains of salt. -
@bernardomattiucci The plate acts as a heatsink for the heater. If you don't attach it well at every point - i.e. no big air bubbles - the heater is liable to burn up.
I agree with @droftarts on using thick tooling plate. It is rigid, flat, and distributes heat well. The extra thermal mass will take longer to heat and cool, but you won't have to worry about Z artifacts due to rapid bed temperature changes. Use PID, not bang-bang, to control the bed temperature.
The heater should be the same size as the plate if possible. If you use a small heater, the cooler edges of the plate won't expand as much as the hotter center and the bed may bow unacceptably when heated.
Mount the heater on the plate using high temperature silicone so it won't detach after repeated heating and cooling. Mount a thermal cutoff on the heater (not the plate) to protect against fire if the if the adhesive lets go and the heater falls away from the plate.
A bed that large will expand about 1 mm when heated from room temp to 100C. Using a kinematic mount will allow the bed to expand without forcing it, or the support structure, to flex.
X axis sag will look like the bed has a hump on the mesh map. Make sure the X axis is rigid over its span.
-
Good morning
So, I have made some verifications and in the first instance the cause of these deformations can be attributed to the aluminum plate which is only 4 mm thick. A greater thickness, perhaps 8 or 10, would prevent such deformations.
That said...to replace it I would have to detach the Buildtak, which is already ruined, as well as the 1200 W 220v silicone heater.So the solutions, also to improve its usability, are essentially 2:
-
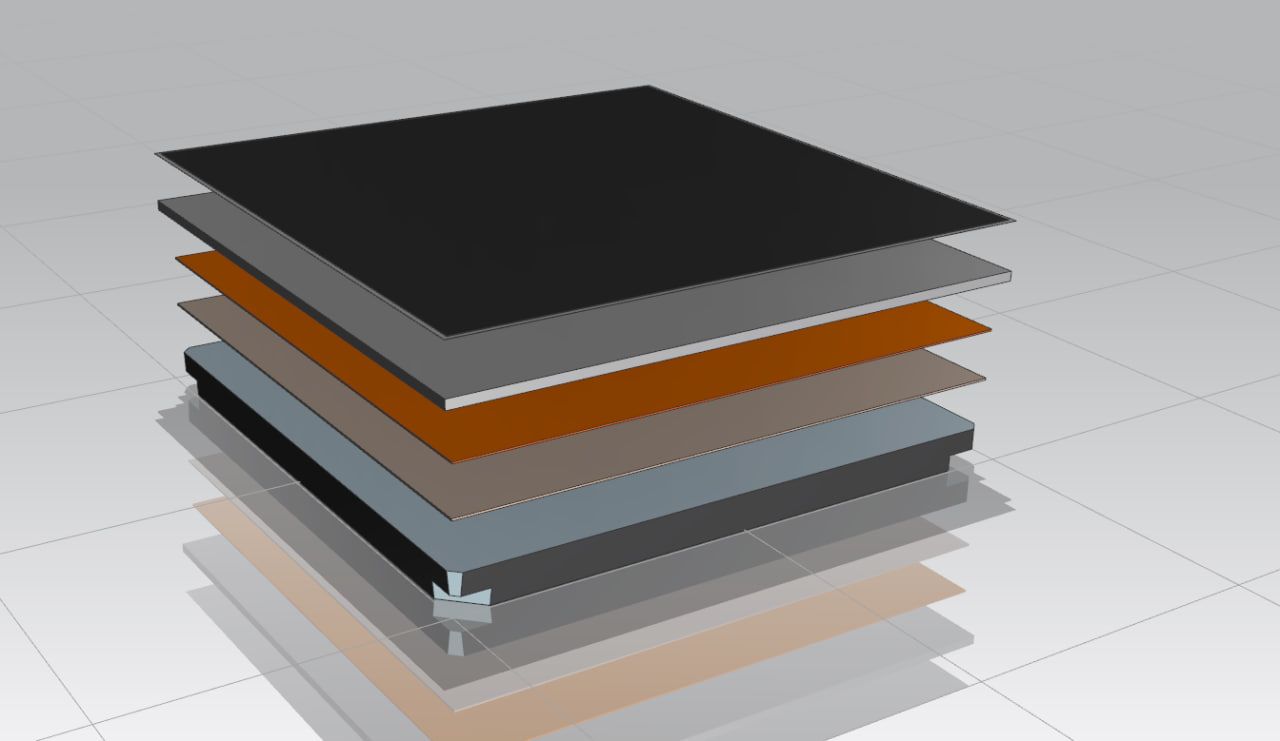
single plate

From bottom to top...: support base, MICA thermoelectric insulation, heating pad, aluminum plate, 0.2 mm thick stainless steel sheet with the Buildtak that can be easily replaced with a similar sheet with PEI mat. -
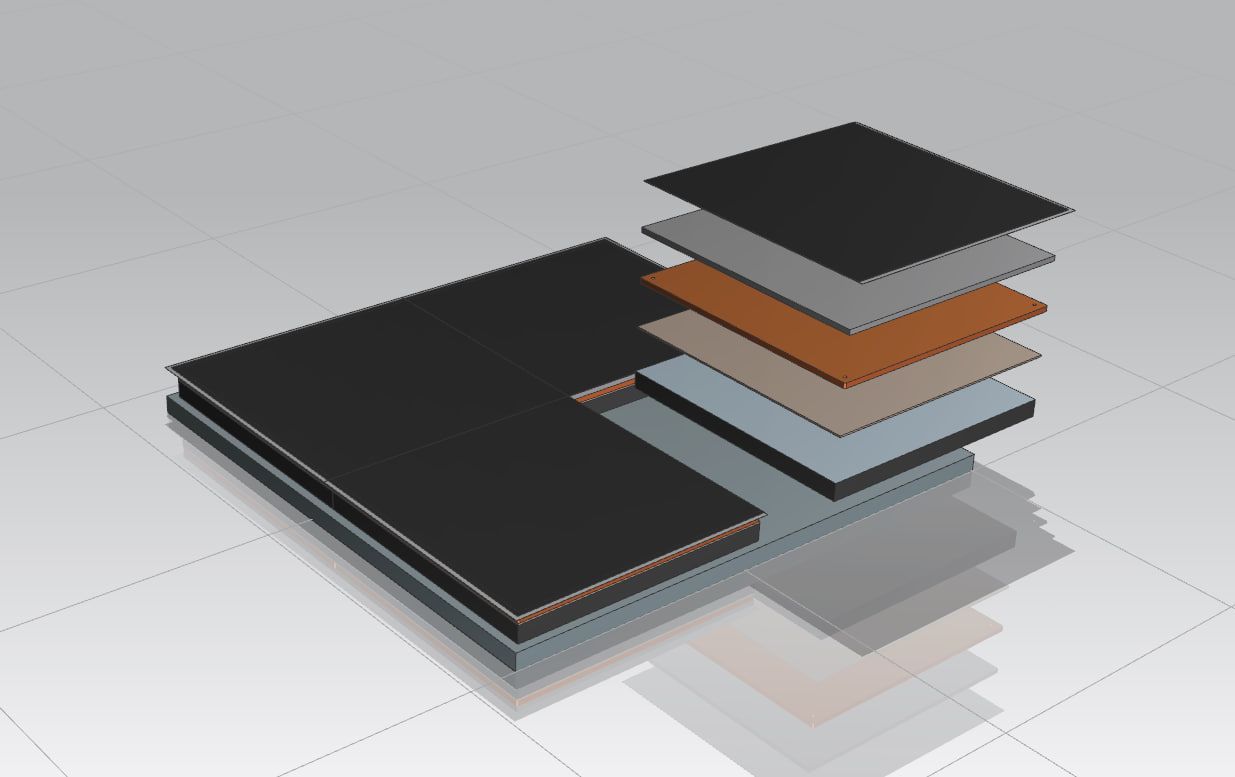
Modular plate consisting of 4 equal parts

From bottom to top...: support base, single module support base, insulator, heating PCB, aluminum plate, 0.2 mm thick stainless steel sheet with the Buildtak that can be easily replaced with a similar sheet with PEI mat. With this second solution, only 1, 2 or all 4 modules can also be heated, replacing the steel printing plate with the printing mat as needed (300x300, 600x300, 600x600mm)
In the former case the heater would be controlled as now, that is, by relay with 24volt coil. In the second case some other possibility could be considered, but I do not know which one.
On the Duet2 I currently use the output for the Heated Bed to control the 220v relay coil.
However, there are the 5 heater outputs on the Duex5 with the corresponding inputs for the Thermistors.This could be controlled through the Duex. What do you think? What do you recommend?
-
-
@bernardomattiucci, you go from aluminum build plate to the 0.2mm sheet with BuildTak. How does the steel sheet stay on the aluminum build plate?
If you have magnets embedded in the aluminum plate, is the stainless steel sheet magnetic? Usually those metal sheets are spring steel which is magnetic. Stainless may or may not be magnetic depending on the alloy used.
Re the heated PCB - I have only seen low power (and smaller) versions. I am surprised that you found a full 600*600 1200W PCB version ...... -

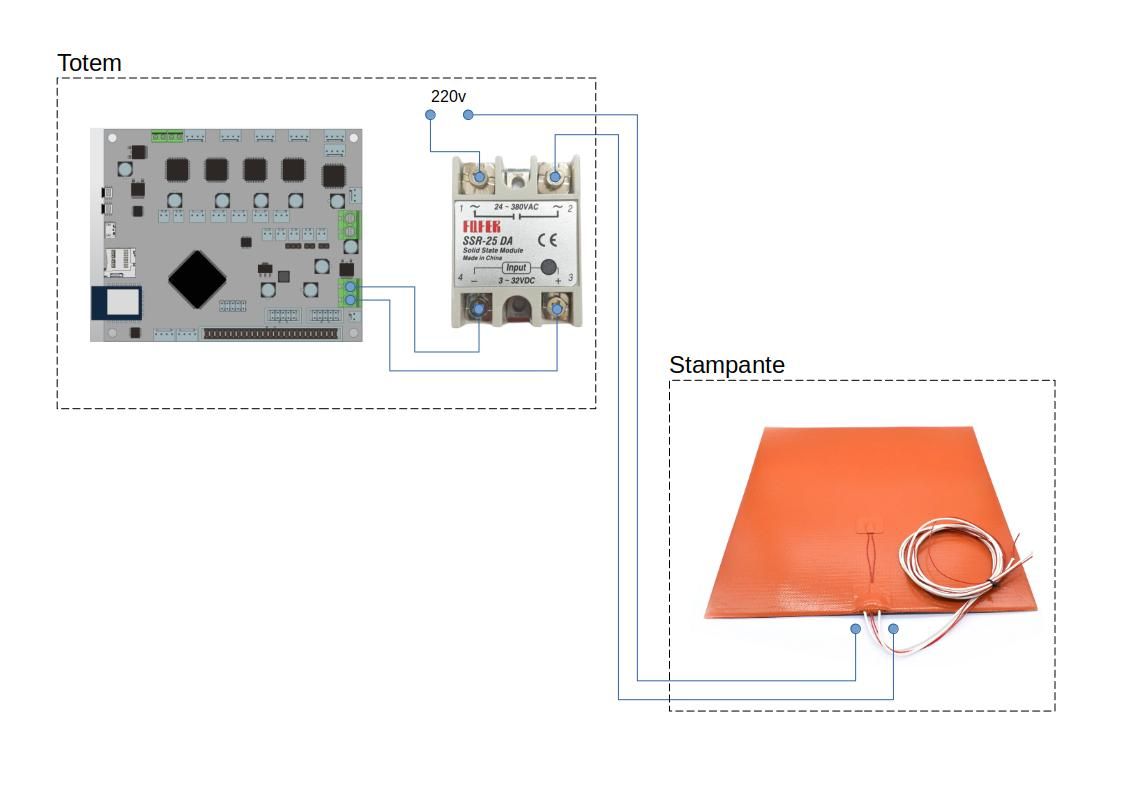
This is my current connection scheme.
Having the electronics mounted in an external and separate totem from the printer body, and using a 220v 1200w silicon pad, I mounted an SSR in the totem and connected everything as shown in the schematic.
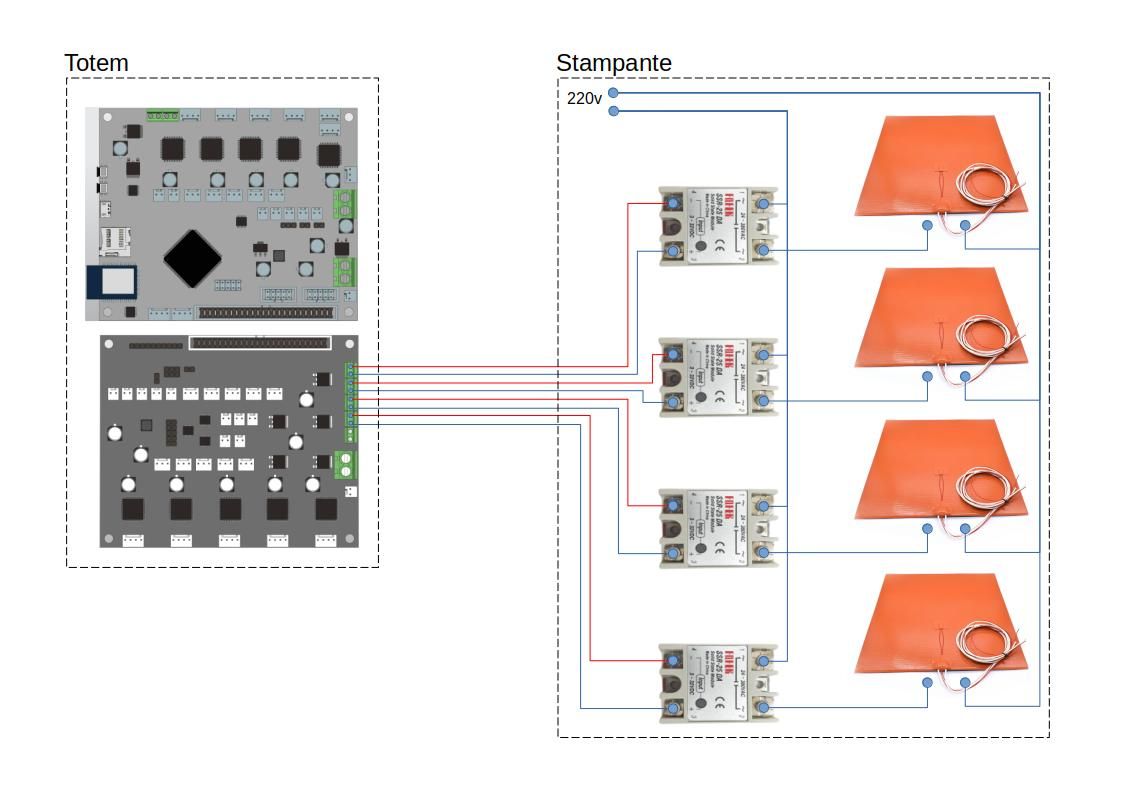
Instead, this is the pattern I would go to use.
Each silicone pad would have 300w, which at 24 volts would be 12.5A, more than double what the printer can handle. It is likely that 300W would also be too much, considering that the aluminum pad, being smaller in size, could have a reduced thickness compared to 10 mm, but even assuming 200W, the draw would still be excessive. Going down to only 120-140W (max 6A@24v) might take too long.
With this solution, I would take advantage of the existing 220 connection cable to power the 4 SSRs. -
I actually meant spring steel -- not stainless, I was wrong.
the current heater is a silicon pad 220v 1200w with dimensions 600x600mm, it was not easy to find it 2 years ago, but I made it.
What I don't like is not being able to replace each component quickly and easily.
I was thinking of a PCB but I would have to have it custom made.
With 4 silicone pads of commercial ones, attached under the relevant aluminum plates of about 300x300 mm (what thickness though?), I could solve it, mounting the steel plate on top. To keep it in place, I could insert 2 mm wide magnets along the outer perimeter and between the 4 aluminum plates. -
@bernardomattiucci, a lot of suppliers do custom sizes for silicon heaters but I think I have seen off the rack 600600 heaters. No way would I go with a pcb low voltage heater for that size of a bed and having 4 separate heaters seems to be unnecessarily complex. Not only is it complex but you can't even save on electricity by powering only the heaters that are needed as the build plate distortion would likely cause you issues. With 4 separate 300300 build plates you could leave a bit of expansion room but again, the complexity might not be worth it.
I would also like to point out that 1200W is a bit on the low side for that size of a bed (especially if the printer is not enclosed). I would try to find something around 1700W (and if possible even larger) but you have to keep in mind what kind of AC power you have available. Here in Canada, a standard 115V outlet maxes out at 1800W so you would need either a 20A circuit or two separate 15A circuits with one for the heater and one for the printer electronics and nozzle heaters.
Be careful about individual magnets. If they are not spaced close enough you might get the print adhering perfectly to your BuildTak but the steel plate being lifted up by the cooling print. I would look into a continuous magnetic sheet instead of individual magnets. If I understand you correctly, you are saying that there would be no magnets inside a 300*300 area and I can't see that working.
-
with the modular solution based on 4 separate heating modules, I would have several interchangeable printing surfaces, one of 300x300mm, one of 600x300mm and one of 600x600mm, to be replaced as needed.
I live in Italy, with 220v voltage and 16A outlets, so I have no problem.
1200W with the 4mm aluminum top is enough and it takes about 3 minutes to go from about 16 to 60°C.
With a single 10mm aluminum plane it surely becomes a few--or would take longer anyway.
I don't know what would be the best solution!
-
@bernardomattiucci This site will give an accurate estimate of heat-up time based on plate size and heater power: https://jscalc.io/calc/uS8JYjYISgIvzJ1x
While it seems wasteful to power the whole bed even for small prints, keep in mind that the bed runs at full power only until it heats up and then it starts turning on and off to maintain the set temperature. While it might run at 1200W for 10 minutes or so to get to print temperature, it probably only requires a few hundred watts to maintain that temperature. Slicers normally put prints at the center of the bed because it's the most evenly heated part of the bed where you can count on relative flatness and good print adhesion.
As @jens55 pointed out, if you heat a small part of the bed, the whole thing is going to warp. Make sure the bed is at print temperature before you probe and run mesh compensation.
-
this is my idea:

this is my idea
I take an 8mm 6061-T6 aluminum sheet and apply the silicone heater under it.
On this slab I lay the 4mm one with the Buildtak mat on it.Theoretically it should work. What do you guys say?
-
@bernardomattiucci Is that 8mm plate cast tooling plate? Regular aluminum sheet is rolled/extruded and will not be flat like cast plate. What will hold the 4mm sheet on the 8mm plate?
Is the 4mm sheet aluminum or steel? If you're thinking of flexing the 4mm sheet to release prints, you may have problems if it is aluminum- the first time you try to flex it, it may just stay bent. 4mm steel may be too thick to flex much.
I use an 8mm cast tooling plate bed on a kinematic mount with a 750W heater and 0.7mm PEI sheet glued to it. ABS, PLA, TPU, and PETG (haven't tried anything else) stick. I release prints (usually) after the plate has cooled using a sharp scraper and a few drops of IPA dropped along the edge of the print. I've been using the same PEI sheet for about 6 years, regluing it every few years. When I did the most recent reglue I sealed the edges with silicone which may prevent having to reglue it again.
-
I will update you
I removed the silicone heater and did some testing by simply resting the 4mm aluminum panel on the heater--more or less free to expand. The problem persists, although the printing surface struggles quite a bit to heat up--perhaps the air remaining between the silicone pad and the bottom surface of the aluminum does not allow sufficient heat transfer.
Then I removed the Buildtak surface and did some more testing....
Apparently this is the cause of the huge deformation that I encountered above. The Buildtak should not be applied directly to the aluminum panel because it tends to act as a "heat insulator" and thus cause the plane to warp.As soon as I find a way to re-glue the silicone pad under the aluminum, I will do more tests and put back the 4 mm glass I had previously.
I will let you know.
In the meantime, the 1200w, 220v, 600x600 mm silicone heater, identical to the one I have, I can no longer find!
Do you have any useful links to well-stocked online stores? -
@bernardomattiucci Here's a company that makes good quality heaters- they sell via ebay, amazon, ali-express, etc.: https://www.keenovo.com/ They supply heaters with and without adhesive sheets. Get one without adhesive and use silicone to mount the heater on the plate.
Build-tak probably expands more than the aluminum when heated, and if the aluminum is thin it might cause it to bow if the build-tak is glued to the aluminum. A thicker aluminum plate would be less likely to have that problem. How are you attaching the 4mm plate to the thicker plate? Large prints stuck to the build-tak will shrink, even during printing, and may pull up the edges and corners of the 4mm sheet.
I would be very careful about operating the heater without it being pressed/glued into intimate contact with the aluminum plate. Any air between the heater and the aluminum may cause dangerously high temperatures to occur and burn up the heater.
-
The support base (tile), rests on a support structure. On it is glued a layer of Mica. Then, simply resting on top of each other, are the heater with the aluminum plate, and on top I will mount a 4 mm glass plate with Buildtak.
The silicone pad at the moment I set it on the plate with the thermal paste that is used for processors, hoping it will do the trick. I don't have silicone at the moment.I've seen the kenovo before, but they don't have the size I need. I will have to contact them directly.
Centering of the aluminum plate and glass is done by 4 plastic angles tightened together with a steel cable equipped with a spring. Nothing fancy. The plate does not move anyway-in my case it is fixed.
Anyway, thank you.
I will update in the next few days.