Vivedino Troodon rebuild
-
also what happened to formbot that they are selling those boards off for $10? -
@t3p3tony that's just a driver. The boards are $80
-
@t3p3tony
Thanks for the help! I will get some boards and bits and pieces ordered up!
My mistake about the board - thought that was really cheap : ) -
@mikento I have a Troodon 400, I have actually rebuilt most of it with a Duet 3 6HC and a Tool Board v1.1 but clearly a Duet 3 mini 5+ and a mini 2+ expansion board would be the best.
Considering you are looking to have a custom print head, I would like to suggest looking at the Tool Board, it will simplify a lot the wiring and also opens the possibility to use the accelerometer (there are currently basic functionality implemented with RRF3.3 but more will come with 3.4).
Formbot's custom board are not working on the newer version of RRF, I think the last that worked was 3.1.
I'm not sure if the screen from the Troodon will work on a Duet 3 board, it was connected using the ribbon cable.
Can the 5v, GND, Rx and Tx be used with a 4 wire cable? -
@fred-y
Thanks very much for the info! I already chucked the extruder and print head and upgraded to RRF3.0 to enable this. Thanks for the tool board idea - I think that would be good to minimize the (heavy) wiring which is constantly moving.
I think I will order a Duet screen in case the original doesn't work.....Mike
-
@fred-y
Hello again! Just wondered - you just needed the Duet 3, and the toolboard, no other expansion boards? And a panel due?
Was there any weird wiring you came across? I think I'll go down the same route at the moment.
Best regards, Mike -
@mikento for the Troodon, you need 7 drivers:
- Z => 4
- X => 1
- Y => 1
- E => 1
If you go with the Tool Board, you need 6 provided by the board.
I have little knowledge on the Duet 3 Mini5+ (never used it) so this is based on my understanding... hopefully I'm not wrong.
You can either go with the Duet 3 Mini 5+ and a Duet 3 Expansion Mini 2+, this will provide a total of 7 (5+2) or with a Duet 3 6HC, it has 6 drivers but this board is overkill for a 3D printer.
If I had to do it again I will go with he Duet 3 Mini5+ and the Exp. board.The Mini 5+ used the same connectors as the stock board for the steppers.
If I remember correctly, the wiring was straight forward with a Mini 5+ it is probably to be plug and play, I still recommend to double-check the polarity of the different connectors.
The RGB LED strip might be a little tricky, I think each color has to go on a different output.
I replaced it I think by a WS2812B strip (it's not anymore installed).The firmware will have to be adjusted.
Regarding the Tool Board, check the documentation, you will need a 12ohm resistance
https://duet3d.dozuki.com/Wiki/Duet_3_Tool_Board#Section_CAN_connections
or use a distribution board but that's expensive compared to the cost a the resistance.If for whatever reason, you opted for the Duet 3 6HC, you will need an RJ11 cable.
-
@fred-y
Sorry for the slow reply! too busy.......
Thanks very much for the details! Just need to find time for the install now....
The LED strip I´m not bothered about anyway! -
@mikento The fun is about to start
")
You can poke me if you need a little bit of help. -
@fred-y
one more question before I take things to bits - can I run the 2 24v heaters off the mainboard and everything else on the print head off the toolbar. I am assuming(and hoping) so!! I saw the toolbar only has the possibility for 12v/5A for heaters. I have 2x 50W, 24v.
At present, I´m only running 1 print head. -
@t3p3tony
I looked closer at the details for the V1.1 toolbar today. By using the jumper to enable Vin=Vout, I assume this makes the fan and heater outputs 24v, if Vin is 24v?
In that case, 2 heaters wired in parallel could be used on the toolboard. I have 2x 50W/24v heaters in the printhead
Please could you confirm this before I start rebuilding : )
Thanks, Mike -
@mikento said in Vivedino Troodon rebuild:
I assume this makes the fan and heater outputs 24v, if Vin is 24v?
not exactly. it makes out 1 and out 2 - designed for fans - at 24V. Those headers are not suitable for heaters.
Out0 is the output that is designed for a heater. It is only ever at VIN voltage (not selectable) and that is rated to 5A so at 24V that is appropriate for your 100W heaters
See
https://duet3d.dozuki.com/Wiki/Duet_3_Tool_Board#Section_Hardware_specificationand
this part of the wiring diagram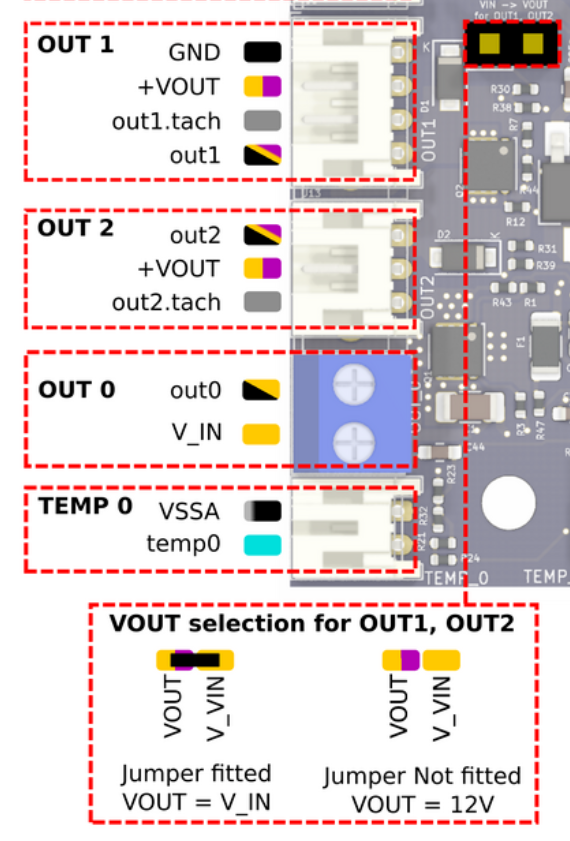
-
@t3p3tony
Fantastic : ) thanks for clarifying that! I misunderstood the instructions and thought everything out of the toolboard was at 12v, unless the jumper was used to select 24v. -
@fred-y (or anyone else!)
Hello again! Work has been hectic and I'm just getting time to do this conversion now.....I wondered if you could share your config file? Or point me how to configure for 4x Z motors. I can't see how to configure 4xZ motors in the RRF config tool.
Thanks in advance! Mike -
@mikento I looked at the configuration tool quickly and I didn't see the option for multiple Z motors.
Basically, you just set the different drivers using the M569 command.
M569 P0.2 S1 ;D3                                                    ; physical drive 0.2 goes backwards
M569 P0.3 S0 ;D3                                                    ; physical drive 0.3 goes forwards
M569 P0.4 S0 ;D3                                                    ; physical drive 0.4 goes forwards
M569 P0.5 S1 ;D3                                                    ; physical drive 0.5 goes backwards
Make sure the direction matches your setup and be careful when you will do the first tests.
You need to define the 4 drivers on the Z using the command M584
Order should be rear left, front left, front right and read right.M584 X0.1 Y0.0 Z0.2:0.4:0.5:0.3 E121.0 ; set drive mapping ; --- drive map --- ; _______________ ; | 1-0.2 | 4-0.3 | ; | ----- | ------| ; | 2-0.4 | 3-0.5 | ; --------------- ; frontThe 2 commands above are specific to your wiring.
Make sure you setup the position of the belts (below is what I have on a Troodon 400) - you can just measure, these values are important for the gantry calibration.
; Belts positions
M671 X-65:-65:465:465 Y475:-15:-15:475 S20 						; Z belts at 4 corners
I believe this is all you need; make sure you consult the gcode documentation: https://duet3d.dozuki.com/Wiki/Gcode
I hope this will give you enough information, let me know how it goes.
-
some more info on multiple Z motor configuration is available on the dozzuki at Bed levelling using multiple independent Z motors - Duet3D.
-
@fred-y, oliof
Thank you both for the fast and really helpful reply! Mike