Isnt it easier, in Orca, to add for each material in Start Gcode a line to call a specific saved map?
Posts made by aceranic
-
RE: Bed mesh at different tempsposted in Tuning and tweaking
-
Bed mesh at different tempsposted in Tuning and tweaking
Bed mesh/height changes at different temperatures, ie. 50, 70, 100 for different materials.
For each temp that I use I saved mesh under different name, ie. heightmap50.csv.Can I call different heightmap from start gcode in Orca based on the filament in use?
So normall call is G29 S1 and will call heightmap.csv and G29 S1 P"heightmap50.csv" would call for 50degC.
Does this make sense to use?
-
RE: Steppers off during G4posted in Tuning and tweaking
@jay_s_uk thanks a lot
M906 X1600 Y1600 Z1200 E1200 I30 ; set motor currents (mA) and motor idle factor in per cent
M84 S30 ; Set idle timeout -
RE: Steppers off during G4posted in Tuning and tweaking
@jay_s_uk Running 3.5.3
; Configuration file for Duet WiFi (firmware version 3)
; executed by the firmware on start-up
;
; generated by RepRapFirmware Configuration Tool v3.3.10 on Mon Dec 06 2021 21:58:20 GMT+0100 (Central European Standard Time); General preferences
M575 P1 S1 B57600 ; enable support for PanelDue
G90 ; send absolute coordinates...
M83 ; ...but relative extruder moves
M550 P"TazmanSW" ; set printer name
M669 K2 X1:0:1 Y0:1:0 Z1:0:-1 ; select CoreXZ mode; Network
M552 S0 ; enable network
M586 P0 S1 ; enable HTTP
M587 P192.128.68.68 ; connect to access point "Network-ssid-123" using WPA2-PSK authentication at specified IP address
M552 S1 ; enable networking as a client
M586 P1 S0 ; enable FTP
M586 P2 S0 ; enable Telnet; Drives
M569 P0 S0 ; physical drive 0 goes forwards
M569 P1 S0 ; physical drive 1 goes forwards
M569 P2 S0 ; physical drive 2 goes forwards
M569 P3 S1 ; physical drive 3 goes backwards Extruder
M584 X0 Y2 Z1 E3 ; set drive mapping
;M350 X16 I0 ; configure microstepping without interpolation
M350 X16 Y16 Z16 E16 I1 ; configure microstepping with interpolation
M92 X80.00 Y80.00 Z80.00 E562.00 ; set steps per mm
M566 X850.00 Y850.00 Z850.00 E240.00 ; set maximum instantaneous speed changes (mm/min)
M203 X30000.00 Y30000.00 Z30000.00 E10000.00 ; set maximum speeds (mm/min)
M201 X3000.00 Y3000.00 Z2000.00 E3500.00 ; set accelerations (mm/s^2)
M906 X1600 Y1600 Z1200 E1200 I0 ; set motor currents (mA) and motor idle factor in per cent
M84 S2 ; Set idle timeout; Axis Limits
M208 X0 Y0 Z-1 S1 ; set axis minima
M208 X372 Y400 Z315 S0 ; set axis maxima; Endstops
M574 X1 S1 P"!xstop" ; configure switch-type (e.g. microswitch) endstop for low end on X via pin !xstop
M574 Y1 S1 P"!ystop" ; configure switch-type (e.g. microswitch) endstop for low end on Y via pin !ystop
;M574 Z1 S1 P"!zstop" ; configure switch-type (e.g. microswitch) endstop for low end on Z via pin !zstop
M574 Z1 S2 ; configure Z-probe endstop for low end on Z; Z-Probe
M950 S0 C"exp.heater3" ; create servo pin 0 for BLTouch
M558 P9 C"^zprobe.in" H10 F1200:420 T6000 ; set Z probe type to bltouch and the dive height + speeds
;G31 P25 X-30 Y-15 Z2.90 ; set Z probe trigger value, offset and trigger height
M557 X50:370 Y50:380 S50 ; define mesh grid
M280 P0 S160 I1 ; Probe reset; Heaters
M308 S0 P"bedtemp" Y"thermistor" T100000 B4138 ; configure sensor 0 as thermistor on pin bedtemp
M950 H0 C"bedheat" T0 ; create bed heater output on bedheat and map it to sensor 0
M307 H0 B1 S1.00 ; enable bang-bang mode for the bed heater and set PWM limit
M140 H0 ; map heated bed to heater 0
M143 H0 S120 ; set temperature limit for heater 0 to 100C
M308 S1 P"e0temp" Y"thermistor" T100000 B4138 ; configure sensor 1 as thermistor on pin e0temp
M950 H1 C"e0heat" T1 ; create nozzle heater output on e0heat and map it to s ensor 1
M307 H1 B0 S0.75 ; disable bang-bang mode for heater and set PWM limit
M143 H1 S280 ; set temperature limit for heater 1 to 250C; Fans
M950 F0 C"fan0" Q255 ; create fan 0 on pin fan0 and set its frequency
M106 P0 S0 H-1 ; set fan 0 value. Thermostatic control is turned off
M950 F1 C"fan1" Q150 ; create fan 1 on pin fan1 and set its frequency
M106 P1 S1 H1 T55 ; set fan 1 value. Thermostatic control is turned on; Tools for MMU
M563 P0 D0 H1 F0 S"Mosquito" ; define tool 0
;G10 P0 X0 Y0 Z0 ; set tool 0 axis offsets
G10 P0 R0 S0 ; set initial tool 0 active and standby temperatures to 0C
M563 P1 D0 H1 F0 ; define tool 1
G10 P1 R0 S0 ; set initial tool 1 active and standby temperatures to 0C
M563 P2 D0 H1 F0 ; define tool 2
G10 P2 R0 S0 ; set initial tool 2 active and standby temperatures to 0C
M563 P3 D0 H1 F0 ; define tool 0
G10 P3 R0 S0 ; set initial tool 3 active and standby temperatures to 0C; Custom settings
;M572 D0 S0.3
M564 H0 ; allow movement of axes that have not been homed
M302 P1 ; allow cold extrusion
M950 P1 C"exp.heater4" ; allocate GPIO port1 to heater4 on expansion connector, 500Hz;M955 P0 C"spi.cs4+spi.cs3" ; all wires connected to temp DB connector, no temperature daughterboard
M593 P"zvdd" F56 ; use ZVD input shaping to cancel ringing at 40.5Hz;M98 P"load_variables.g" ; runs the macro in the file load_variables.g
M501 ; load config-override.g
-
Steppers off during G4posted in Tuning and tweaking
Hi, when my filament is being changed I have G4 P4000 whilwle waiting for MMU to move.
I have noticed that there is an issue with layer heigth which I found out it has changed due to filament change sequence force on gantry as XZ motors are off during this pause.
How to keep XZ under power during the G4? -
RE: New XZmotors problemposted in Tuning and tweaking
@droftarts yep, that is the one.
The plan is to use 2 drivers for MMU.
This should be no problem I believe.
Is there a guide enywhere for the configuration of this board? -
RE: New XZmotors problemposted in Tuning and tweaking
Yep. It seems that 25mm grid was too much to chew. Thanks!!!!
By the way Phaedrux, I ordered BTT extension for 3 drivers for my MMU. Will need help with that

-
RE: New XZmotors problemposted in Tuning and tweaking
@Phaedrux Hi. Will try. Only thing I didnt try yet.
-
RE: New XZmotors problemposted in Tuning and tweaking
@jay_s_uk Not sure still. After board restart it was moving fine few times full X travel. Then I started the print and same issue again.
I tried one older print large size, same. -
RE: New XZmotors problemposted in Tuning and tweaking
Increased current and accwl, jerk, still the same.
-
RE: New XZmotors problemposted in Tuning and tweaking
@jay_s_uk Ok, I didnt have such issue before with same settings. They are set higher is slicer.
-
RE: New XZmotors problemposted in Tuning and tweaking
@aceranic I had to change direction as I was getting Phase warnings....
Also I have 2 motors on Y axis, connected to 2 Z axis drivers. -
RE: New XZmotors problemposted in Tuning and tweaking
; Configuration file for Duet WiFi (firmware version 3)
; executed by the firmware on start-up
;
; generated by RepRapFirmware Configuration Tool v3.3.10 on Mon Dec 06 2021 21:58:20 GMT+0100 (Central European Standard Time); General preferences
M575 P1 S1 B57600 ; enable support for PanelDue
G90 ; send absolute coordinates...
M83 ; ...but relative extruder moves
M550 P"TazmanSW" ; set printer name
M669 K2 X1:0:1 Y0:1:0 Z1:0:-1 ; select CoreXZ mode; Network
M552 S0 ; enable network
M586 P0 S1 ; enable HTTP
M587 P192.128.68.68 ; connect to access point "Network-ssid-123" using WPA2-PSK authentication at specified IP address
M552 S1
M586 P1 S0 ; enable FTP
M586 P2 S0 ; enable Telnet; Drives
M569 P0 S0 ; physical drive 0 goes forwards
M569 P1 S0 ; physical drive 1 goes forwards
M569 P2 S0 ; physical drive 2 goes forwards
M569 P3 S1 ; physical drive 3 goes backwards Extruder
M584 X0 Y2 Z1 E3 ; set drive mapping
;M350 X16 I0 ; configure microstepping without interpolation
M350 X16 Y16 Z16 E16 I1 ; configure microstepping with interpolation
M92 X80.00 Y80.00 Z80.00 E562.00 ; set steps per mm
M566 X150.00 Y150.00 Z150.00 E240.00 ; set maximum instantaneous speed changes (mm/min)
M203 X30000.00 Y30000.00 Z30000.00 E10000.00 ; set maximum speeds (mm/min)
M201 X900.00 Y900.00 Z900.00 E3500.00 ; set accelerations (mm/s^2)
M906 X1200 Y1200 Z1200 E1200 I0 ; set motor currents (mA) and motor idle factor in per cent
M84 S2 ; Set idle timeout; Axis Limits
M208 X0 Y0 Z0 S1 ; set axis minima
M208 X372 Y380 Z315 S0 ; set axis maxima; Endstops
M574 X1 S1 P"!xstop" ; configure switch-type (e.g. microswitch) endstop for low end on X via pin !xstop
M574 Y1 S1 P"!ystop" ; configure switch-type (e.g. microswitch) endstop for low end on Y via pin !ystop
;M574 Z1 S1 P"!zstop" ; configure switch-type (e.g. microswitch) endstop for low end on Z via pin !zstop
M574 Z1 S2 ; configure Z-probe endstop for low end on Z; Z-Probe
M950 S0 C"exp.heater3" ; create servo pin 0 for BLTouch
M558 P9 C"^zprobe.in" H10 F1200:420 T6000 ; set Z probe type to bltouch and the dive height + speeds
;G31 P25 X-30 Y-15 Z2.90 ; set Z probe trigger value, offset and trigger height
M557 X50:370 Y50:380 S50 ; define mesh grid
M280 P0 S160 I1 ; Probe reset; Heaters
M308 S0 P"bedtemp" Y"thermistor" T100000 B4138 ; configure sensor 0 as thermistor on pin bedtemp
M950 H0 C"bedheat" T0 ; create bed heater output on bedheat and map it to sensor 0
M307 H0 B1 S1.00 ; enable bang-bang mode for the bed heater and set PWM limit
M140 H0 ; map heated bed to heater 0
M143 H0 S120 ; set temperature limit for heater 0 to 100C
M308 S1 P"e0temp" Y"thermistor" T100000 B4138 ; configure sensor 1 as thermistor on pin e0temp
M950 H1 C"e0heat" T1 ; create nozzle heater output on e0heat and map it to s ensor 1
M307 H1 B0 S0.75 ; disable bang-bang mode for heater and set PWM limit
M143 H1 S280 ; set temperature limit for heater 1 to 250C; Fans
M950 F0 C"fan0" Q255 ; create fan 0 on pin fan0 and set its frequency
M106 P0 S0 H-1 ; set fan 0 value. Thermostatic control is turned off
M950 F1 C"fan1" Q150 ; create fan 1 on pin fan1 and set its frequency
M106 P1 S1 H1 T55 ; set fan 1 value. Thermostatic control is turned on; Tools
M563 P0 D0 H1 F0 S"Mosquito" ; define tool 0
;G10 P0 X0 Y0 Z0 ; set tool 0 axis offsets
G10 P0 R0 S0 ; set initial tool 0 active and standby temperatures to 0C
M563 P1 D0 H1 F0
G10 P1 R0 S0
M563 P2 D0 H1 F0
G10 P2 R0 S0
M563 P3 D0 H1 F0
G10 P3 R0 S0; Custom settings
;M572 D0 S0.3
M564 H0
M501
M302 P1
M950 P1 C"exp.heater4" ; allocate GPIO port1 to heater4 on expansion connector, 500Hz;M955 P0 C"spi.cs4+spi.cs3" ; all wires connected to temp DB connector, no temperature daughterboard
M593 P"zvdd" F56 ; use ZVD input shaping to cancel ringing at 40.5HzM98 P"load_variables.g" ; Runs the macro in the file load_variables.g
-
New XZmotors problemposted in Tuning and tweaking
Hi,
Duet 2 WiFi board, I changed XZ motors, CoreXZ printer, and started having issues with X movement staggering at higher speeds.
Video of the problem below.It is not slicer related as it is happening in every X movement regardless if printing or just moving.
-
RE: Mesh bed leveling only in printing area using orca slicerposted in Tuning and tweaking
@droftarts Hi, I tested and it is working fine, also changed to 5x5 points.
-
RE: Mesh bed leveling only in printing area using orca slicerposted in Tuning and tweaking
@RodrigoRMaraujo Does it require G29 S1 to load a mesh or it is done differently?
-
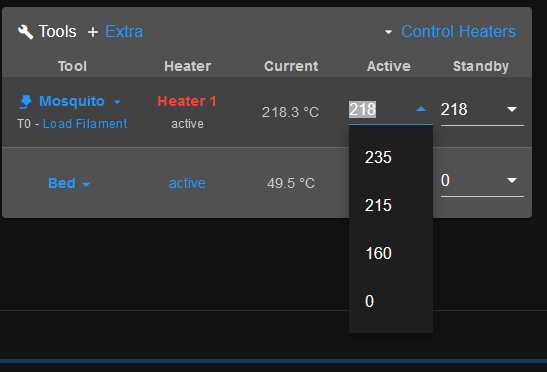
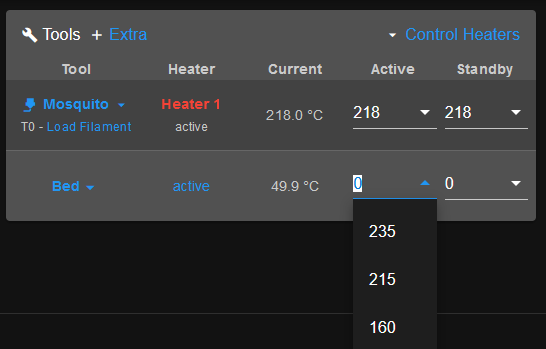
RE: set bed temp is not shown on DWCposted in Duet Web Control
@aceranic Just found other port, it is <single bed control which was on. after off, all is good with Bed temp.
Also 3.5.3 has issues with WiFi, will try 3.5.4. -
RE: set bed temp is not shown on DWCposted in Duet Web Control
I have same issue since upgrade to 3.5.3.
On PanelDue all is showing fine, on DWC no setpoint temp for Bed.
Same on 2 laptops and on tablet, phone, etc.Also noticed that I cant open local page only using the IP address.
WiFi server 2.1.0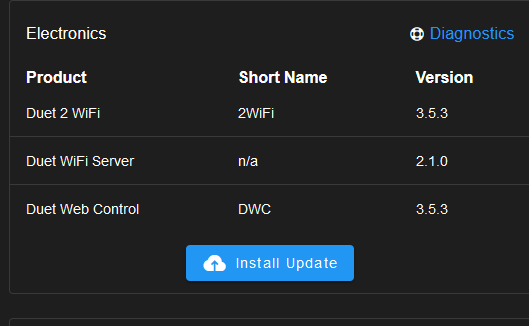
More to above, not possible to set presets for Bed. it has memorized presets from Hotend?