Multiple Motion system configuration and setup
-
@SANJR
By using the while true loop daemon.g will run continuously.
You must put a G4 command in the loop or it will use too much clock time and hinder the performance of the main movement process.
At least 1 second is recommended, but you could experiment with less.
So the loop will run every second and check your conditions.
It will actually be slightly longer (the time it takes to process the commands)I do not know if you're feeding wire (MIG/TIG) or powder (PTA).
If you're feeding wire, then why not use a proper MIG or cold wire TIG wire feeder?
Then the welder does the work.In any case, I'm not up to date on multiple movement queues, but sending U999 is going to cause that motor to move 999mm or degrees or whatever unit.
About the only way I could see your method working in any way would be to command a G1 command that sensed an end stop (maybe H4)
You could then simulate the end stop with a relay or mosfet, switching it on/off in your other macros.How are you slicing your models?
If it's a normal slicer is used you'll have to post process it to turn the welder on/off at the appropriate times.
That's why I suggested considering laser mode or M571 as these would both turn an output on when any extrusion commands were activated in your G Codehttps://docs.duet3d.com/User_manual/Reference/Gcodes#m571-set-output-on-extrude
In normal robotics / automation the sequence of events is
- send signal to welder to start
- wait for signal from welder that arc is established
- commence movement
- complete movement
- send signal to welder to stop
- wait for signal from welder that arc & post gas flow are complete
- move to next position
If your welding power source doesn't have any interface to return these signals then you might try using a Hall effect sensor on the current lead.
-
Thanks for the feedback.
We are trying to use a basic TIG weld machine that has no feeder wire setup.
So trying to create a feeder motor with a stepper motor. The reason for a stepper motor is to have a precise feed rate in an interrupted process such as WAAM.A Python script is being prepared for slicing the models. In this regard, we are currently trying to build a basic single-walled geometry.
The G1 command was used to instruct the U-axis feeder motor to start rotating i.e., to feed the wire at a defined rate when the printhead state is on condition and stop feeding when the print head state is off condition.
If this can be done in any other alternate way... please recommend it..
And regarding the suggested G1 with H4 parameter, does this mean an endstop is to be configured as an axis endstop or as a trigger (with a separate triggerx.g file)?
And to simulate with a relay or mosfet means to interface this signal with the relay of the welding torch? Because in the daemon.g file, the Printhead state (which has two macro files for ON and OFF) is interfaced with the U-axis motor, is now the endstop of the U-axis motor to be added to this daemon.g file?
Request yor suggestions please
-
@SANJR
You need the U axis to move at a fixed speed an unknown time period until commanded to stop.
My suggestion of a G1 H4 move is the only method I can think of to do that.
I do not know if it will work in the context of multiple concurrent motion queues.
You would need to configure an endstop associate with the U axis.
Instead of a switch, connect the endstop pins to the output of a relay (or mosfet)
Control the relay in your macros at the same time as you are controlling the relay that triggers the welding.So your macros might look like
; Print Head ON
M42 P3 S1 ; turns on the relay to start welder
; set Print Head state to ON
global.PrintHeadState = 1
G4 S{global.waitTime} ; wait for arc and pool to form
M42 P4 S0 ; set the endstop low
G91
G92 U0 ; Set U axis position to zero
G1 H4 U99999 F{global.feedRate} ; commence feeding
; Print Head OFF M42 P3 S0 ; turns on the welder relay M42 P4 S1 ; set the endstop high to stop feeding G91 U-3 ; retract some wire ; set Print Head state to OFF global.PrintHeadState = 0 G4 S{global.postGasTime} ; wait for post gasUsing this I don't see the need for running daemon.g
Or for the global.PrintHeadState
You would just call your start and stop macros in your gcode at the appropriate positions.I still have serious doubts that setting the motor as an axis the best way to go about it.
Perhaps someone else might have some suggestions. -
Hi Owen,
Sorry for not able to understand the ¨connect the endstop pins to the output of a relay (or mosfet)¨. Example, if an endstop is configured to IP pin OUT_4, wire from the pinds on the board will connect with the endstop pins. And how to connect from here to an relay?

Second in the macros provided the {global.waitTime} and {global.feedRate} are the values that we need to enter? Example
G4 S1 ; wait for arc and pool to form
G1 H4 U99999 F1000 ; commence feeding -
@SANJR
Yes, the variables are just so you can adjust them in real time.You wouldn't be using a real endstop.
You would use a realy to "act" like an endstop.
In this way you have control over when it triggers using M42
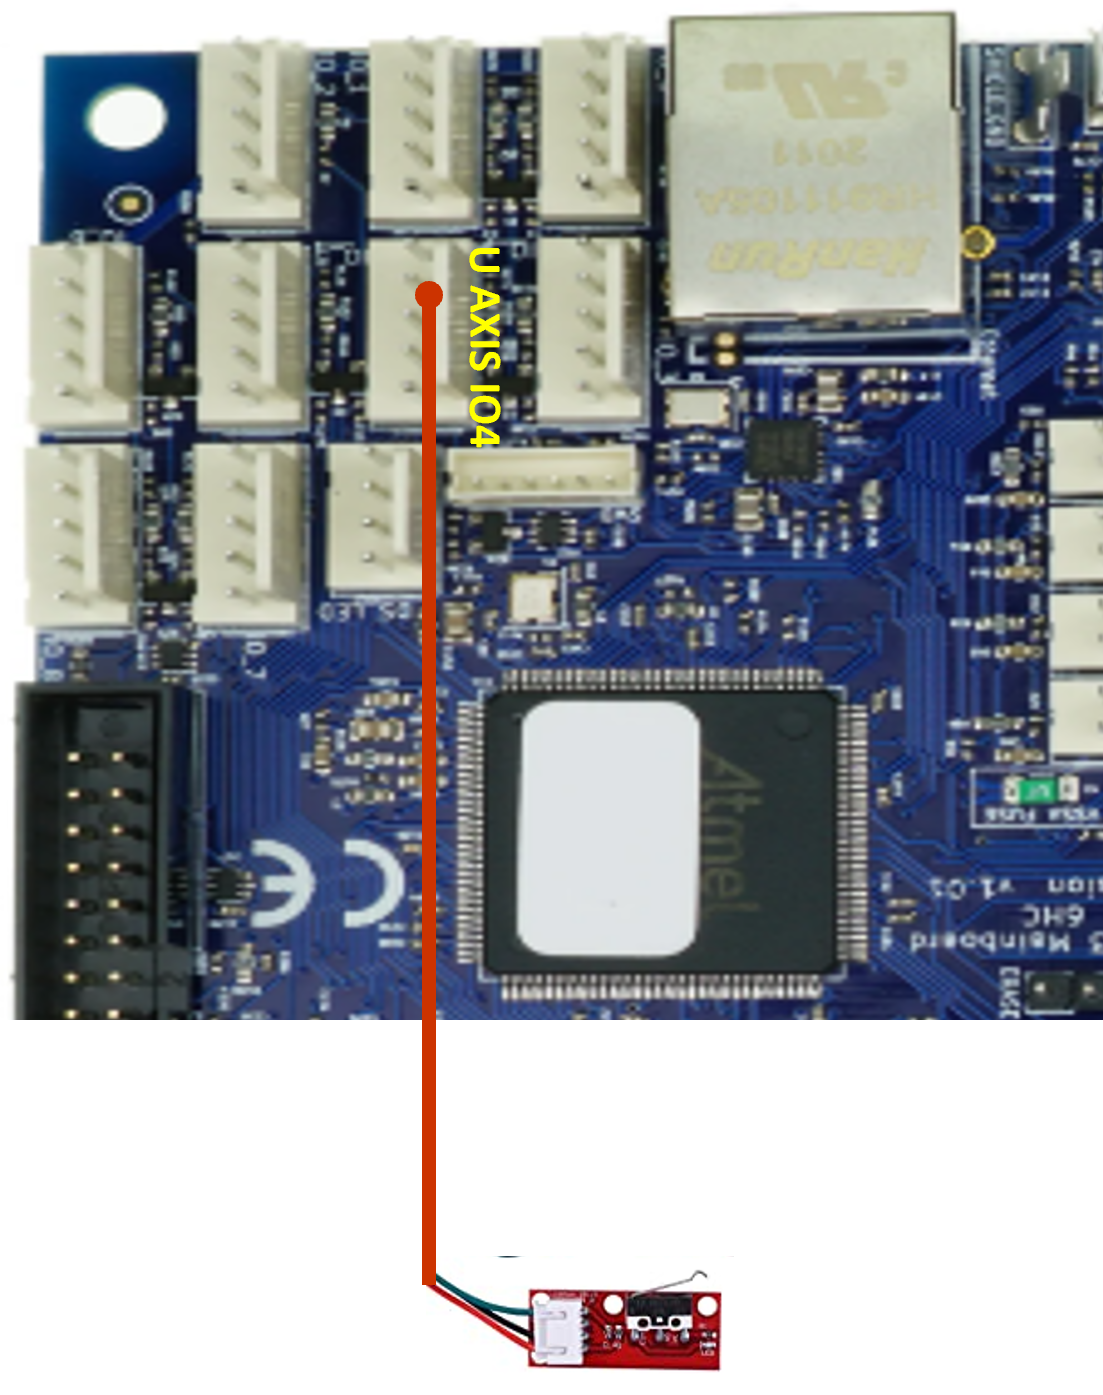
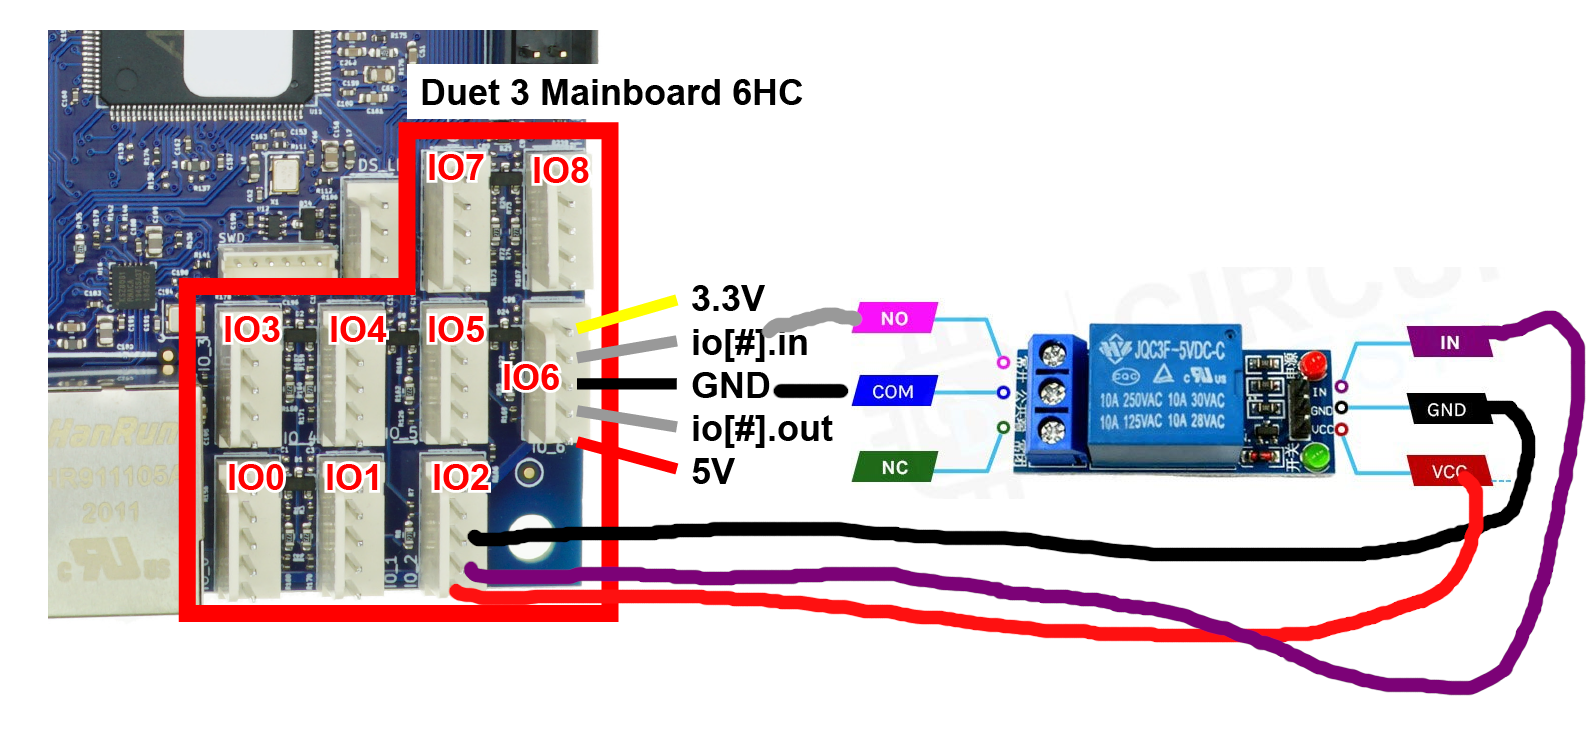
Something like this.Configure your "endstop" on IO6
M574 U2 S1 P"io6.in"; simple switch on high endConnect the wires from IO6 to the COM and NO connections of the relay.
Configure an IO output on IO2.
M950 P4 C"io2.out"Wire according to the requirements of the relay.
By sending M42 from this port, you simulate a real endstop.
So in theory you can set the axis in motion using G1 H4 and stop it any time using an M42 to close the relay (triggering the end stop)I have no idea if this will work in the way you want it to.

-
Thanks for the new sugeestion.
I will create the the required files and paste here soon. I have one constraint, since we are short of IO pins since the Z axis levelling is done with endstops and two more endstops at the maxima as tiggers to stop the out of limit travel.
So currently we have only one io pin and 3 OUT Pins empty. Is it possible to use the out pin to the relay? If not then i may have to reduce the maxima of Z axis to 1 from 2.....
And can i use any IO pins for this relay or is there any preference........
-
@SANJR
You can use any IO if it can trigger your relay.
You are better to start a new thread about the suitability of particular OUT pins.
You will need to supply details of your duet board, relay type (specifications) and how you plan to wire it. -
Thanks Owen as suggested, i am opening a new thread titled ¨Configuring stepper motor as filament feeder motor¨ for the suitability of the IO-Relay-Out PIN configuration.
Also attaching a few schmatics and codes that may suit the purpose intended.
Requesting your insights for the same plz....
-
@SANJR
My suggestion to start a new thread was specifically about whether the IO you were planning to use is suitable to drive a particular relay.
However in your new post, you have effectively duplicated this thread.
There is not really any more advice I can offer except to read the documentation in that regard.
https://docs.duet3d.com/en/How_to_guides/Wiring_your_Duet_3 -
-
There are some errors with the PintHeadState ON and PrintHeadState OFF. Error message is displayed as
M98 P¨0:/macros/Print Head State ON¨
Error: Bad command: global.PrintHeadState = 1M98 P¨0:/macros/Print Head State OFF¨
Error: Bad command: global.PrintHeadState = 0I have declared the global PrintHeadState = 0 in the config.g file before the Fans section where the OUT_6 pin is configured.
What could be the reason for the error bad command? And how to solve this issue plz......
-
-
Thanks Owen
So in the config.g file the global variable is to declared as
global PrintHeadState = 0; Assume initially offAnd in the macros to PintHeadState ON
set global.PrintHeadState = 1& in the PrintHeadState OFF
set global.PrintHeadState = 0What i mentioned above is correct?
-
@SANJR
Yes, that is correct -
Observed two strange conditions
-
After changing the syntax of the global variable. For the first few minutes, I was getting the same error message. But when i shutdown and restarted the machine after a few minutes, for the first time the motor started rotating. And when I tried to repeat it for a few more trials, the motor was not responding.
-
And during the first trial the motor did not stop when the PrintHeadState OFF macro was called. It was rotating for the U99999. So i had to force stop by pressing the emergency button in the DWC
For the first condition where the changes made to was not being updated. Is there any reason for residual voltage is being circulated due to voltage drop down....... Just a guess not sure if this the reason. How to resolve this issue plz...
Second how to control the motor U99999 stop?....
-
-
@SANJR
I can't offer any more help.
I have said all along I didn't like the way you were doing it and recommended other possibilities.
I merely offered a method that may or may not work the way you were trying to do it, but it's up to you to debug any issues.
Good luck with your project. -
I can understand
This method may not be the best way
Is there any other alternate way to get this requirement.
Only constraint which i face is the welder doesn´t have an feeder motor. It could perform in autogeneous mode (without filler wire) only. So i need to setup the feeder motor.
Previously tried a DC motor controlling them via OUT pin but i was not able to control the feed rate. But lately i learnt that a ESC can be used which helps to set the desired feedrate.
Any suggestions would be welcome please
-
This setup is completed. Hence can be closed
-
 undefined droftarts marked this topic as a question
-
 undefined droftarts has marked this topic as solved