Z Problem Corexy
-
Please post your homing files and start gcode as well.
-
This my start gcode:
G1 X0.0 Y300.0 Z1.0 F1000.0 ; prepare to prime
G92 E0 ; reset extrusion distance
G1 Z0.2 F1000.0
G1 X60.0 Y280 E9.0 F1000.0 ; priming
G1 X125.0 Y280.0 E12.5 F1000.0 ; priming
G1 Z0.5 F1000.0
G92 E0 ; reset extrusion distance
From duet panel I can home everything in the right condition
-
What's in homeall?
-
; homeall.g
; called to home all axes
;
; generated by RepRapFirmware Configuration Tool v2.1.8 on Sun Mar 01 2020 23:52:57 GMT+0100 (Central European Standard Time)
G91 ; relative positioning
G1 H2 Z-5 F600 ; lift Z relative to current position
G1 H1 X-305 Y-305 F1800 ; move quickly to X or Y endstop and stop there (first pass)
G1 H1 X-305 ; home X axis
G1 H1 Y-305 ; home Y axis
G1 X5 Y5 F600 ; go back a few mm
G1 H1 X-305 F360 ; move slowly to X axis endstop once more (second pass)
G1 H1 Y-305 ; then move slowly to Y axis endstop
G1 H1 Z355 F360 ; move Z up stopping at the endstop
G90 ; absolute positioning
G92 Z350 ; set Z position to axis maximum (you may want to adjust this) -
You have your Z axis inverted. The bed in the corexy drops away from the nozzle during a print, but it's still moving in Z+ direction.
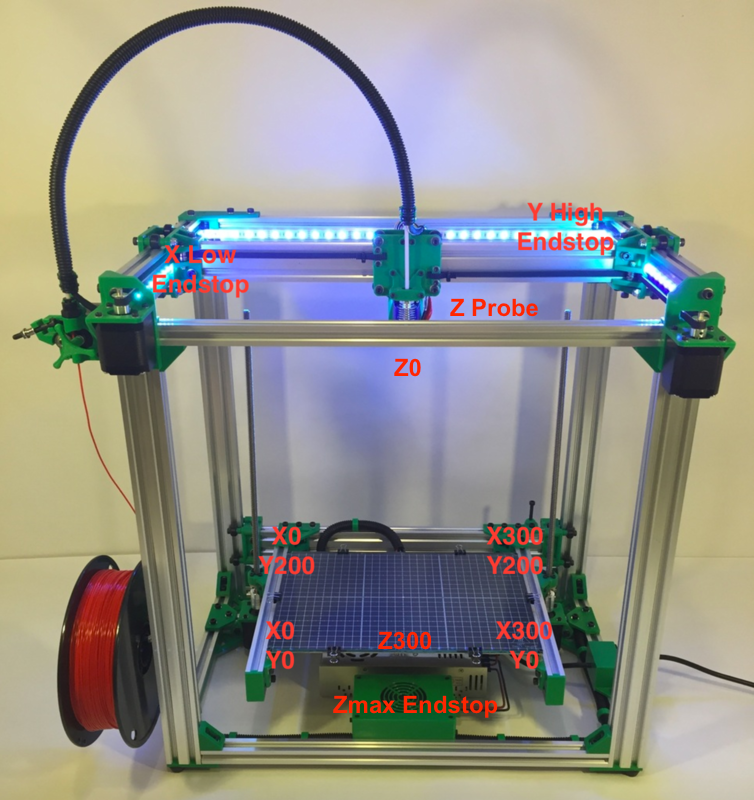
Your homeall file is set to home to Z max and your Z endstop is configured for Z max position, but is your Z endstop actually at the opposite end away from the nozzle?

-
How to solve the problem?
-
@Dav said in Z Problem Corexy:
How to solve the problem?
First I need to know where your Z endstop is located.
-
Up near xy axes, from here I manual level my bed with springs.
-
@Phaedrux my y 0 is on the back left corner also
-
@Dav said in Z Problem Corexy:
my y 0 is on the back left corner also
Ok that's going to need some changes as well. Here's what you'll need to change.
In config.g the Z endstop position needs to be changed from Zmax, to Zmin by changing Z2 to Z1. Same with the Y endstop, from Y1 to Y2.
You have:
; Endstops
M574 X1 Y1 Z2 S0 ; set active high endstops
Should be:
; Endstops
M574 X1 Y2 Z1 S0 ; set active high endstops
In homeall.g you need to invert the direction of your Z and Y movements and change the G92.
G91 ; relative positioning
G1 H2 Z5 F600 ; lift Z relative to current position
G1 H1 X-305 Y305 F1800 ; move quickly to X or Y endstop and stop there (first pass)
G1 H1 X-305 ; home X axis
G1 H1 Y305 ; home Y axis
G1 X5 Y-5 F600 ; go back a few mm
G1 H1 X-305 F360 ; move slowly to X axis endstop once more (second pass)
G1 H1 Y305 ; then move slowly to Y axis endstop
G1 H1 Z-355 F360 ; move Z up stopping at the endstop
G90 ; absolute positioning
G92 Z0 ; set Z position to axis maximum (you may want to adjust this)
Now when you've made those changes we need to test the motor movement direction BEFORE you home the printer. So after you've made those changes, power off the printer and physically move the print head to the center. Manually lower the bed as well so that it's not close to the nozzle.
Now turn on the printer and send these commands in the gcode console. DO NOT HOME THE PRINTER YET.
Send
G92 X150 Y150 Z10Then use the jog buttons to test the movement direction.
X+ should move to the right, X- to the left.
Y+ should move to the bacm, Y- to the front.
Z+ should lower the bed, Z- should move the bed towards the nozzle.If all those movements are correct, you can try to homeall, but be ready to cut the power in case something goes wrong.
-
@Phaedrux said in Z Problem Corexy:
G92 X150 Y150 Z10
With Y2 my y going to the wrong way to home.
also the Z going to the wrong way now.
; Configuration file for Duet WiFi (firmware version 2.03)
; executed by the firmware on start-up
;
; generated by RepRapFirmware Configuration Tool v2.1.8 on Sun Mar 01 2020 23:52:56 GMT+0100 (Central European Standard Time); General preferences
G90 ; send absolute coordinates...
M83 ; ...but relative extruder moves
M550 P"Sapphire" ; set printer nameM667 S1 ; select CoreXY mode
; Network
M552 S1 ; enable network
M586 P0 S1 ; enable HTTP
M586 P1 S0 ; disable FTP
M586 P2 S0 ; disable Telnet; Drives
M569 P0 S1 ; physical drive 0 goes forwards
M569 P1 S1 ; physical drive 1 goes forwards
M569 P2 S0 ; physical drive 2 goes forwards
M569 P3 S1 ; physical drive 3 goes forwards
M584 X0 Y1 Z2 E3 ; set drive mapping
M350 X16 Y16 Z16 E16 I1 ; configure microstepping with interpolation
M92 X80.00 Y80.00 Z400.00 E415.00 ; set steps per mm
M566 X900.00 Y900.00 Z12.00 E120.00 ; set maximum instantaneous speed changes (mm/min)
M203 X6000.00 Y6000.00 Z180.00 E1200.00 ; set maximum speeds (mm/min)
M201 X500.00 Y500.00 Z20.00 E250.00 ; set accelerations (mm/s^2)
M906 X800 Y800 Z800 E800 I30 ; set motor currents (mA) and motor idle factor in per cent
M84 S30 ; Set idle timeout; Axis Limits
M208 X0 Y0 Z0 S1 ; set axis minima
M208 X300 Y300 Z350 S0 ; set axis maxima; Endstops
M574 X1 Y2 Z1 S0 ; set active high endstops; Z-Probe
M558 P0 H5 F120 T6000 ; disable Z probe but set dive height, probe speed and travel speed
M557 X15:215 Y15:195 S20 ; define mesh grid; Heaters
M305 P0 T100000 B4138 R4700 ; set thermistor + ADC parameters for heater 0
M143 H0 S120 ; set temperature limit for heater 0 to 120C
M305 P1 T100000 B4138 R4700 ; set thermistor + ADC parameters for heater 1
M143 H1 S280 ; set temperature limit for heater 1 to 280C; Hotend
M143 S260 ; max hotend temperature to 260C
M307 H1 A290.3, C119.0, D10.9 S0.6 ; PID heather
;M305 P0.6 X100 ; heater P1/H1 on channel 1; Fans
M106 P0 S0 I0 F500 H-1 ; set fan 0 value, PWM signal inversion and frequency. Thermostatic control is turned off
M106 P1 S1 I0 F500 H1 T45 ; set fan 1 value, PWM signal inversion and frequency. Thermostatic control is turned on; Tools
M563 P0 D0 H1 F0 ; define tool 0
G10 P0 X0 Y0 Z0 ; set tool 0 axis offsets
G10 P0 R0 S0 ; set initial tool 0 active and standby temperatures to 0C; Custom settings are not defined
; homeall.g
; called to home all axes
;
; generated by RepRapFirmware Configuration Tool v2.1.8 on Sun Mar 01 2020 23:52:57 GMT+0100 (Central European Standard Time)
G91 ; relative positioning
G1 H2 Z5 F600 ; lift Z relative to current position
G1 H1 X-305 Y305 F1800 ; move quickly to X or Y endstop and stop there (first pass)
G1 H1 X-305 ; home X axis
G1 H1 Y305 ; home Y axis
G1 X5 Y-5 F600 ; go back a few mm
G1 H1 X-305 F360 ; move slowly to X axis endstop once more (second pass)
G1 H1 Y305 ; then move slowly to Y axis endstop
G1 H1 Z-355 F360 ; move Z up stopping at the endstop
G90 ; absolute positioning
G92 Z0 ; set Z position to axis maximum (you may want to adjust this) -
-
Ok, if Z is going to wrong direction, we now need to change the motors rotation direction to get it going the right away again.
In the drives section you have:
M569 P2 S0 ; physical drive 2 goes forwards
Change it to:
M569 P2 S1 ; physical drive 2 goes backwardsX and Y are moving the right directions though?
If homeall is working, you'll also need to make changes to the individual homex homey and homez files.
-
@Dav said in Z Problem Corexy:
M569 P0 S1 ; physical drive 0 goes forwards
M569 P1 S1 ; physical drive 1 goes forwards
M569 P2 S0 ; physical drive 2 goes forwards
M569 P3 S1 ; physical drive 3 goes forwardsyes changed
M569 P0 S1 ; physical drive 0 goes forwards
M569 P1 S1 ; physical drive 1 goes forwards
M569 P2 S0 ; physical drive 2 goes forwards
M569 P3 S1 ; physical drive 3 goes forwardsP2 and now works, i've also inverted the endstop of my Y in another way works in the wrong way.
Now is printing -
@Dav alright. As long as Y+ moves to the back of the printer you should be ok. Otherwise you may get mirrored prints.
-
My home is back left for x and y. From here if I click x+ my x goes to right, if I click to y+ it comes to me from the back to the front
-
@Phaedrux from what I see in your picture my y is inverted from your.
Is this OK? My endstop is on the back left and not in the print like your -
@Phaedrux
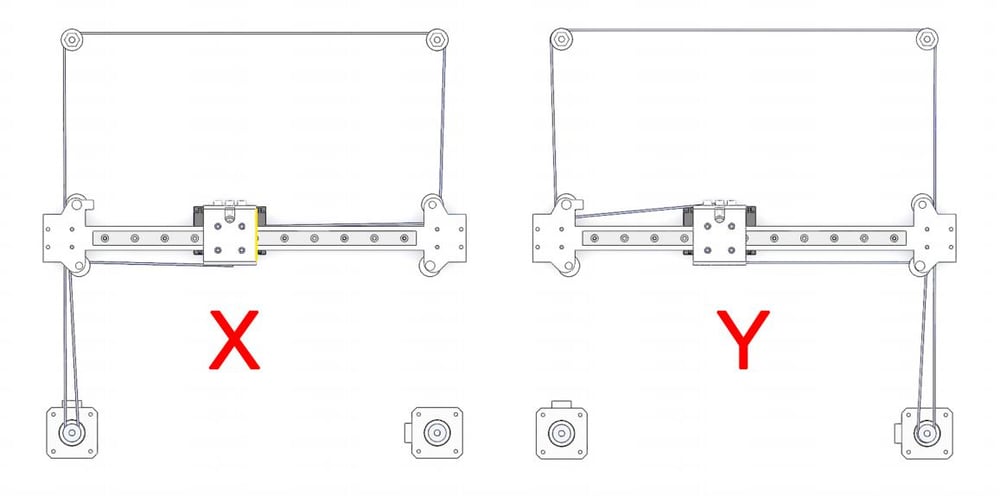
I'm a little confused, I follow this cabling

the problem is that if I conect x motor to x connector in duet board and y motor on y connector, if I move x on console it moves the y and vice versa...why?
-
CoreXY always moves both motors. The only move that turns one motor and not the other is an exact diagonal (turn the motor by hand and you will see which diagonal).
So with one motor plugged in, either one, you will always see that individual motor turn, even though you commanded a "straight" move.
-
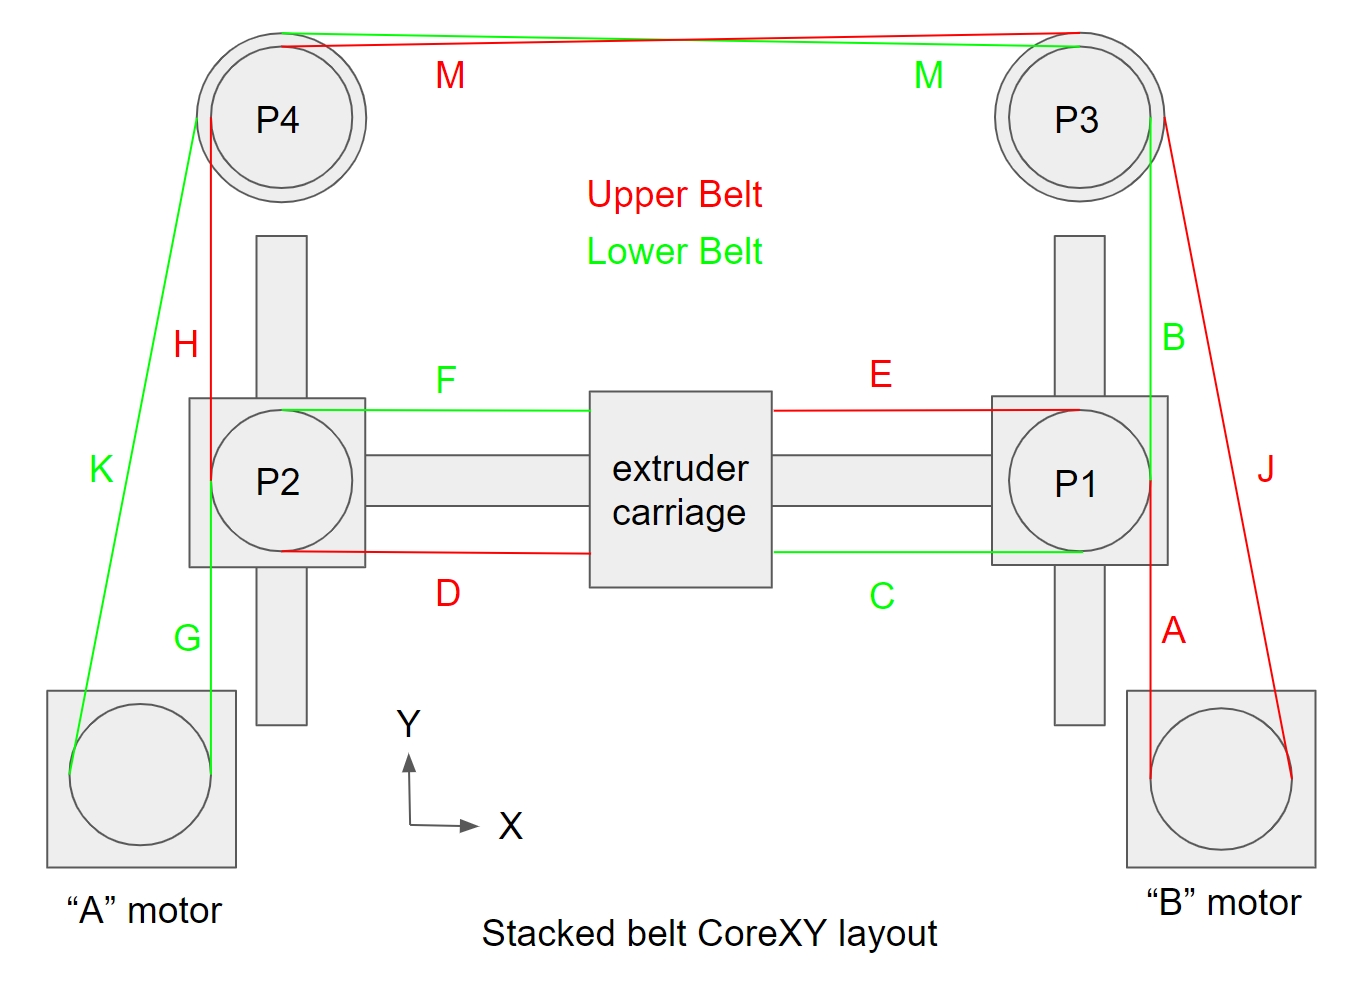
@Dav Is that your actual belt diagram? If so, you've got more than Z axis problems. The belt tension will vary with extruder carriage position, and that means the X and Y axis relationship will wander (belt tension is what keeps the axes square), and prints will be distorted.
The problem is that the segments of the belt that vary in length depending of extruder carriage/X axis position are not parallel to the guide rails. In this diagram, belt segments labeled A-H have to be parallel to the guide rails. The other segments don't have to be parallel to the rails.

When you set up the Z axis screws, you didn't even think about putting them in a position that wasn't parallel to the guide rails. Belts work the same way. Compare your diagram to the one above- almost none of the segments that need to be parallel to the rails are parallel. The working side of the belt loop has to be parallel to the guide rails in any linear motion system.
More info on proper corexy layout here: https://drmrehorst.blogspot.com/2018/08/corexy-mechanism-layout-and-belt.html
Don't worry about it, this is an extremely common error that is probably the cause of many people thinking that there's something difficult, tricky, or magical about corexy printers.
I have collected a bunch of photos and computer renderings of incorrect corexy mechanisms. You can see them here. You are not alone...