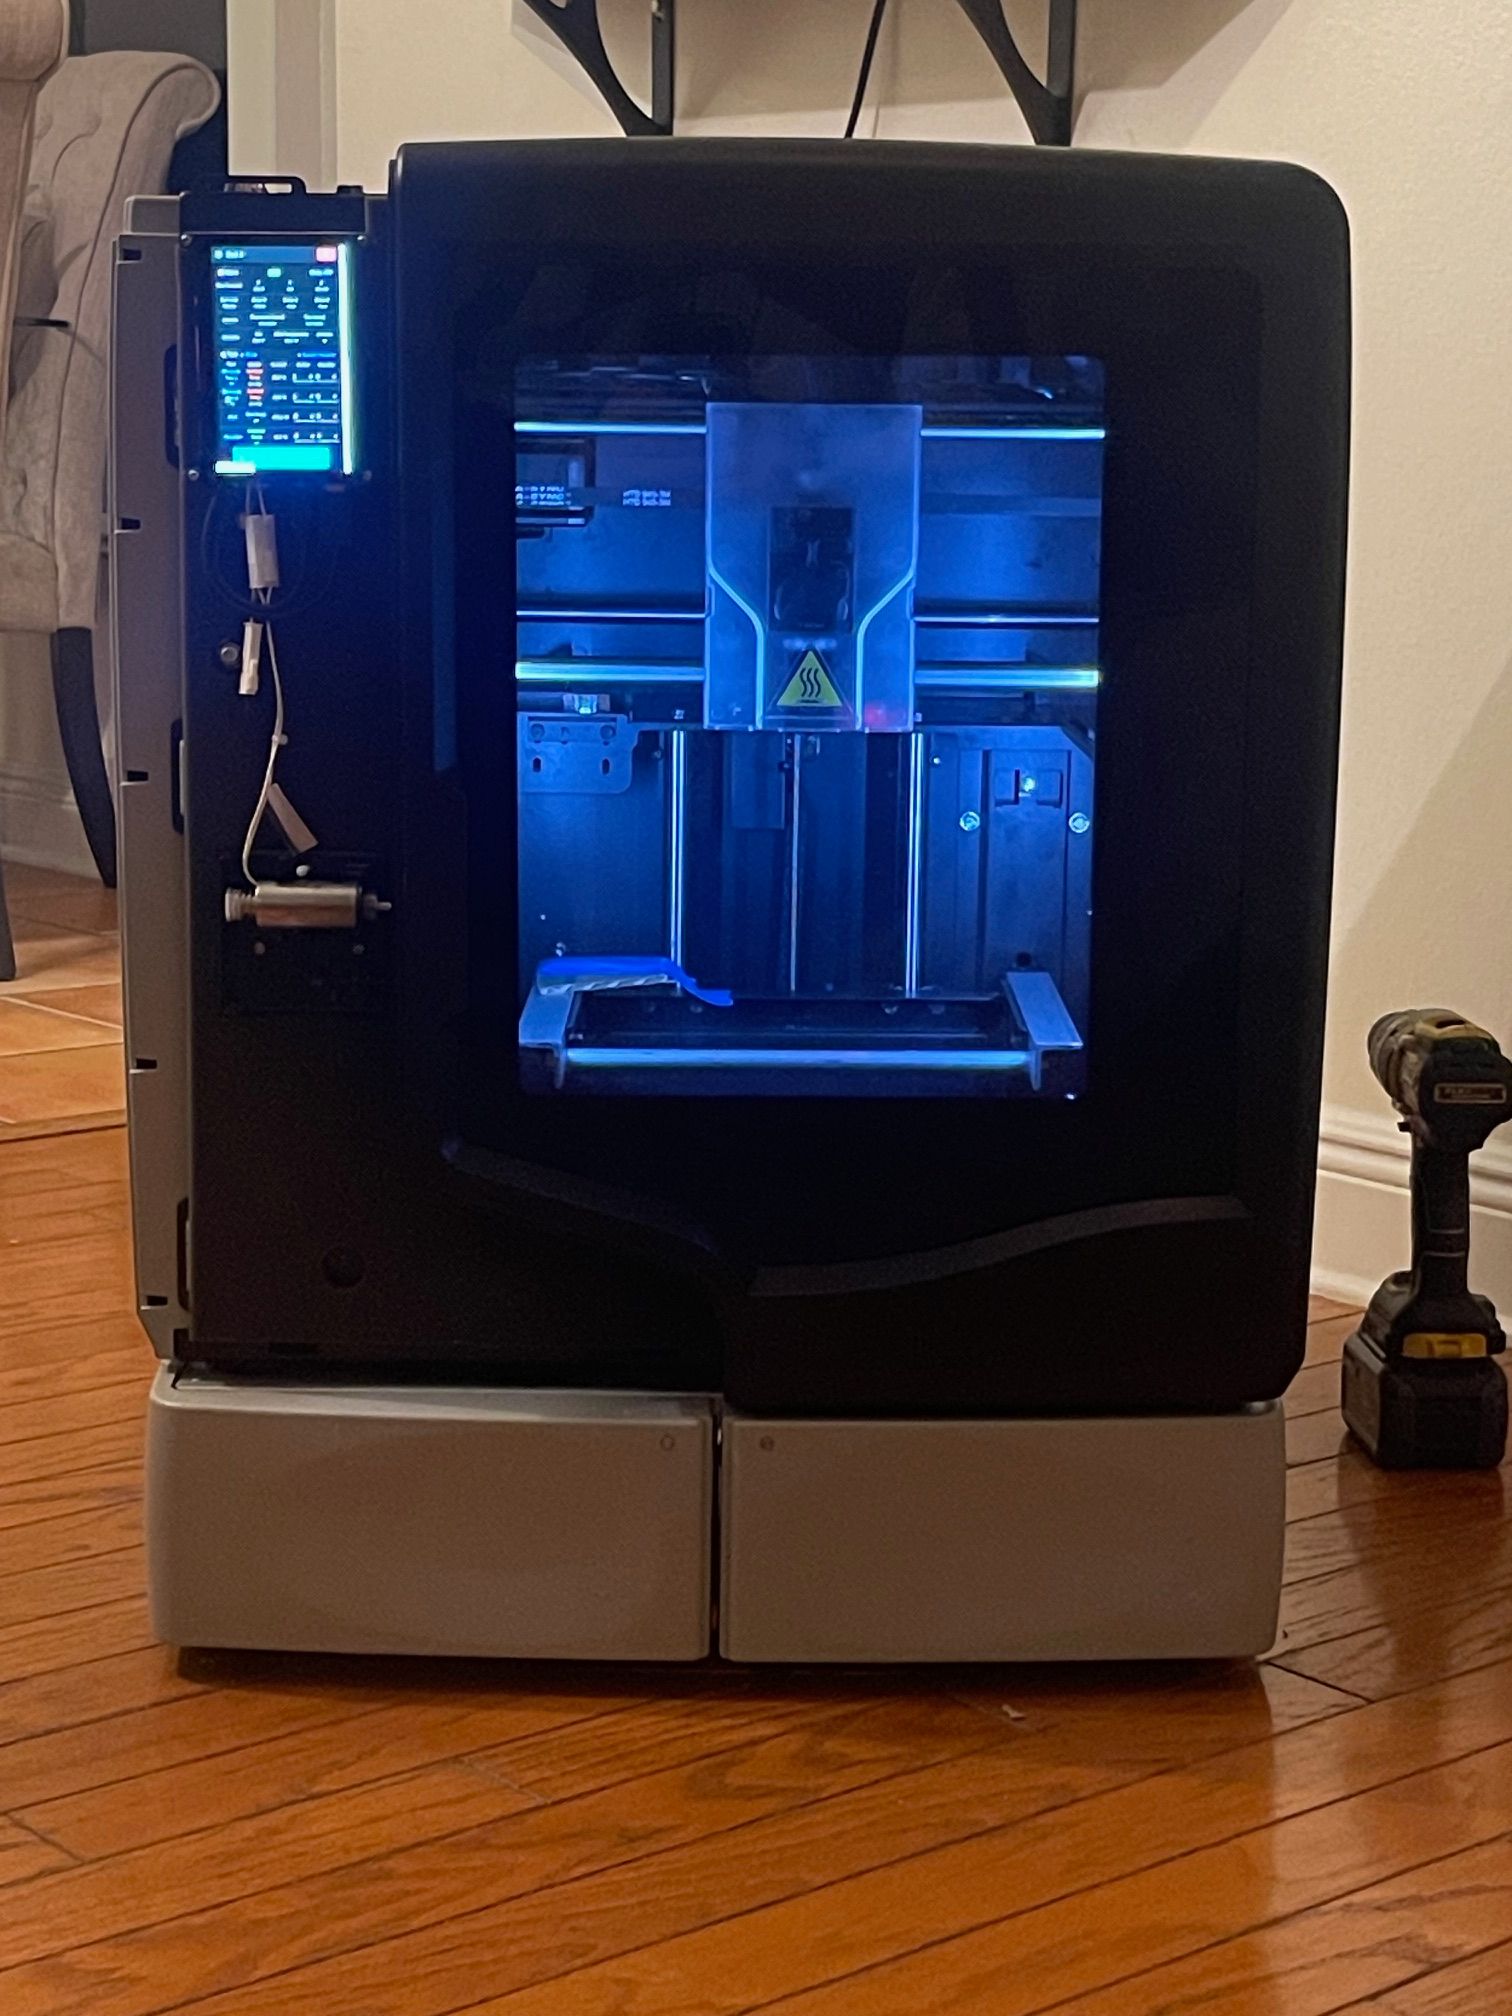
Stratasys uPrint Duet Complete Retrofit
-
-Stratasys uPrint -Duet 3 Mini 5+ -Raspberry Pi 4 -5” HDMI Display
-Duet Tool Board -Duet Magnetic Filament Monitor -BL Touch
-Duet Tool Distribution Board -LGX Lite Bondtech Extruder W/Motor
-Slice 3D Mosquito Hot End -Rhino 480-Watt 24V DC Power Supply
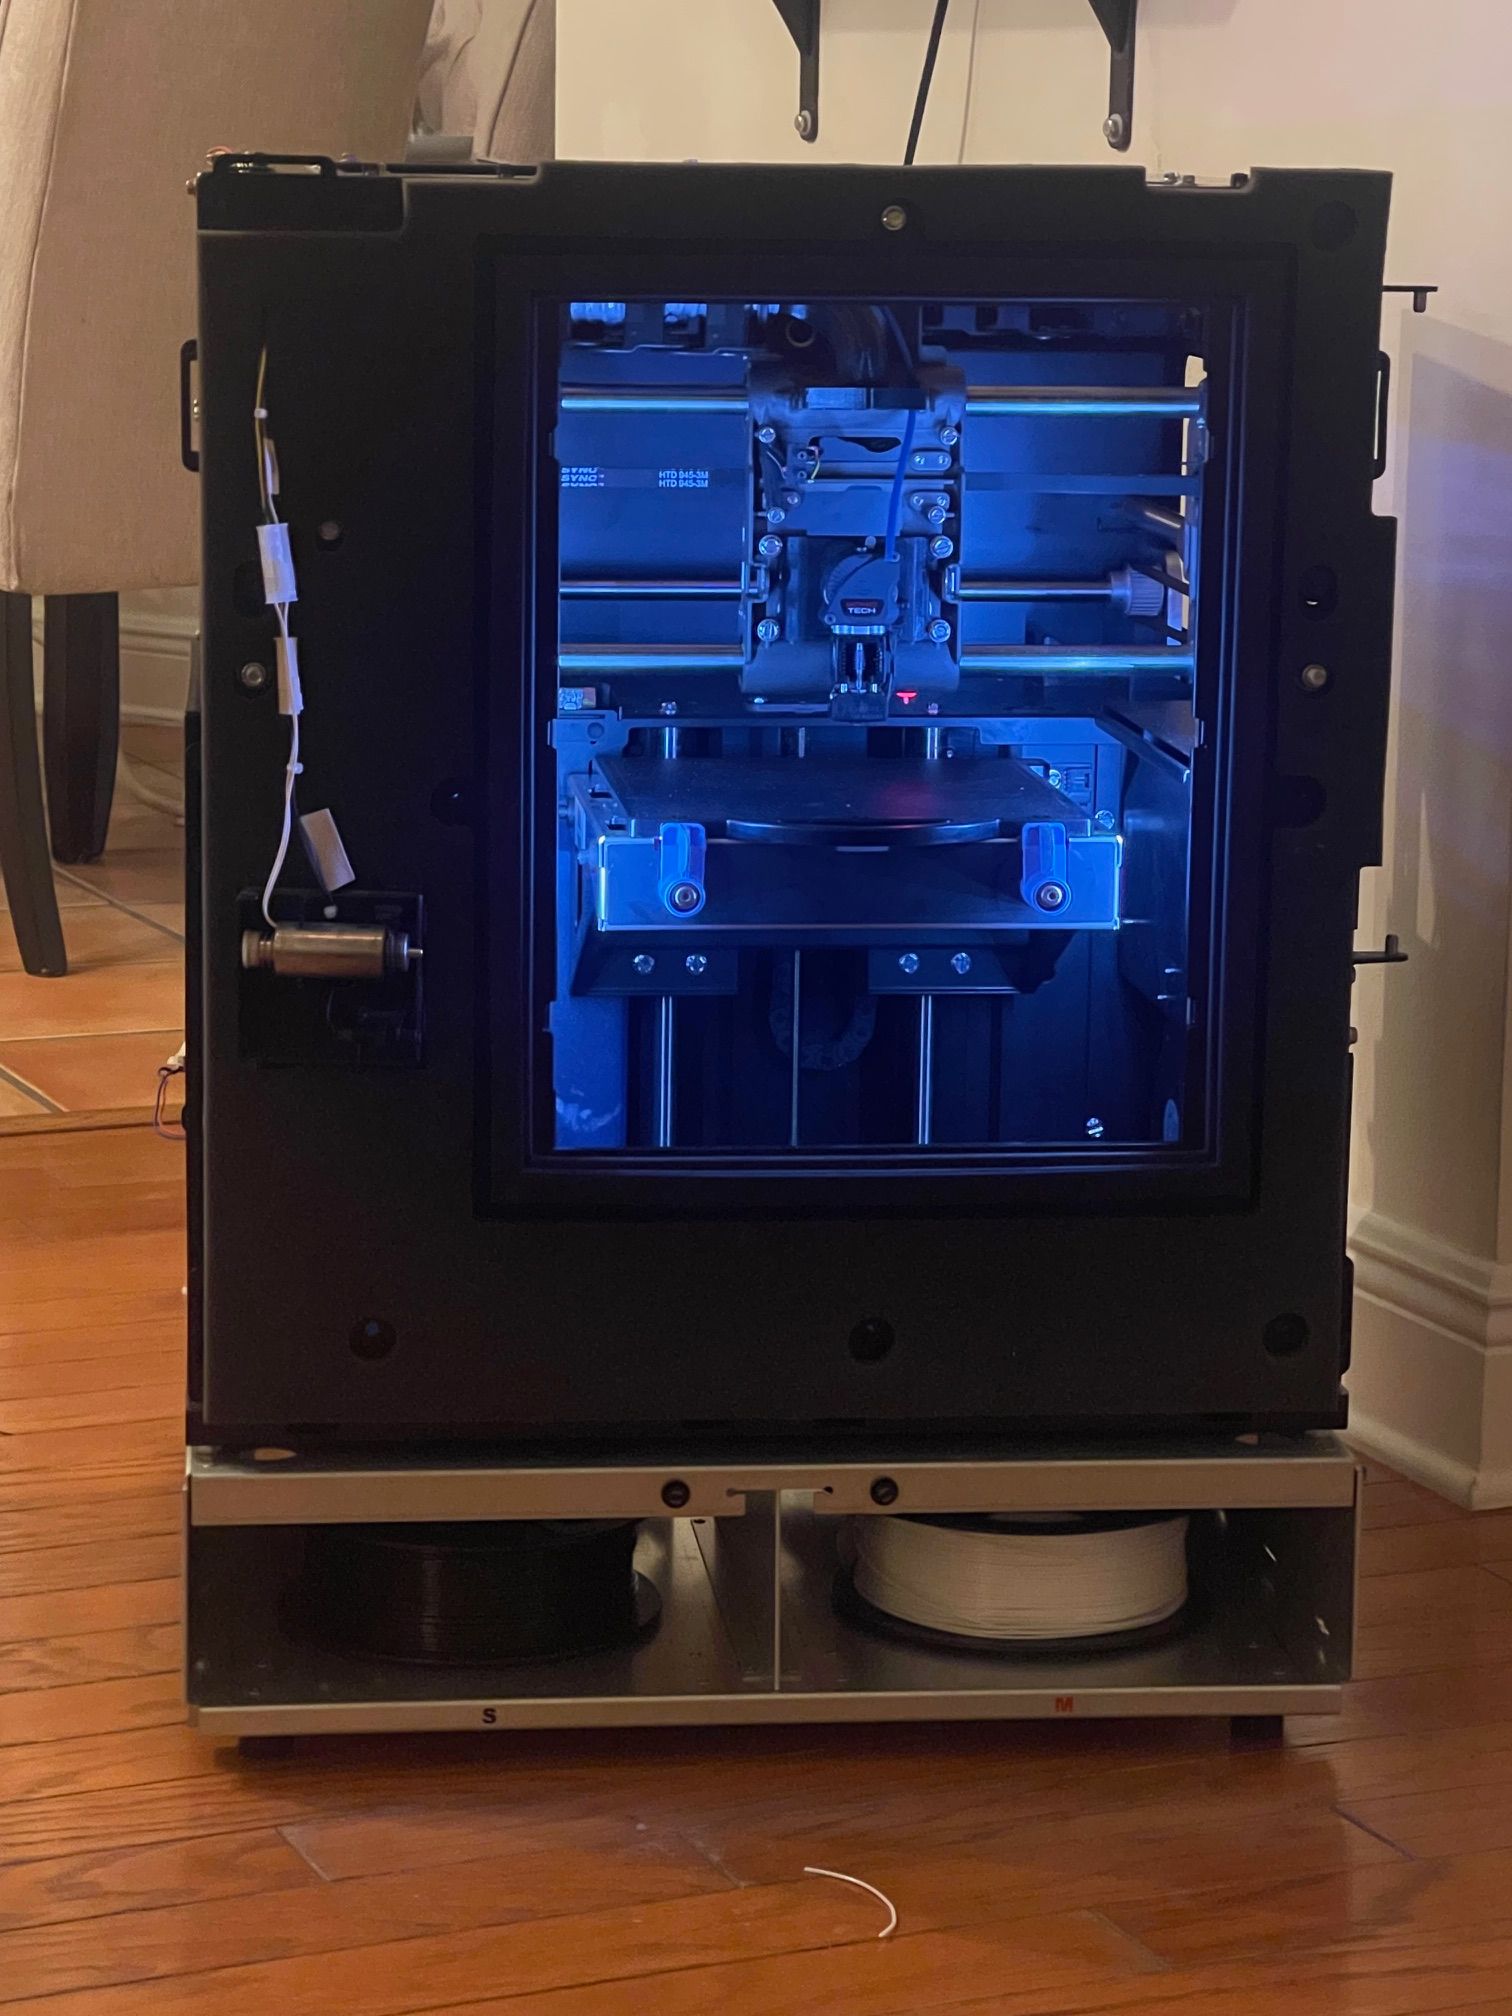
This printer started out as a random Facebook Marketplace find one weekend. $100 later and I now have a 9-year-old machine I fully intended to strip down and use to upgrade the motion system on my other Duet machine, just a retrofitted Wanhao D6 I built years ago. The currents motion system just isn't the best only because of the quality of materials used by the factory, but it works. After some time tinkering with the machine during the disassembly the ideas started to pool, and I began the DIY printer build. And keeping my other machine intact.
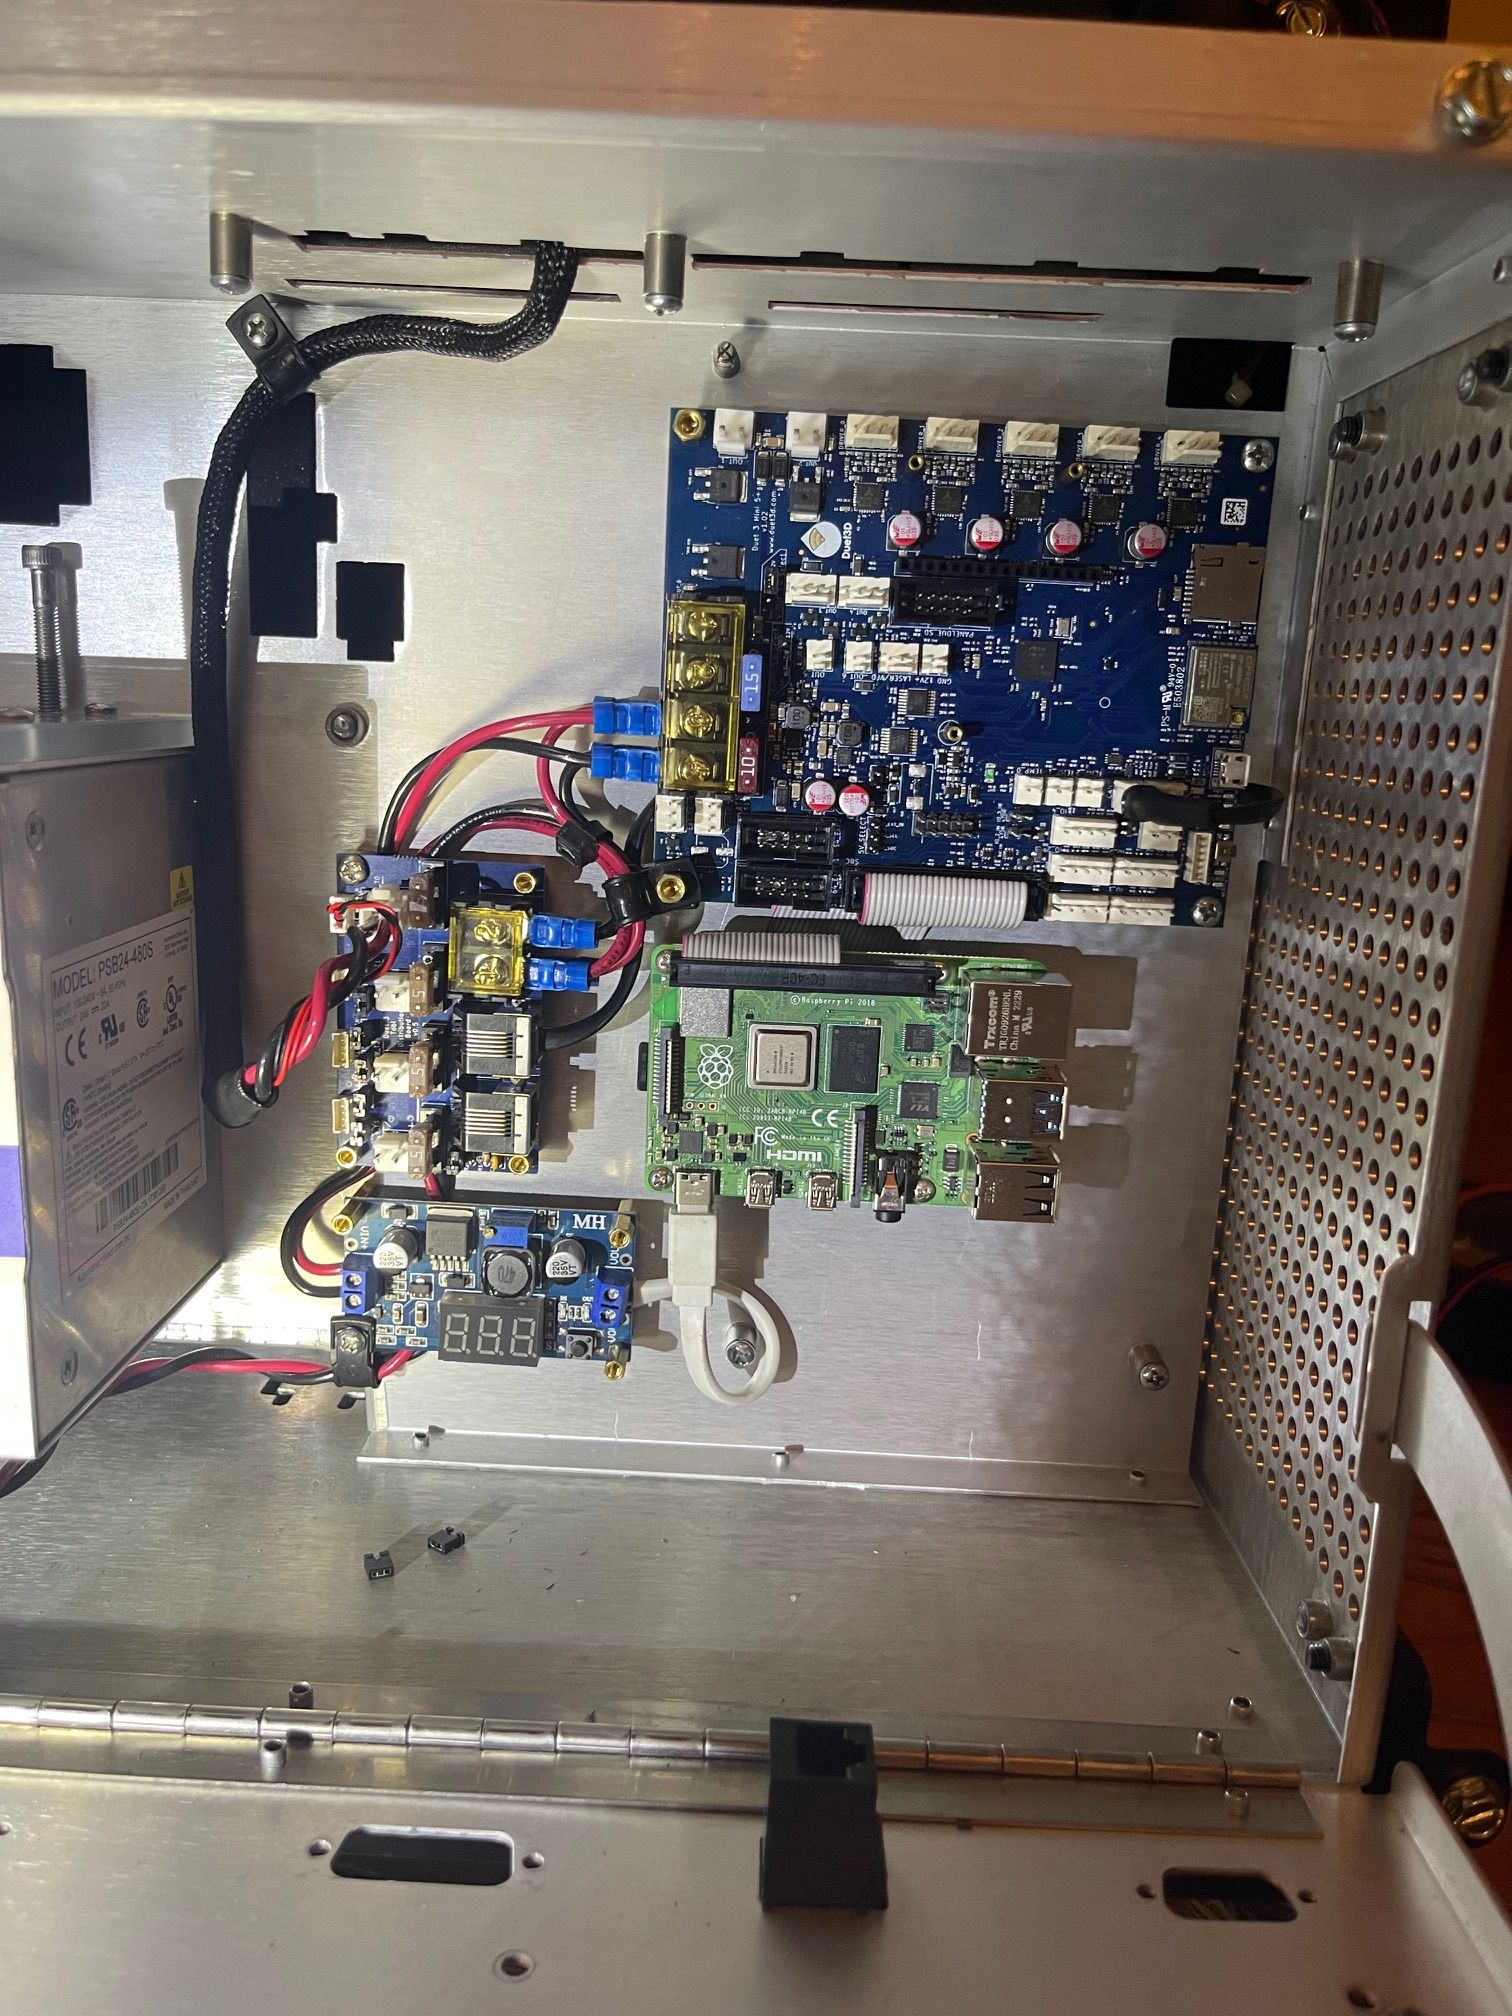
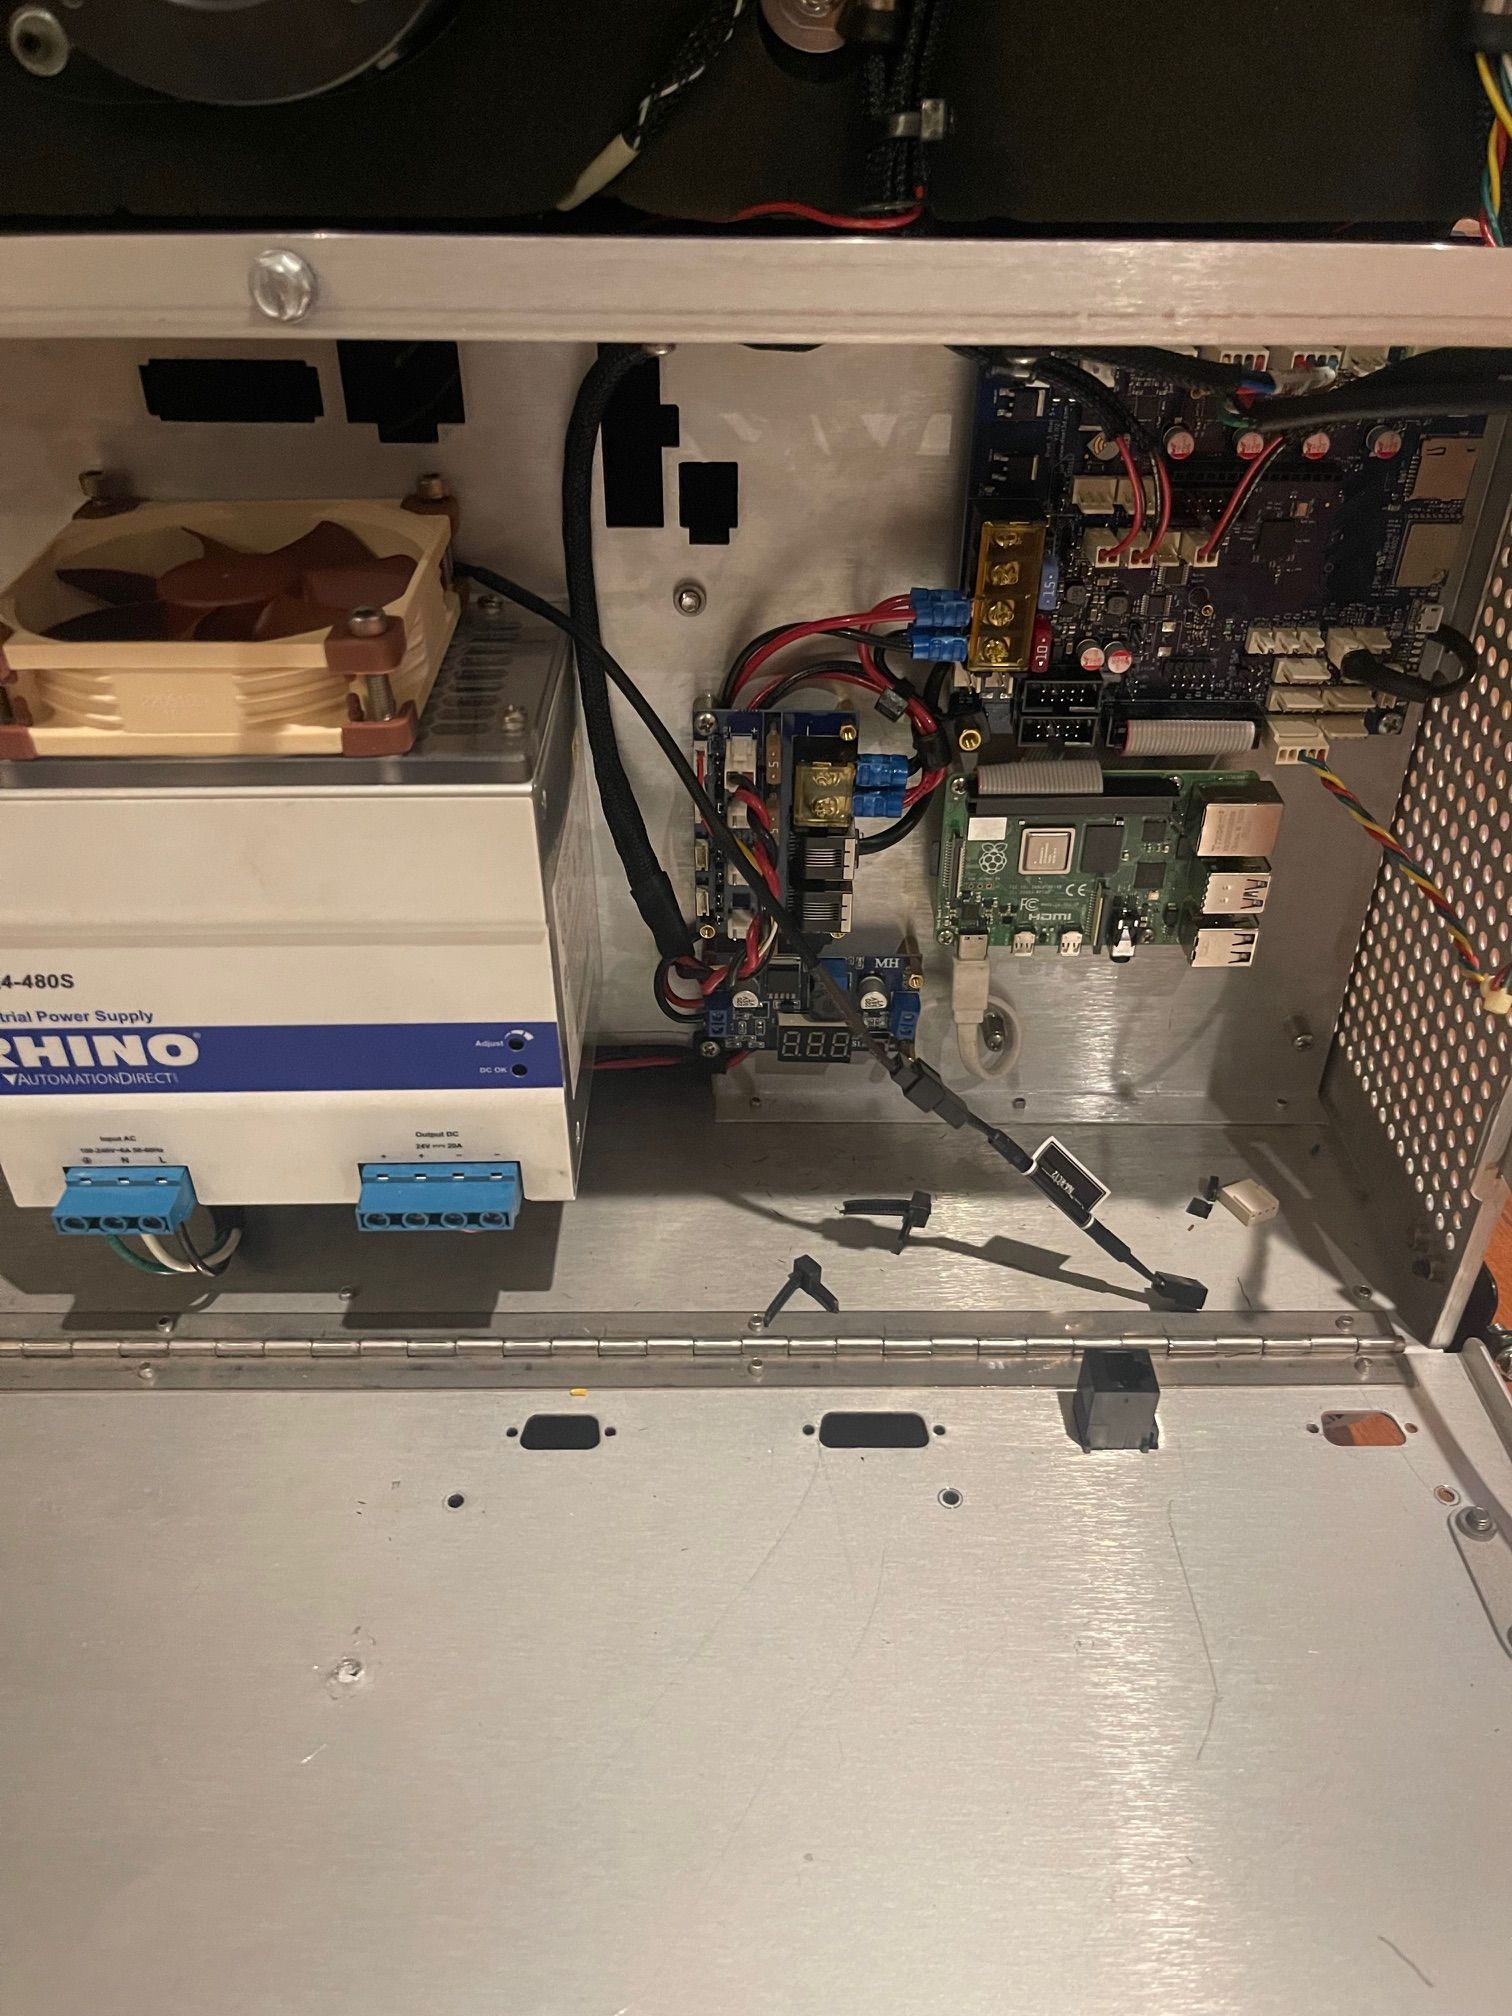
After disassembling the electronics cabinet, I was surprised to find that an old Rhino power supply I've been holding onto fit perfectly inside. Neither the heated bed (down the road) nor the chamber heaters use 24V. Both will/are 120v AC. SSR’s are being used to allow the Duet to have all the control over each heater. But the hot end heater is 24v DC. So, this power supply should be more than the machine will ever need.
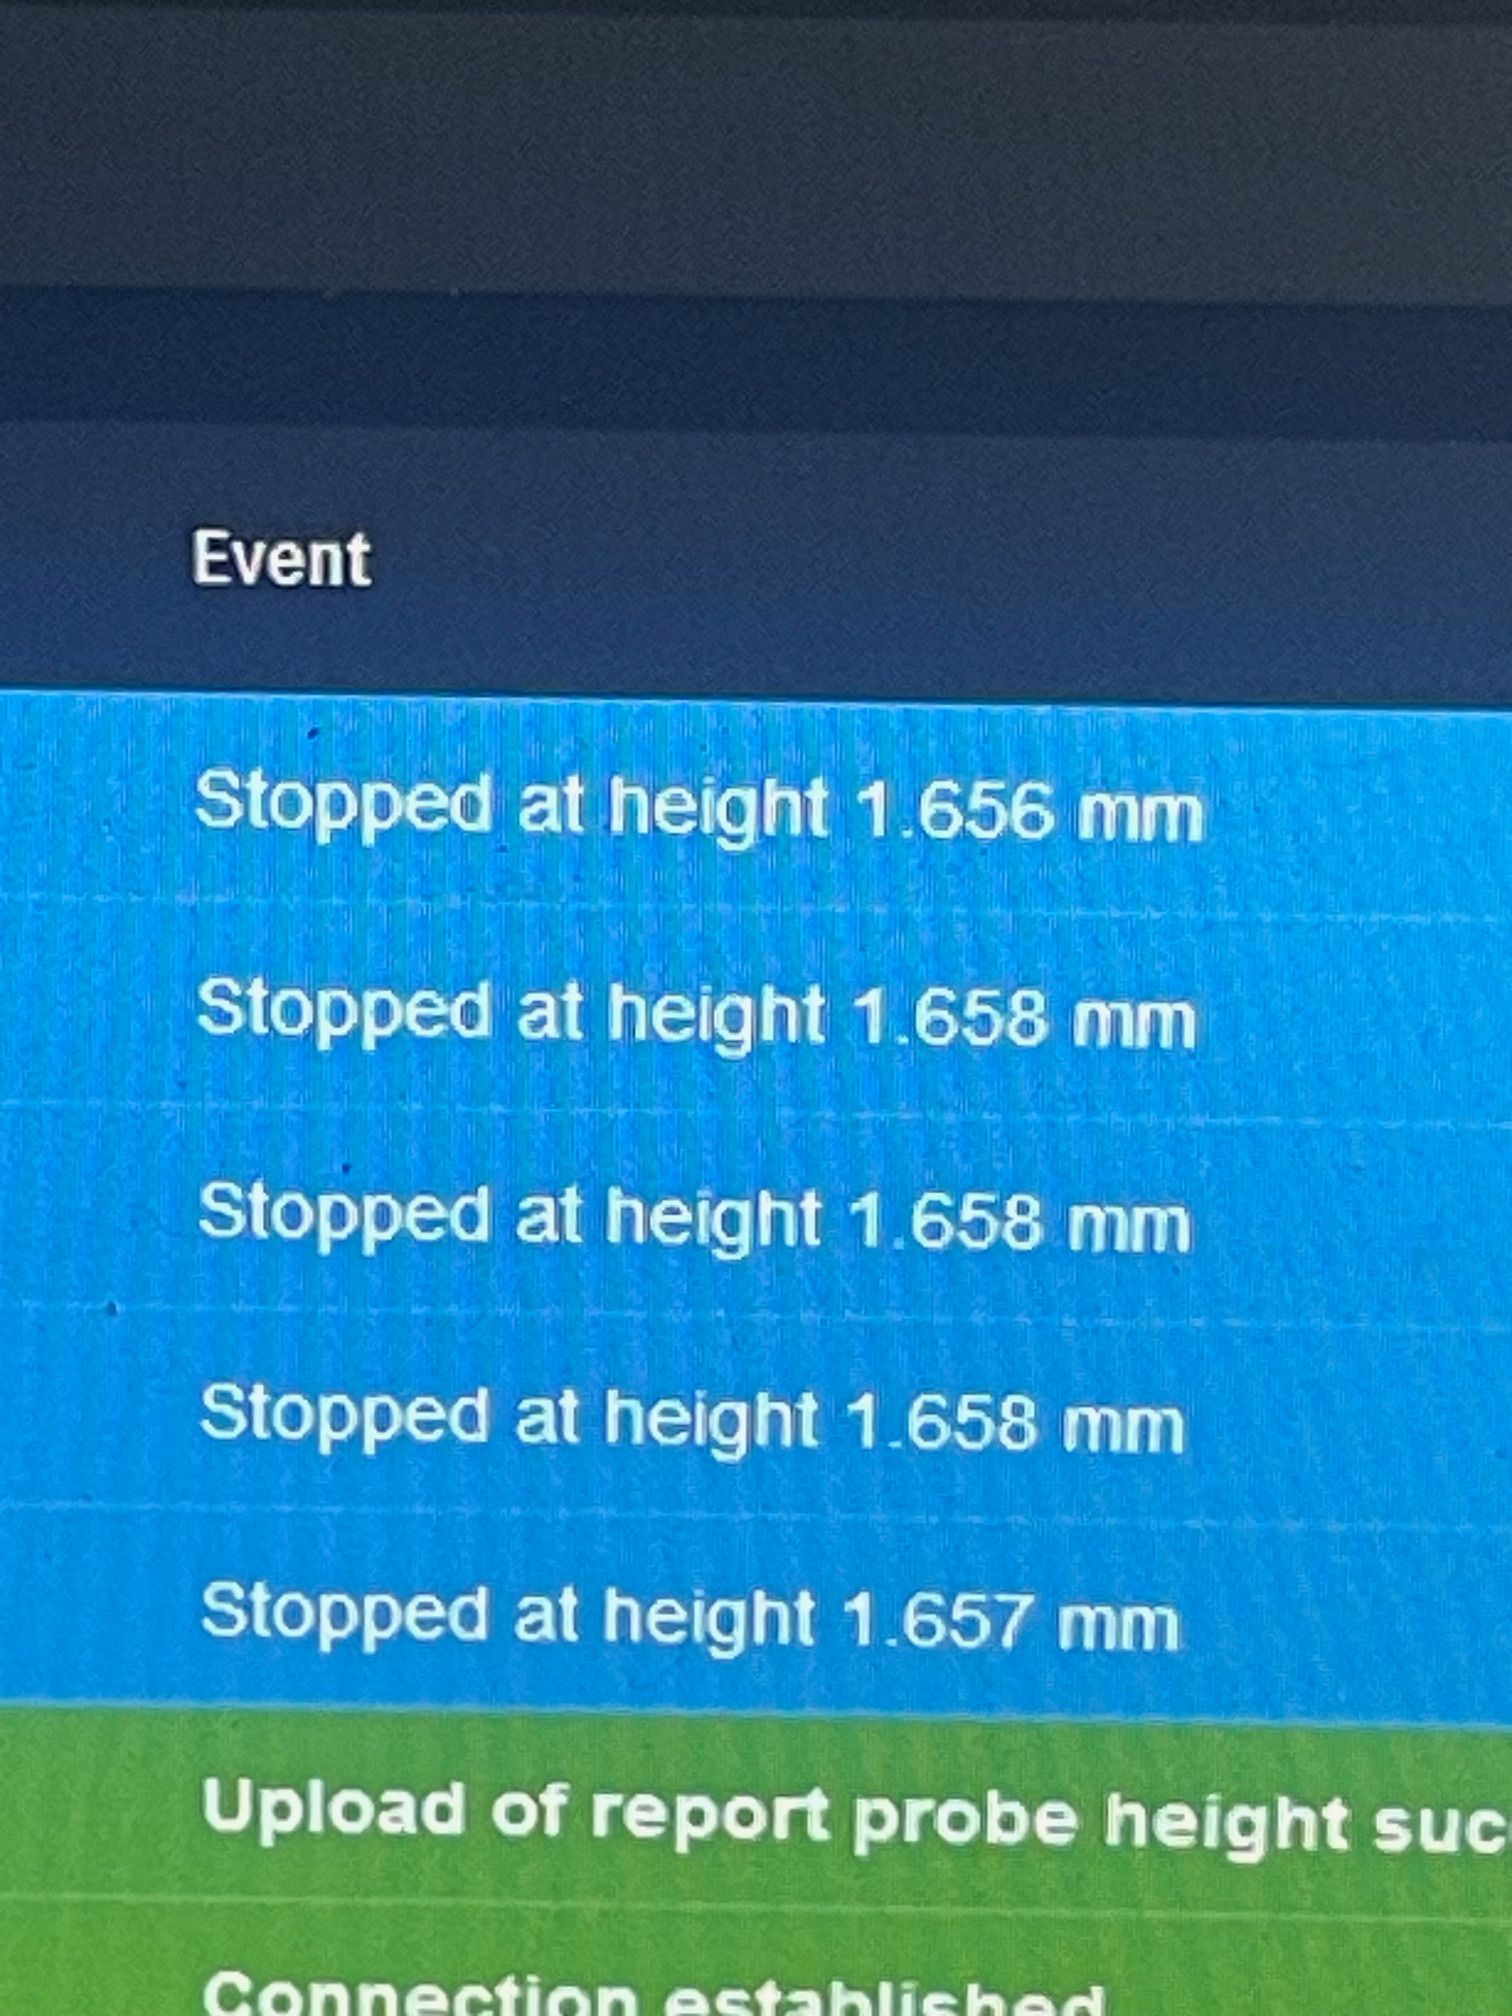
Getting all the original motors hooked up was simple, but to be sure of wiring a multimeter was used to check wiring. I chose to remove all the factory end stops and go with micro switches for simplicity over anything, and eventually I would have to in the event of a failure. With end stops and motors connected I was able to test the motion system and finalize the steps/mm in all axis. With very minimal tweaking from where I started, I was very pleased with its repeatability with my dial indicator.
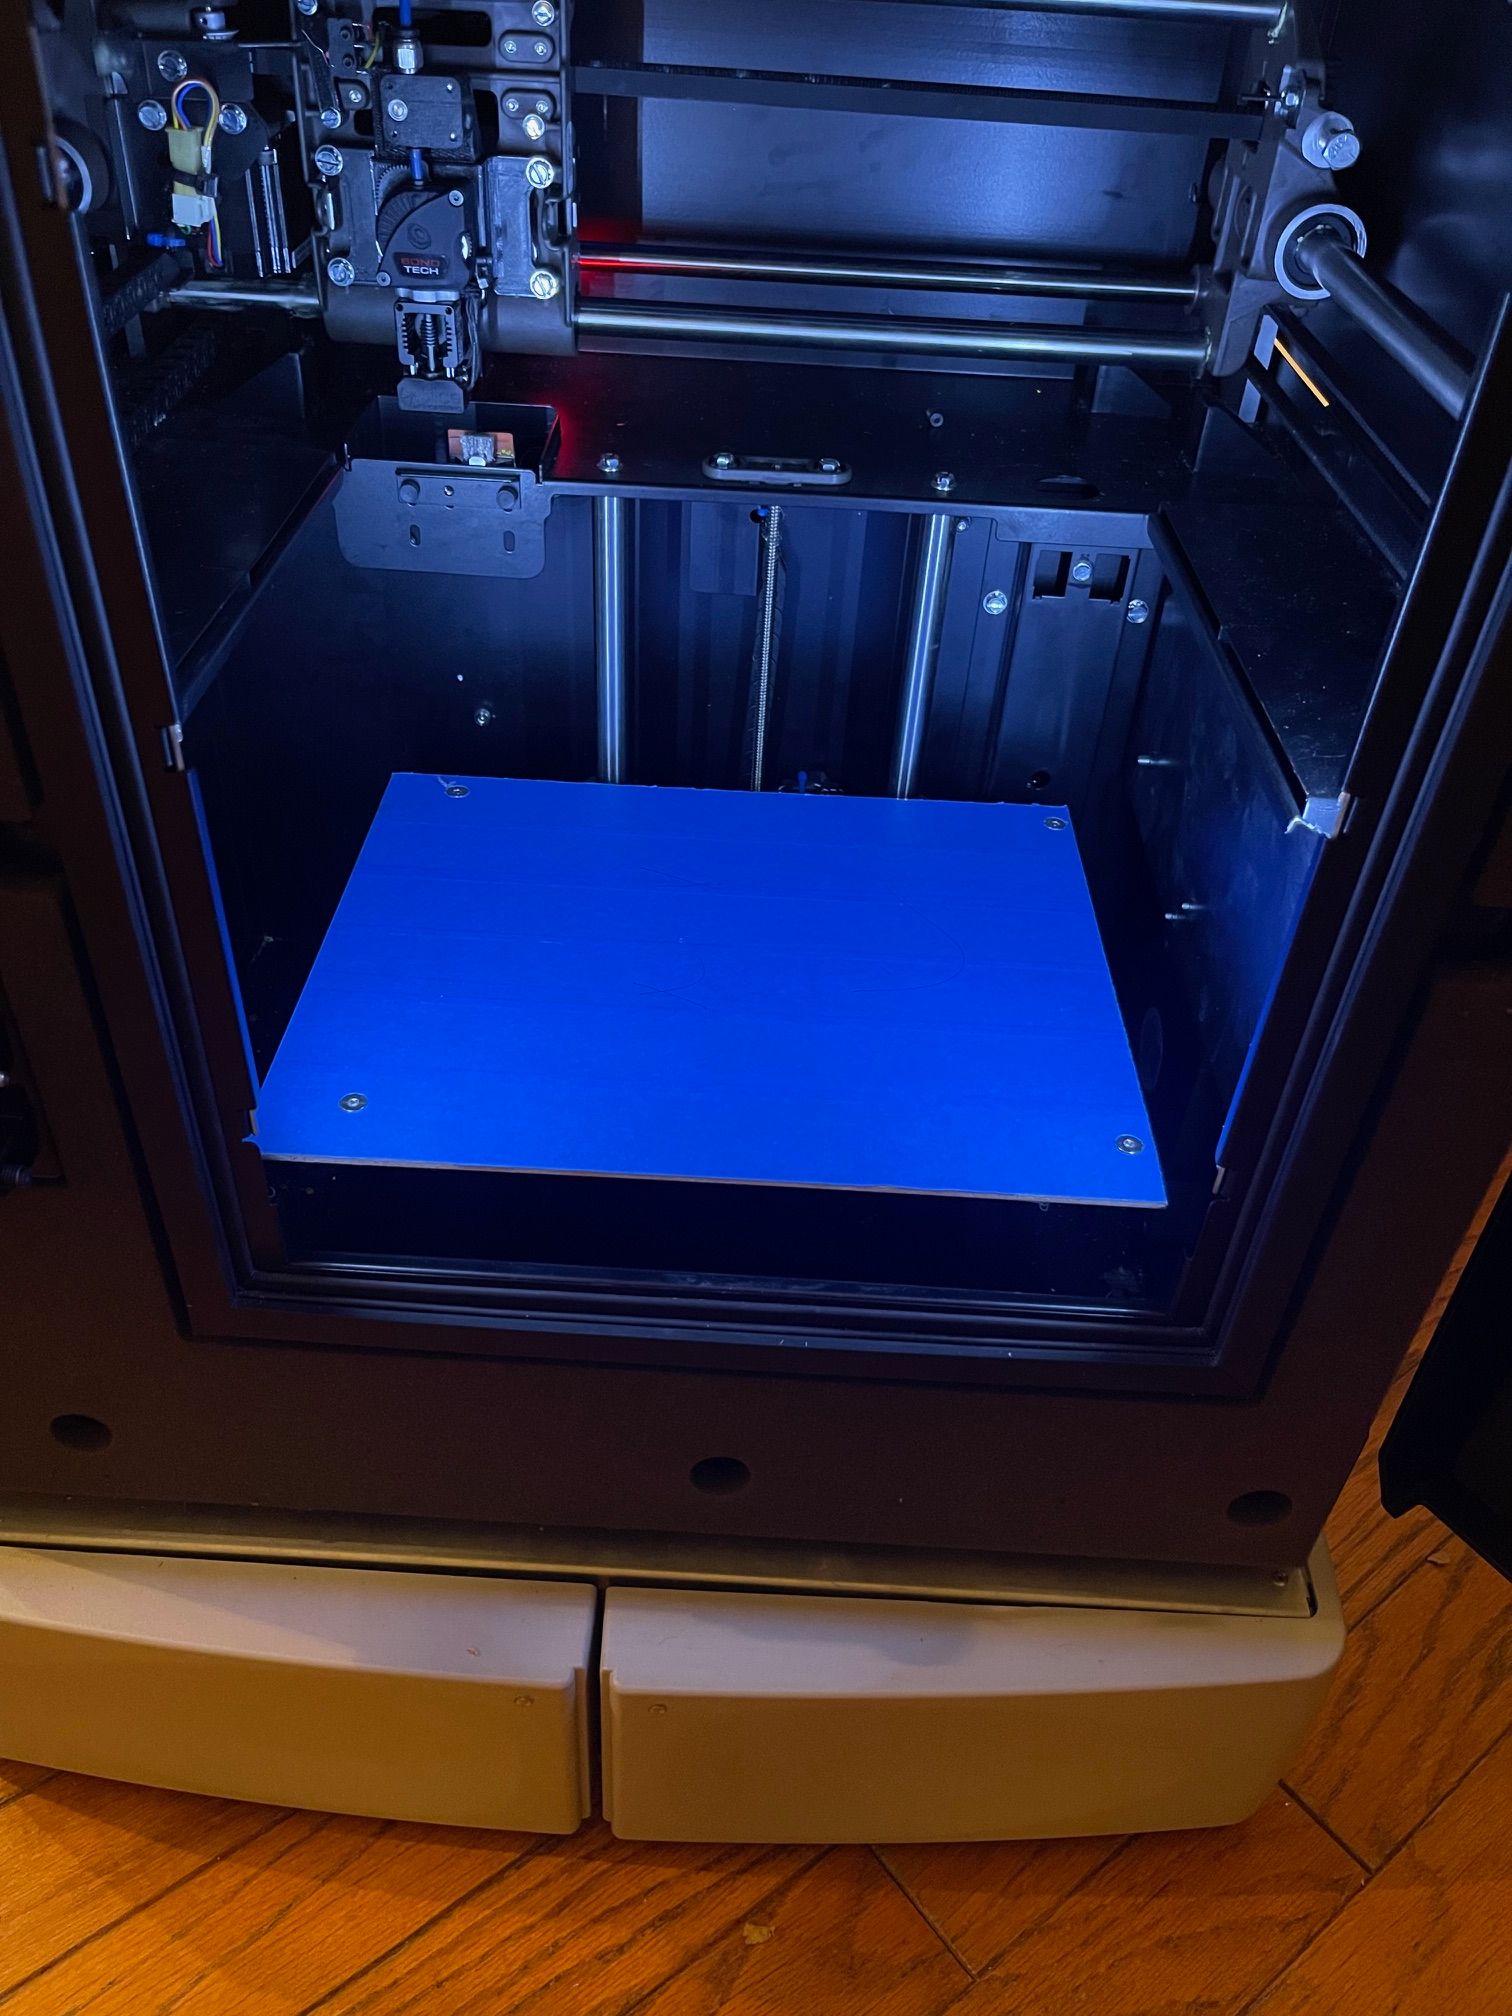
After a few test parts I was able to get the hot end mounted in a way to use as much build volume as possible, but still fit under the factory cover. With some ductwork I was able to maintain the original part cooling fan that will be needed when the chamber is heated. The BL Touch is mounted directly behind the hot end (25mm offset) so visibility is kept, and so as much of the bed is able to be probed. The filament monitor was I wanted to ensure the machine has good quality prints and had to be mounted to the print head because of Duet’s need for it to be on the same Tool Board as the extruder.
The print bed was modified but is not in the final configuration. I will be having a bed built and machined to match the Stratasys tolerances. But as a test bed, it is working just fine. Have had minimal issues with bed adhesion with PETG even without a heated bed. I assume the machine's accuracy has something to do with that. All of the final heights of the machine have been based off of the factory trash can and brush combo. My machine retains the function of the brush even though I could gain 10mm+- in Z volume by doing so. Now it has a 280MM x 240MM print surface and 190MM of height, so at least an improvement over the original size and larger than my other machine.
I chose to continue having the heated chamber functional as well, but not something used unless needed and limited to 70 degrees C. I used a SSR to control the heaters and the duet has conditional Gcode to have the blower fans on if the temp is set to anything above 1 degree C. I have to iron out issues with the blower fans as I believe one is failing/failed but will replace both as a precaution before I use them.
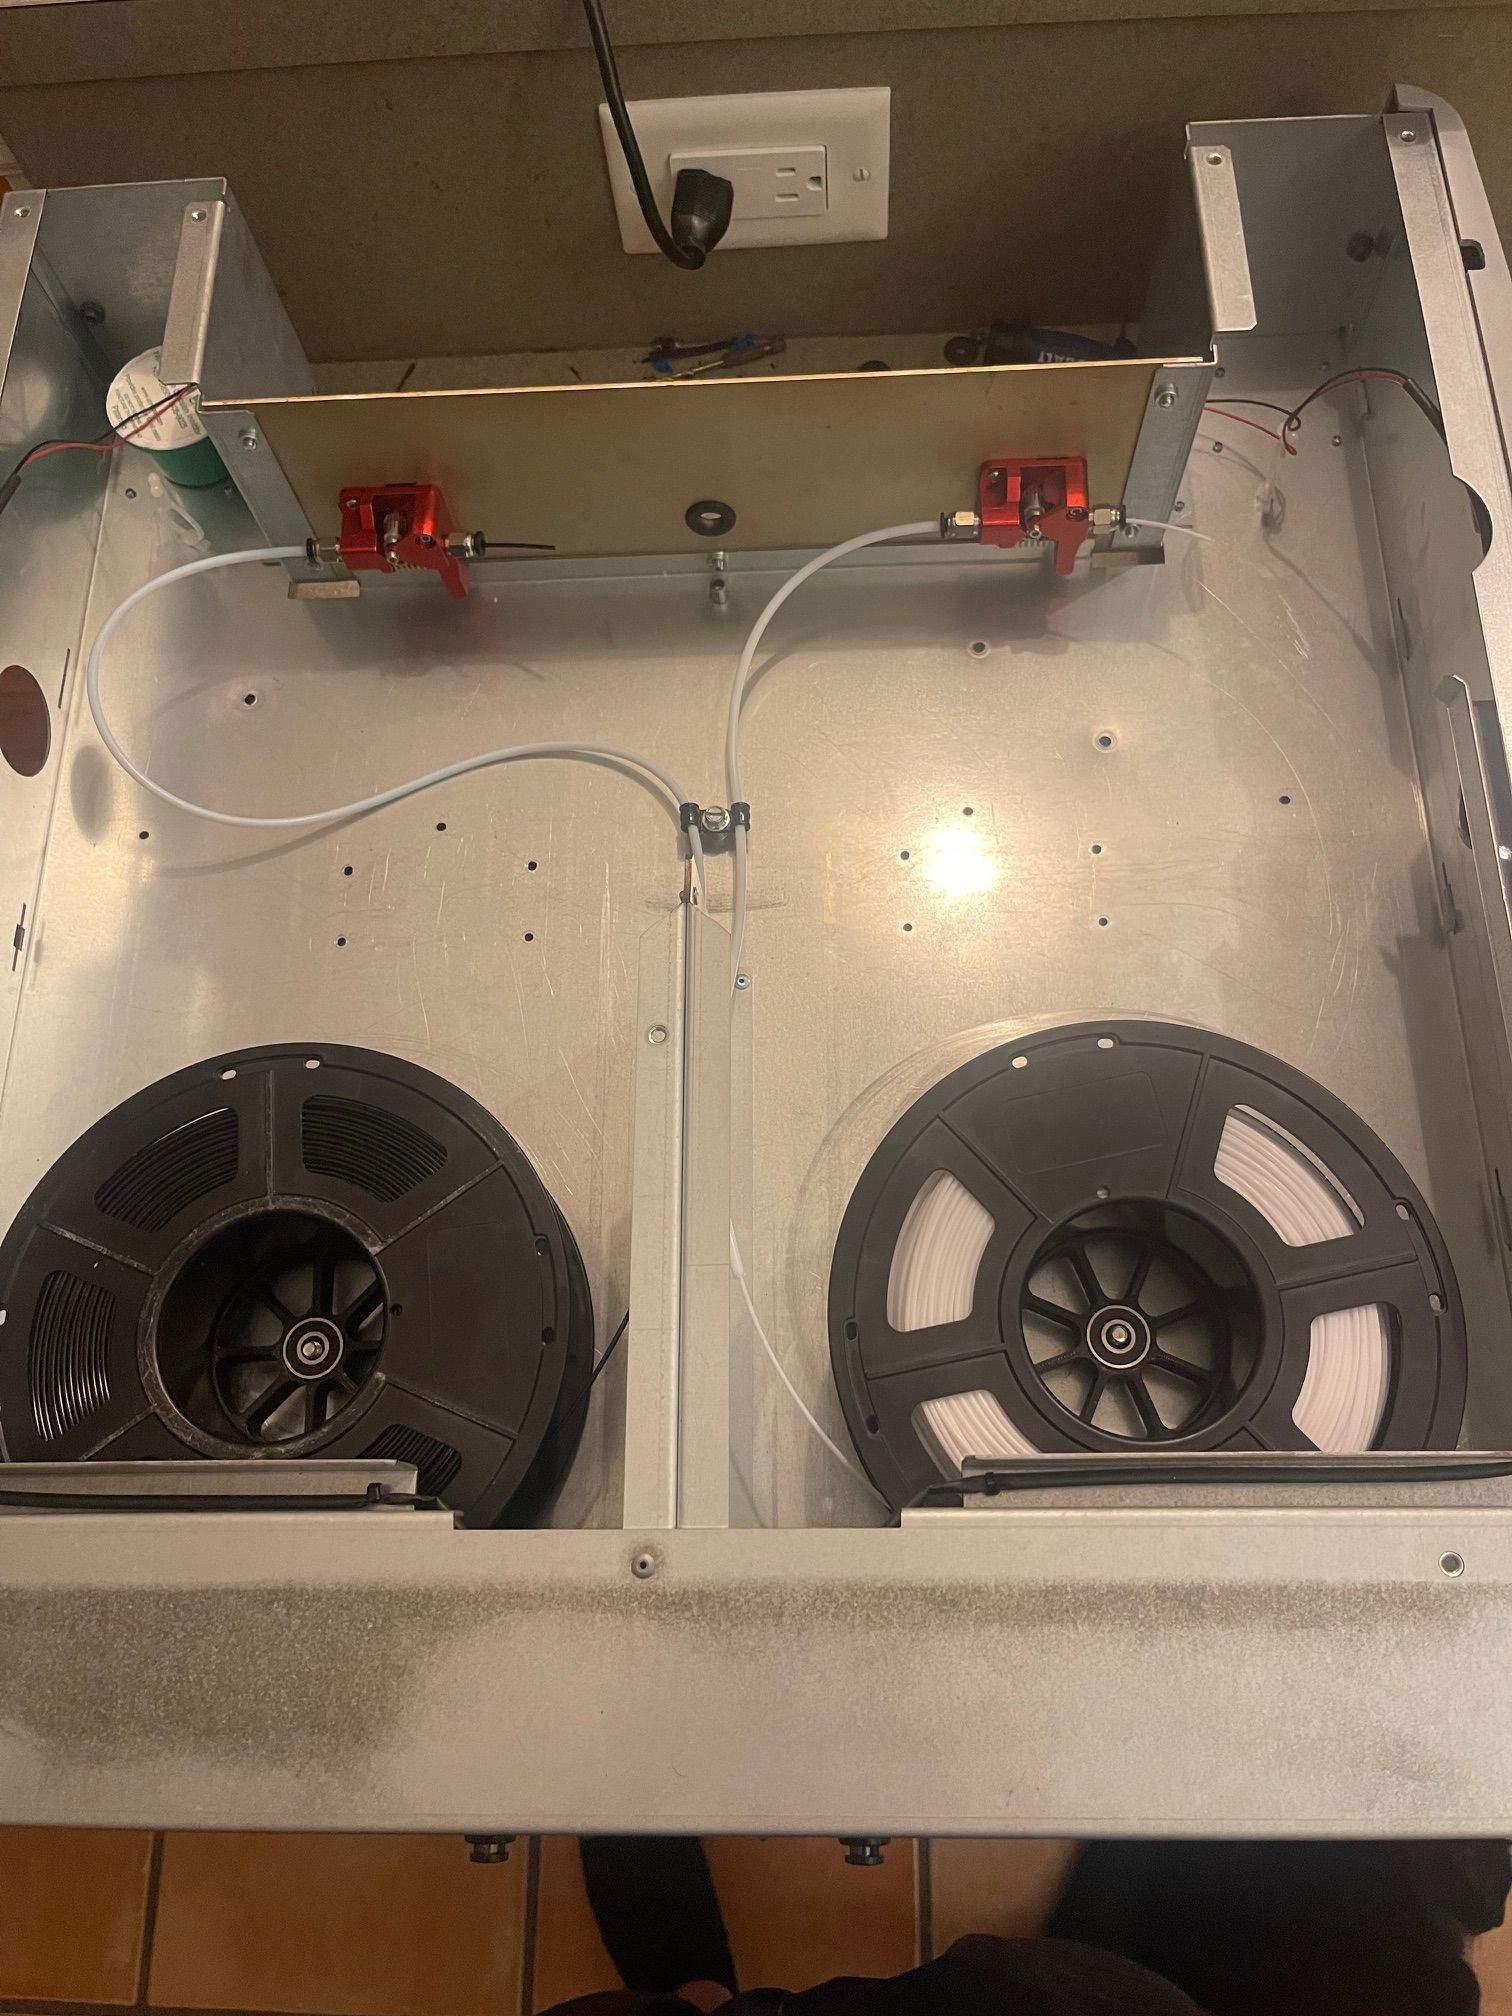
I have the material bay setup in a way that allows two filament s to be exchanged into the single hot end but with testing after extruding filament at temp the machine had issues and I've opted to follow Bambu and cut the filament as close to the hot end as possible and purge the filament left into the trach can in the machine. Though that is a long-term desire for the machine and will have to be tinkered with as I go but all of the needed extruders are installed though only one is mapped in the config.g file.
“Tray 1” is the only operating extruder and is pushing the filament to the direct drive extruder. The motor is mapped as a second extruder motor with a 50/50 mixing ratio with the direct drive, and I've compensated the difference by doubling the steps per mm and the info presented int the DWC is correct. I also have the capability to use the second extruder to home the filament to the direct drive very quickly and not having to put the additional wear on the direct drive motor. I am not a huge fan of having additional tools for each material because long term id like 8+ filaments loaded and ready to print any time.
Adding the 5” HDMI display was only because I happen to have the display laying around and I was able to rotate the screen in the Raspberry Pi 4 to alight with the factory display of the uPrint.
Eventually I'd like to build an enclosure and ditch the ABS parts completely but for not a coat of satin black paint worked to change its look completely. I'd also like to take some inspiration from the Bambu machines and add an 8-spool loading system on top of the Stratasys and ditch the material bay all together. Thats why the Tool Distribution board was added so I'd be able to easily add additional control boards to this machine and continue to modify it well into the future and extend its life. There was nothing wrong with the motion system, and in my head to maintain the original machine well into the future may become impossible so ditching all the proprietary aspects of the machine and adapting it to the open-source components where chosen. And only on my fourth print with it and im astounded with its quality and ability to print as well as it does without a part cooling fan or bed heater is amazing, and I'm sure the addition of those will only increase its ability to print fantastic parts.

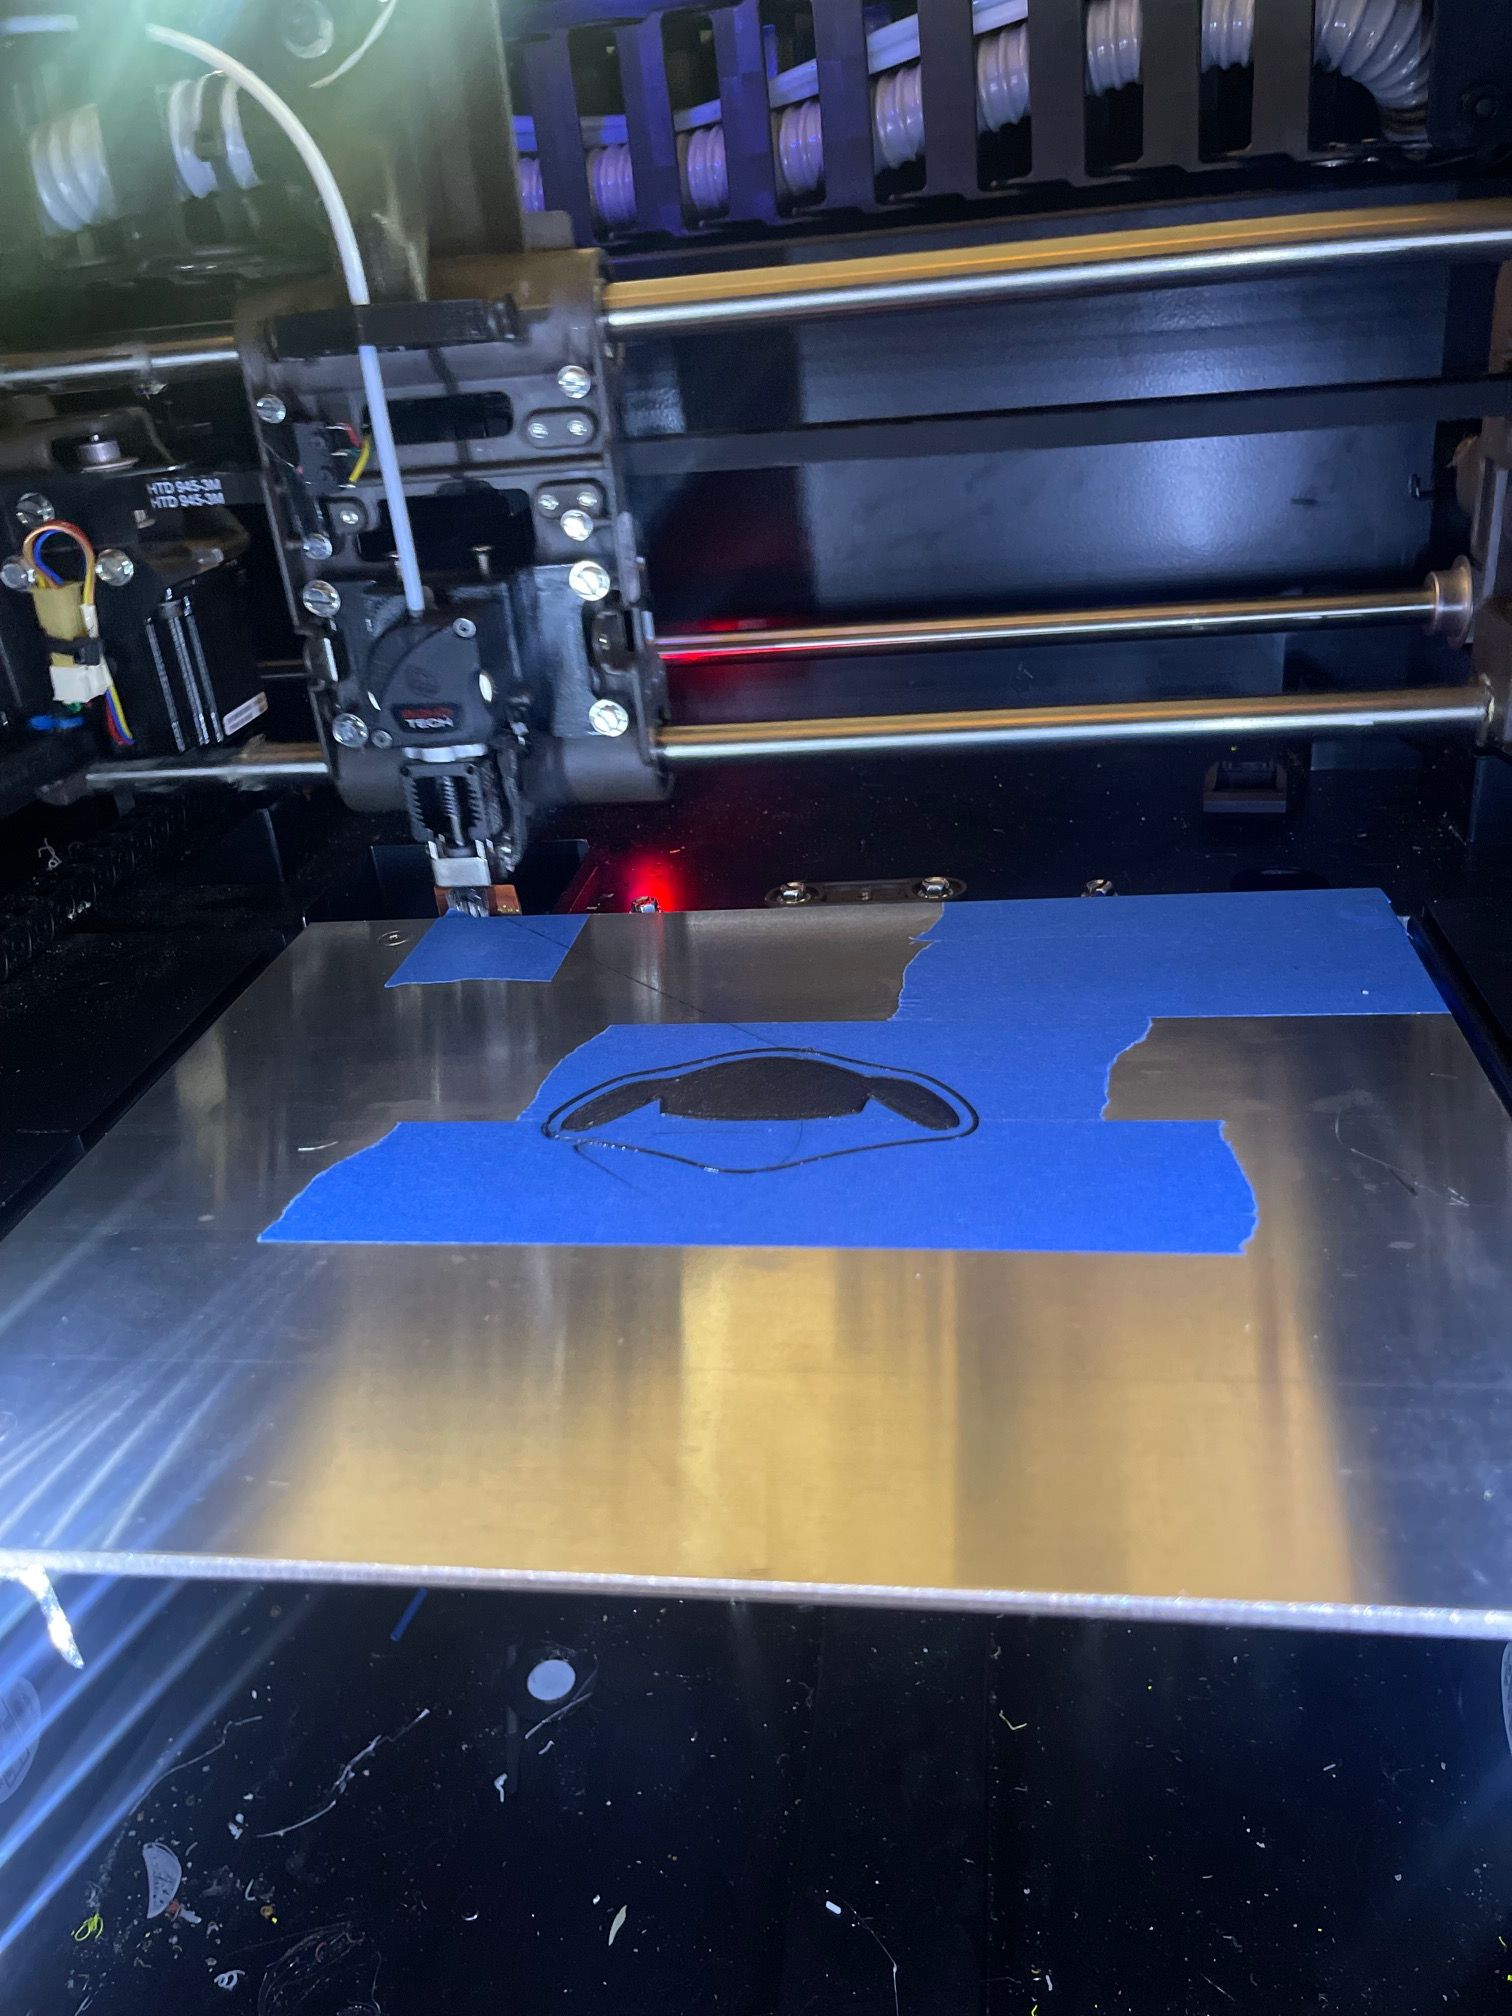
This was taken the first Z probe to setup the BL Touch to show the machines repetability
-
@Thatguywithathing Awesome job! Just amazing how compact your updated electronics are compared to the Stratasys SBC, motion control board, and PDB board.
-
@sebkritikel it’s amazing how much they had to install in the original machine for it to have the same functionality with todays electronics. I do have to do a final clean up on the machine and I’ll be able to have much more detailed photos of it complete
-
@Thatguywithathing it's great to see someone tackle this. I had the exact same thought with my Fortus 250mc that's just been languishing in my garage for years. Have you made any progress since this original post? I'm at Step 0 at this point but my ultimate goal is to use both feeds into the head but, like you, just getting one working for now is great.
I'm thinking I'll need a Duet3 board, a compatible RasperryPi, and perhaps a new power supply? I have all of the original internals so if there's a way to reuse that power supply, great. If not, I can't imagine they're that expensive. If you have a parts list of what you've added/documented, I can start researching if they're still available or updated versions.
Best part, I'd LOVE to get rid of the dedicated 20A circuit that the Fortus needs. Now that it's in my home and not at the shop, I don't really have a dedicated circuit at the moment.
Thanks again and great job!
-
@hub3d This year I kicked off my Dimension 1200 conversion to the Duet 3 ecosystem. I've made been plenty of progress since my last post in this thread, aim to post an update soon. https://forum.duet3d.com/topic/37434/dueprint-with-a-duet-3-6hc-stratasys-dimension-conversion

Goal is to use as much existing infrastructure from the original printer as possible - only items removed were the Stratasys SBC and control board. X, Y, Z motors wire directly to the Duet 3 6HC, and the extruder motor (at the time the picture was taken) is ultimately controlled by 6HC -> CAN-FD -> Sammy-C21 -> Step/Dir -> Geckodrive G320x -> PWM -> Stratasys PDB -> Extruder motor. Right now I'm working on an alternative to the Geckodrive G320x, as it works in a pinch, but its not the right tool for the job.
@hub3d said in Stratasys uPrint Duet Complete Retrofit:
Best part, I'd LOVE to get rid of the dedicated 20A circuit that the Fortus needs. Now that it's in my home and not at the shop, I don't really have a dedicated circuit at the moment.
I thought the Fortus 250mc only required a 15a circuit?
-
@hub3d IMO. Gut the machine and start with the axis steppers and motions system. I pulled all the electronics out of my machine and started over completely. Imagine if your machine required parts that may not be available in the future. It may require a partial or full rebuild to something else down the line.
-
@sebkritikel I checked out your post on your machine. Good work, but I’m curious as to why you’re choosing to keep the majority of the electronics from stratasys? I’d there a function that’s kept? Or is it the challenge? I personally only wanted to have the high accuracy and also the weight of the machine.
-
@Thatguywithathing Good question! From a long term sustainment perspective, keeping the majority of the Stratasys parts is a risk. If something breaks, or a consumable (nozzle, or liquifier tip as Stratasys calls them, etc) is needed, head to ebay and hope you can find it. Over the years when working on some other 3D printer projects, I've picked up a few random spares off ebay, so for me the risk is low (for now!).
In my case, some pros:
- Limit switches, end of axis switches, door switch and head toggle switches already exist, as well as their wiring. Can reuse
- Dual extrusion system is repeatable and reliable. Can reuse. (I also quite like dual/multiextrusion, be it this, IDEX, etc. Would like to maintain this as a dual extrusion system).
- Infrastructure to power/switch chamber AC heaters already exists, can reuse
- 120V heaters for the model, support material are present, as well as the ability to drive them.
- Existing nozzles (liquifier tips) work well in heated chambers, no concerns about clogging or heat creep
- Cost - reusing as much as possible is likely the most cost efficient approach (assuming we start with a functional printer).
Added Capability
- I added a small 48VDC power supply to power the Duet 6HC. This grants some additional speed for the X,Y, and Z stepper motors vs. stock 24V.
Cons:
- Existing tool head is large & heavy. Yes, it offers great dual extrusion capability, but a smaller print head (or somehow 2x for IDEX) could zip around the chamber and offer excellent prints.
Personal Challenges:
- Closed-loop DC motor control (for the extruder) - a fun personal challenge for me. DC motor control isn't something RRF (or other printer firmwares) natively support (RRF supports closed loop stepper motors via the 1HCL expansion board). Using a Geckodrive G320x with step/dir from an expansion board (could be a 1XD from Duet, or a Sammy-C21, etc) pretty much works immediately, but when driving the DC motor directly, you'll either see the driver fault out, or the motor will see excessive thermal rise - the G320x just isn't the right tool for this type of motor. I'm having much better luck with a Nucleo-64 running SimpleFOC's SimpleDC library.
- Custom PCB. The conversion can be done simply by running jumper wires from the Duet(s) to the PDB, but I wanted to dig a bit deeper into the world of electronics design.
Were the printer non-functional (print head assembly missing, no PDB, etc) then I for sure would have taken an alternative approach to converting it over to RRF. Your conversion is extraordinarily well done, and highlights how powerful modern controller boards are compared to the ancient boards in the stock machines!