Hoping for a little print failure guidance...
-
@vbtalent2 It looks like either the nozzle is too far from the bed or the extruder is not extruding enough filament. The symptoms of both are pretty much the same. Have you confirmed the nozzle height and the e-steps?
-
@MJLew said in Hoping for a little print failure guidance...:
@vbtalent2 It looks like either the nozzle is too far from the bed or the extruder is not extruding enough filament. The symptoms of both are pretty much the same. Have you confirmed the nozzle height and the e-steps?
I followed the (Extruder setup )pretty closely but will be double checking that setup now that you've given me some direction...
When setting up the nozzle I used a piece of paper as the guide to determine the closeness which seems to be pretty standard. As for adjusting the nozzle, is it reasonable to try and adjust it down in small increments and try to re-run the code?
VB,
-
This post is deleted! -
@vbtalent2 Please check that the thickness of the paper is what you expect. Due to post apocalyptic skimpflation all papers I have measured are significantly thinner than they used to be. HP premium was 0.2mm but not anymore.
Having written that it looks like your nozzle is too far from the bed not too close. Recheck the nozzle height for the first layer.
Make sure the part cooling fan is completely off for the first layer too.
-
Since you use Cura, please double check that filament diameter is set correctly, Cura still defaults to 2.85mm filament for custom printers. Also make sure to check retraction, Cura's default 6mm retract length is fine for 2.85mm Bowden setups. If you want firmware retract, you have to install the machine settings plugin to enable it.
-
I also think it looks like the nozzle is too far from the bed. If you are not aware of the "baby steps" button in DWC and PanelDu, check them out. You can play around all day with pieces of paper and still want to do some fine tuning while your first layer is printing and this is what the baby steps are for.
I'll also jump up on my anti-paper soapbox for a minute - paper thickness is not an engineering measurement tool. Once you shove it under a too-close nozzle a few times or get a little oozing plastic on it, it's not the same thickness and you need to start guessing if you're feeling a clear space to a roughed up space. Much better to invest in a cheap set of long feeler gauges (like this: https://www.amazon.com/Stainless-Feeler-Imperial-Measuring-0-02-1-00/dp/B08GLN7K1R ). On my printer I adjust so that the .2mm slips under the nozzle and the .25mm does not. Then it's baby steps.
And best to do all this with both the hot end and the bed heated up.
-
Thanks for the great reply's...
Last night I got busy and started setting the nozzle closer to bed, I did make some progress. I think I'm pretty close, maybe flattening too much, but I still think there's not enough material being extruded even though I've nearly halved the amount that was already calculated, at least that's my feeling (see pic)?
@mikeabuilder "If you are not aware of the "baby steps" button in DWC and PanelDu"
I noticed the "Baby steps" buttons but was uncertain of exactly how much the increments would impact the closeness of the nozzel so I was doing small increments via editing the config.cfg. I'll try the buttons next... cool feature!
I can do a feeler guage... appx. what should be the starting/ending thickness?? great idea by the way...
Maybe its a Cure setting that's causing the extrusion issue??
Is Cura also not the "best" for beginners to start with?
VB,
EDIT
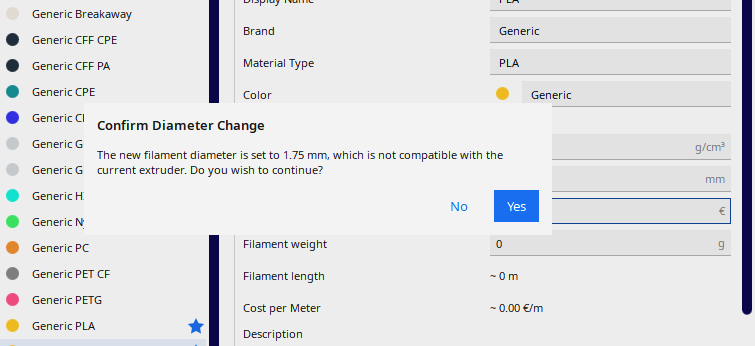
Upon looking through the Cura settings you were correct in the material thikness. I'm using 1.75 but Cure=a generic PLA is 2.85, and won't let me change it and gives the following error..
-
I can do a feeler guage... appx. what should be the starting/ending thickness?? great idea by the way...
Follow @mikeabuilder's advice from his above post. The problem is with the Cura settings: For one, slicers tend to incorporate more and more features which are IMHO printer-specific and should better be taken care of by the firmware - and don't worry, other slicers do the same thing.
More important is to tell the slicer of choice the relevant technical data of your printer.
I'm using 1.75 but Cure=a generic PLA is 2.85, and won't let me change it and gives the following error..
So, in Settings, select your printer and try to set the nozzle diameter of the extruder to 0.4 mm. If the error continues to show up, confirm that you want to continue. Hope that helps to fix the under-extrusion issue. Else, you will have to recalibrate your extruder, see Calibrating Extruder E Steps per MM.
The other thing is layer thickness. It is quite ambitious to start with just 0.1 mm for the first layer. This will not work well with a slightly textured surface (such as blue tape). Cura allows to set the first layer hight separately, so take 0.2 mm for that. BTW, that conforms to the values @mikeabuilder hinted you at: feeler gauge of 0.2 and 0.25. For a layer height of 0.1, you must use 0.1 (to pass between bed and nozzle) and 0.125 (to just not pass).
-
Making some progress... but still uncertain of the closeness of the nozzle to the bed???
The setting in Cura for filament size was the key, I'm printing with 1.75 PLA...
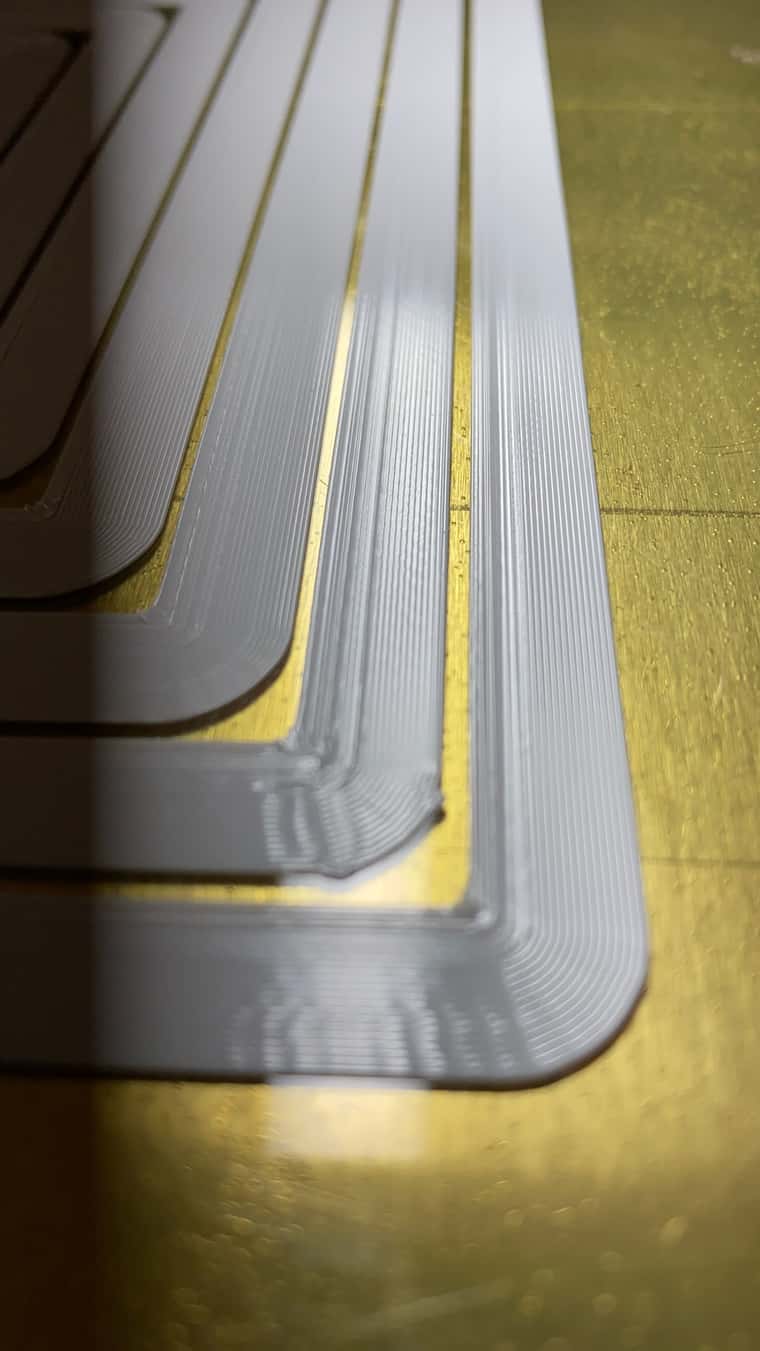
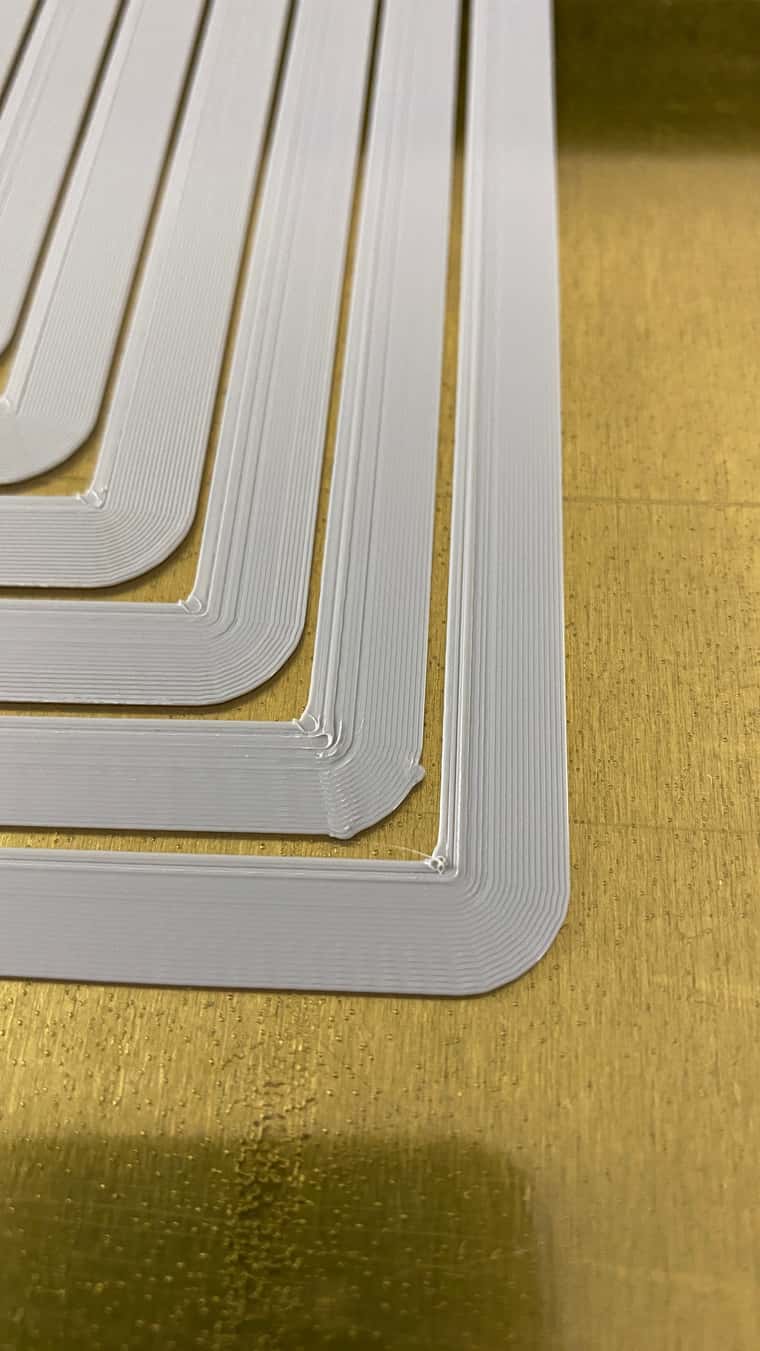
Here are a few pics as I was trying to dial in the nozzle to bed adjustment, using the "Baby Stepping". I closed down the gap by .020 (is that a lot?), I'm uncertain if I'm now too close??? Also, there appears to be a lot of artifacts in the print.
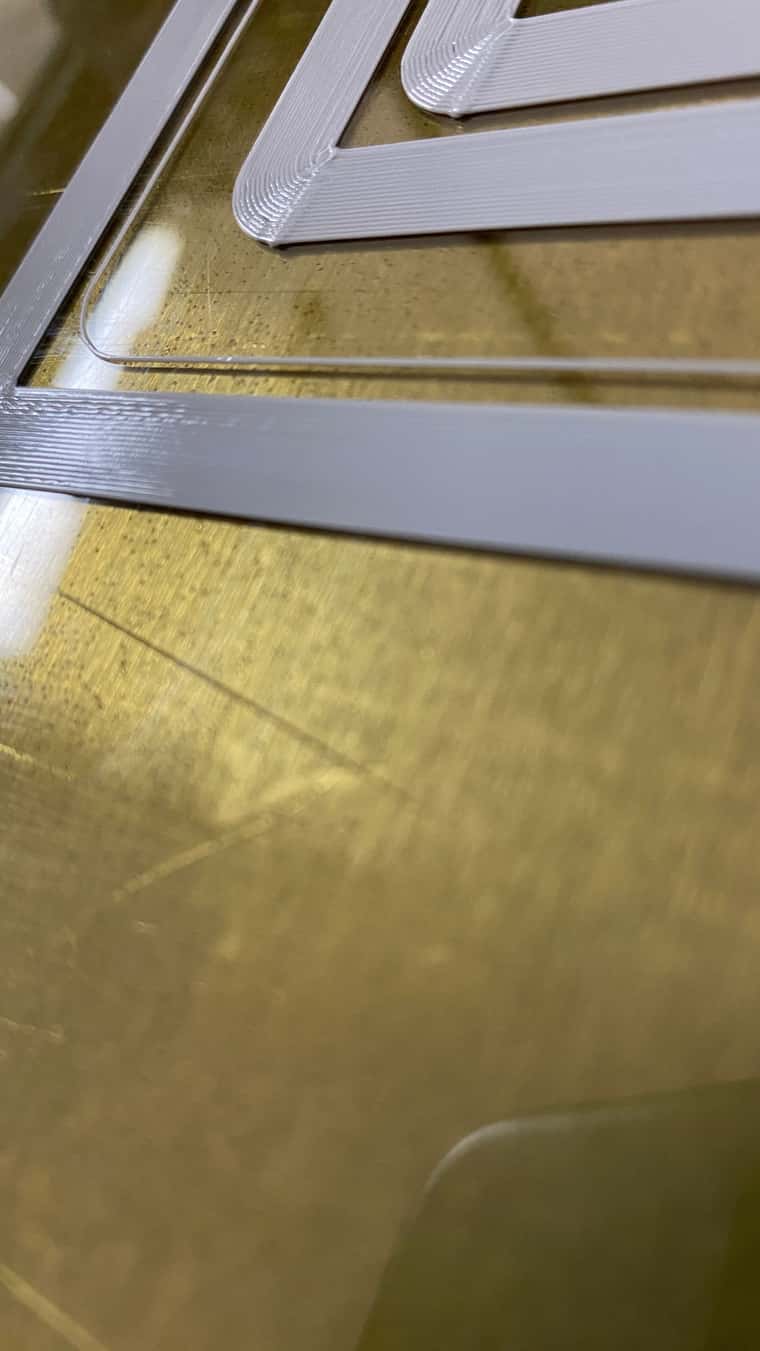
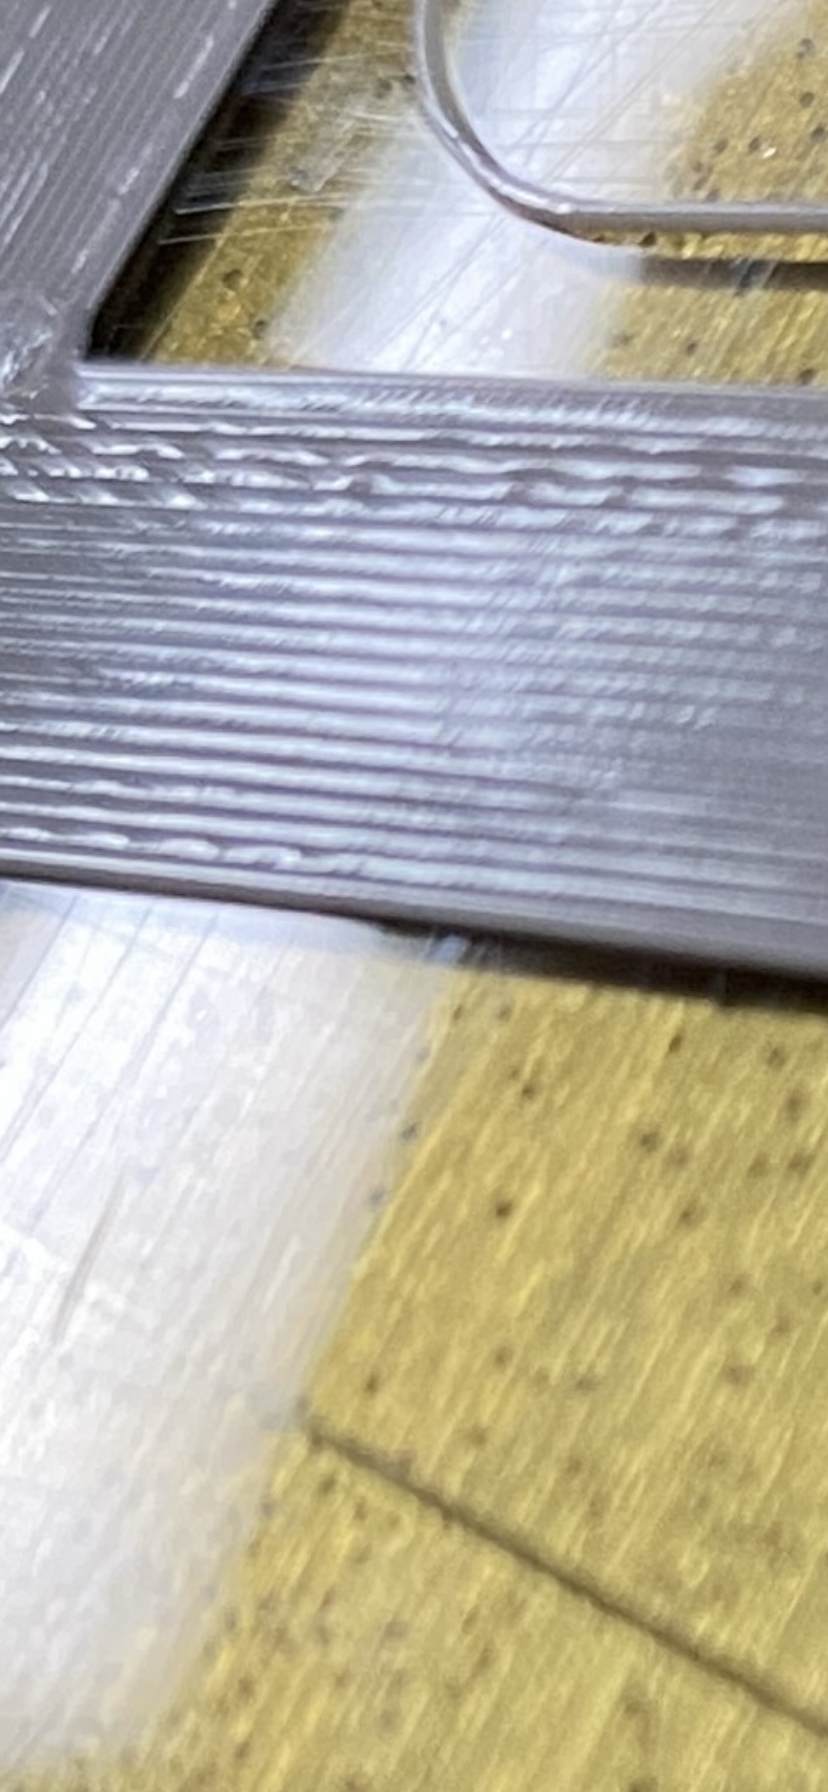
VB,
-
@vbtalent2
Something still not quite right with the layer height. It looks too thick to me but if it is still too far away from the bed then you are extruding too much.If Cura is not set right as far as filament diameter goes I recommend moving to PrusaSlicer. I think that would be a better beginner slicer.
I use multiple nozzle sizes on my printers but I always set the first layer to 0.2mm no matter what layer height I use for the print.
If your layer height is 0.2mm then 0.02mm would be a reasonable baby step height.
Don't worry about artifacts until you get the first layer right.
-
Making some progress...
That’s a good start. Now, it looks like a decent first layer, not like random plastic ”artwork” as before. There are still two things to deal with: Artefacts how you call it, and nozzle height. To begin with the latter:
I was trying to dial in the nozzle to bed adjustment, using the "Baby Stepping". I closed down the gap by .020 (is that a lot?)
The goal is to determine the proper height - this will be done in your homez- and homeall.g macros and depends on whether you use merely an endstop or a probe. Baby steps are a temporary measure, they are used for fine adjustments on the fly. So if you always need to narrow the gap by 0.2 mm, you have to either adjust the Z value in your
G92command accordingly, or, if you use a probe, you want to correct the Z probe offset (the Z parameter inG31).I can’t tell you which nozzle height is „right“, that depends not only on the first layer height, but is affected by the print surface, too: with blue tape, you tend to ”squish” or ”massage” the filament into the tape, with PEI, you want to gently drop the extrusion onto the surface. You can test this by using baby steps, so for now, you are fine with that.
The ”artefacts” are caused by multiple factors whom you have to figure out one at a time. Looks like you face mechanical issues, things like belt tension or improper guidance of an axis, maybe ringing too. To begin with, lower your print speed substantially, aim at 20 mm/s or so. Then, address the mechanical culprits, one at a time. That’s essential as well as keeping the slicing parameters roughly the same from print to print - don’t experiment with changes all across the table. Oh, and stick with a slicer you feel comfortable with. I have used Cura for years - others may be better, but in Cura, I know what I do.
-
Those newer pictures look pretty good, but I would judge the spacing to still be a little big bigger than desired. Here's why - the tops of each line of filament look a little rounded and there is a groove between each line. I try for a smoother surface. If you get too close you'll see excess plastic being plowed along, making rough ridges - though these can also be from over extrusion.
But this can also be affected by the shape of the nozzle. When you look at the opening in the nozzle, some look flat with a hole in the center, and some have almost no flat space. Those with the flat space tend to make flatter top surfaces (just my observation from my experience - someone else might share some good advice about which nozzle shapes are better for different things).
I agree with the comments from @infiniteloop. 0.1mm is a challenging first layer height. For a new printer, .25 or .3 is a good place to start. Once things are working well then start moving closer. I use a .2mm first layer on almost all prints, even if all my other layers are .1 or eve .05mm. Also, find a slicer you like. I ended up with PrusaSlicer, but mostly because the makerspace I belong to uses it.
A method I use for adjusting the babysteps is to make a square shape about 50mm on a side and one layer thick (.2mm). Adjust the setting in the slicer so that you get a few perimeters, then the rest is filled using straight lines. This will give you a shape that takes a few minutes to print and that will also move along so you can feel the part that's printed after you adjust the baby steps. You can see the effects of a change pretty quickly. And after it's printed, you can peel it off and inspect it closer to see if the adjacent lines are sticking to each other (good) or not (too high off the bed or too little plastic).
If you decide to try out PrusaSlicer, here are some tips:
-
When you install, PrusaSlicer, it'll ask you to pick which Prusa Printers (or others) that you have. Your printer may be in the list. But I recommend including one of the Prusa Printers (I'd pick a Mk3S). With this, you can see the settings that Prusa likes for their printers, which can be helpful as you grow your skills.
-
In the upper-right part of the window, turn on "Expert mode". You have a CoreXY printer with a Duet board - you are (or will be) an "expert. Plus, "expert mode" only shows you all the adjustments you can make and each is color coded for beginner, normal, and expert.
-
Hover your mouse over any setting to get a little description of what it does.
-
Create a custom printer in the printers tab. For Duet boards, G-code flavor should be RepRapFirmware. There are sections in Printers to describe your extruder and the physical limits of the printer. In the machine limits section, you can also make adjustments to the max speed, acceleration, etc (though I recommend setting these to "Use for time estimate" and then making all adjustments in config.g).
-
Definitely spend some time looking at the sliced version of your parts when making changes in the slicer settings, and also comparing those to odd artifacts in the real printed parts. Over time, it'll help you make connections between settings and results.
-
-
Again thanks for all of the information and suggestions.
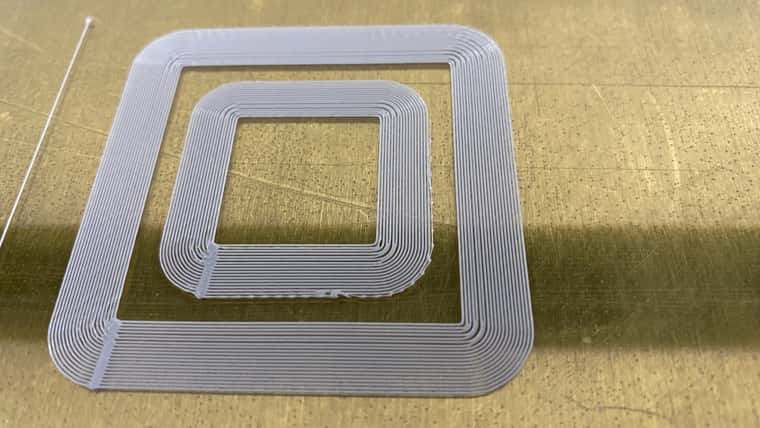
I've changed the first layer to .02mm and I slowed down the print from 60mm to 30mm. I keep pushing the nozzle down .05 while test printing, I think its getting close.. thoughts? The rings are built from the center outwards, so the nozzle is getting closer the further out from the center.
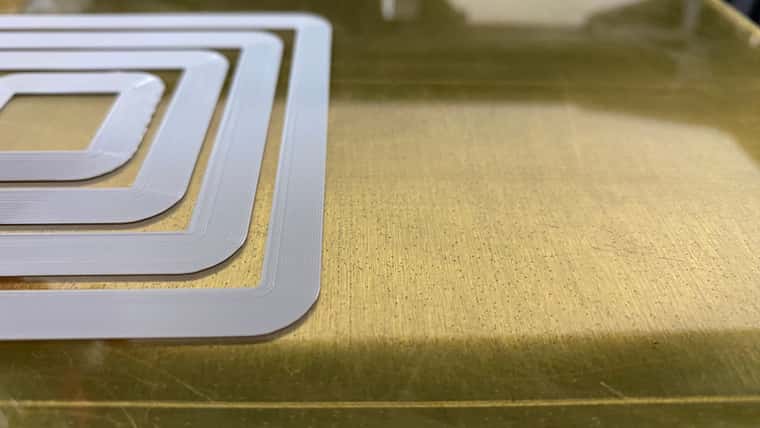
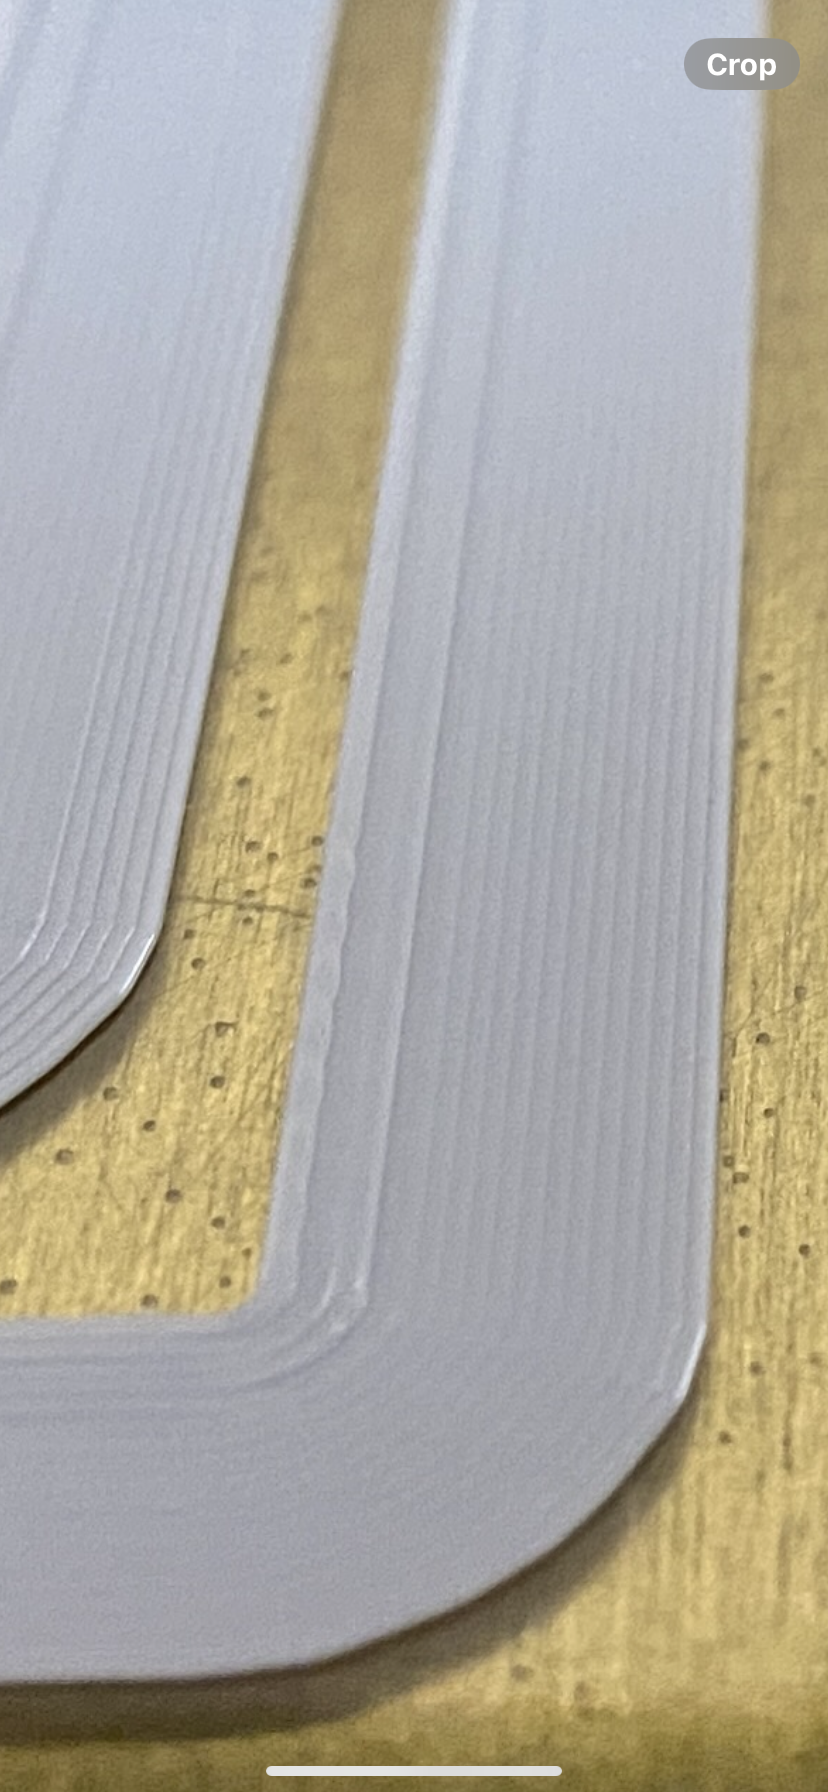
VB,
-
@vbtalent2
The outer rings are looking much better. Measure them with a micrometer so there is no guesswork going on. Be careful to avoid any bumps so you don't get a false reading.If you set 0.2mm as your first layer in the slicer then your printer should be putting down a 0.2mm first layer. That is the ideal situation you are aiming for.
-
I think you've got this part nailed. Now be sure that your zoffset in config.g matches your outer ring and move on to the next challenge.
-
I really appreciate the insight and help...! you guys are great...


I'm assuming that this should check the box on the Extruder feeds and amount of material as well as Nozzle distance to the build plate, correct?
I'll follow up in another thread about the mechanics to keep things clean and separated.
If it were you troubleshooting the next where would you start?
VB,
-
@vbtalent2 said in Hoping for a little print failure guidance...:
I'm assuming that this should check the box on the Extruder feeds and amount of material as well as Nozzle distance to the build plate, correct?
I'll follow up in another thread about the mechanics to keep things clean and separated.
If it were you troubleshooting the next where would you start?
Wondering if anyone had any input to my last few questions in my last post???
Thanks.
-
Next steps... The big categories (I think) are:
Basic accuracy - if you print a cube, say 25mm on a side, and measure it with calipers, is it the right size? Do the corners look sharp? Are there bumps or wiggles? Does things change if the printing speed is increased? Is the top surface pretty flat, or does it have lumps and ridges?
Ringing - (seen most often at higher speeds). If you have stretch in your belts, or something can wiggle, you can get defects in your prints. The Duet board can compensate for some of these. You'll need to get an accelerometer chip and run some tests.
Adapting for shrinkage - When your parts cool, they'll shrink a bit. Print something long that you can measure after printing with calipers. Once you find the error (as a percentage), you can add compensation for that in your filament files.
-
I'm still having issues getting consistent prints and a little lost on where to start.. I thought I was getting close after getting the nozzle dialed in but, no...
So I recorded a few short videos so people could see what was going on..
In this 1st video, there's no material coming out when the print starts and when it does it looks like a blob and doesn't seem to stick?
this second video just seems to compound on the problems, each successive line print creates another blob at the starting point and gaps can be seen in the "finished" section, it's just junk.
The third video, is just showing the progression and is a bit clearer where you can see the mass of material where each line starts as well as the gaps.
I also snapped a few pics of the print, hoping to get some clearer images.
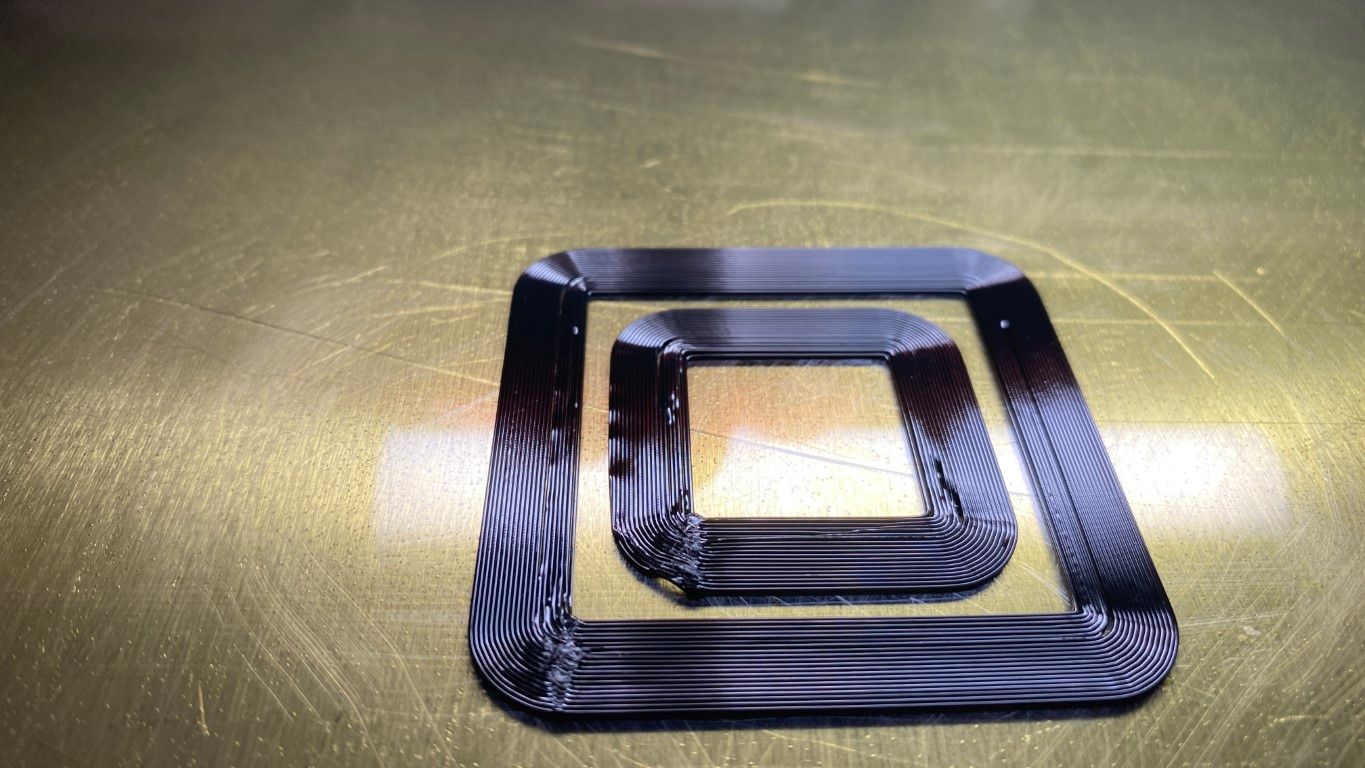
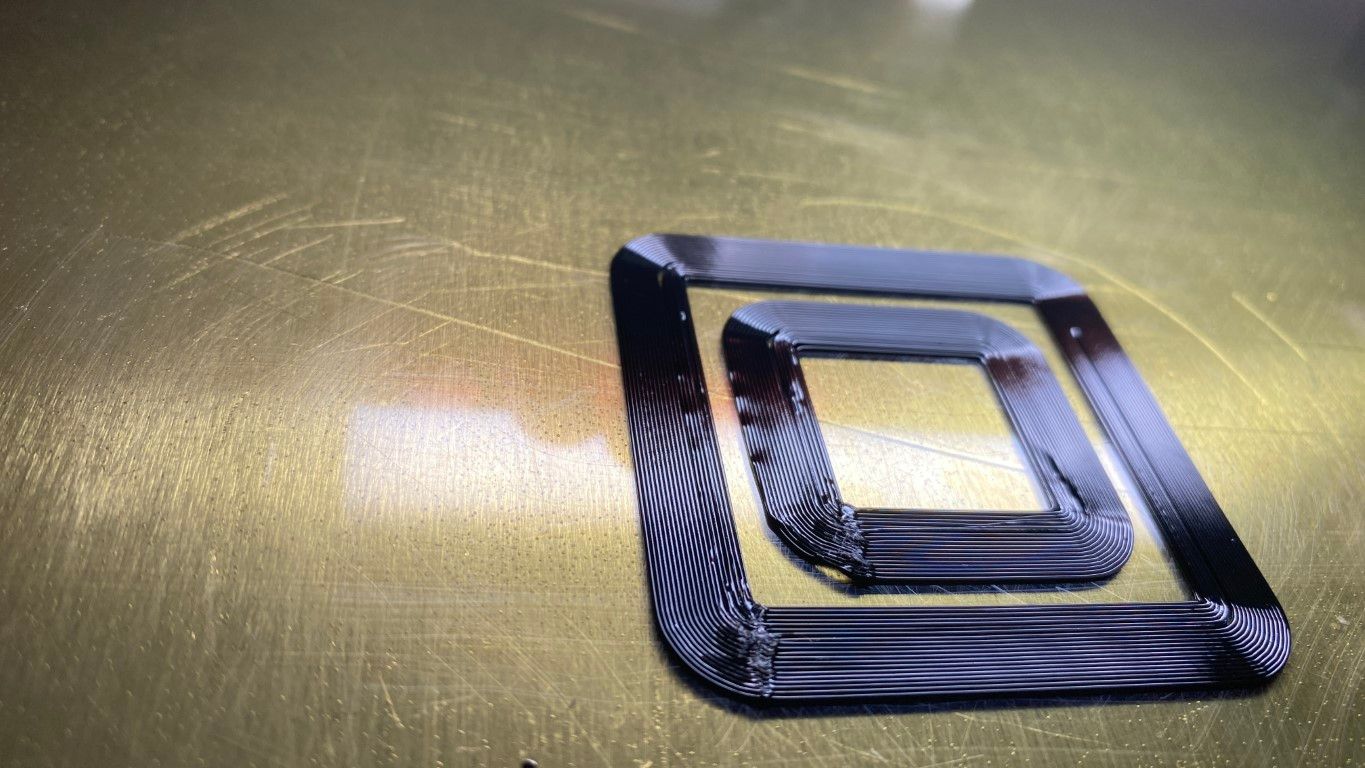
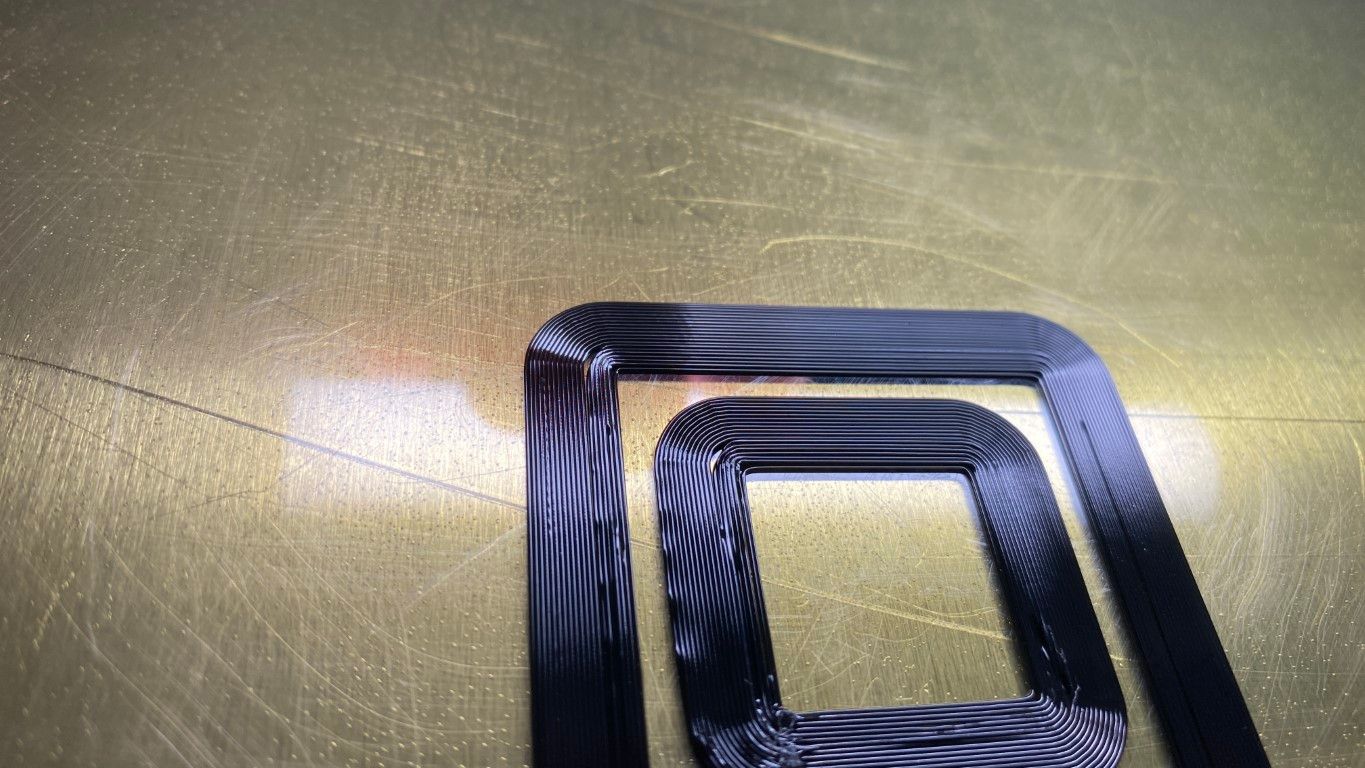
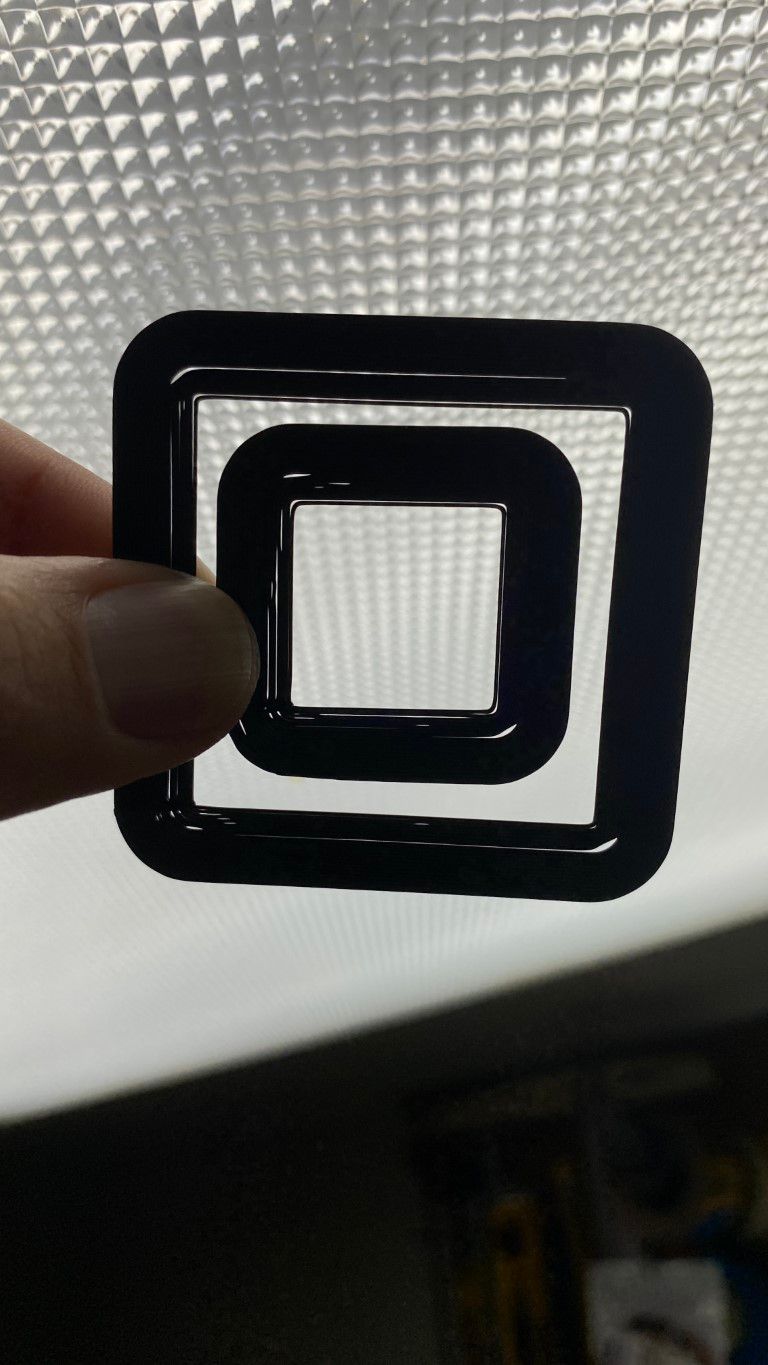
Any suggestions would be helpful...
VB,
-
To me, this looks like the nozzle is too far from the bed. I say this because the individual filament lines look rounded on their tops. If they are rounded on their tops, they are probably also rounded on the side that is touching your glass plate. That can lead to bit and pieces coming off the build plate to make blobs. On my printer, I try to make the top surface of the first layer flat and smooth. The part of the nozzle where the plastic comes out is most likely flat next to the hole. I like to think of that little flat space as an iron that is flattening out the filament on top and providing some pressure to push it against the build plate.
This is where baby stepping should be used. you start the print as you have it, then use baby steps to move the nozzle closer while observing whether the result on the build plate is looking better (in this case smoother). If the nozzle gets too close, then the end of the nozzle will be "plowing" through the plastic already put down and you'll get rough ridges, not the smooth ones you see in your pictures. Then baby step away from the plate until it looks better. .