Mesh bed compensation issue
-
@phaedrux said in Mesh bed compensation issue:
Another way to verify if it's tilt or skew is to set the probe type to manual (M558 P0) and then use the same trigger height check at various positions. Manual probe mode prompts you to jog the Z axis down.
Thank you for the lots of support. I will give this a go tomorrow. I am way too tired already because of this. It was enough for today

-
@kiki0000 said in Mesh bed compensation issue:
But I assume this wasn't my issue
No, that's what I thought too after the last heightmap.
But you couldn't leave the heightmap like this with this large free area.
However, it could have alleviated the problem, since the measuring points and the geometry were completely out of sync.Let's assume that the linear rail of the X-axis is twisted.
Then one way to find out would be to dismantle the rail and turn it 180° to reinstall it.If the error in the test print (as can be seen in the photo) is also twisted (or the trip height values), then the culprit has been found.
If the HiWin rails are all the same length, you could then exchange the X rail for one of the Y or Z axis.
You should think twice about moving the BLTouch. Then you would also have a more stable mount, these inserts as spacers do not look very confidence-inspiring.

P.S.:
If the linear rail is twisted evenly over its entire length, then of course there is no point in turning it over, but I believe that this error occurs more in the left half when I look at the test print.Google Translate
-- Original Text --But I assume this wasn't my issue
Nein, das habe ich mir nach der letzten heightmap auch gedacht.
Aber so konnte man die heightmap ja nicht lassen mit diesen großen freien Bereich.
Es hätte das Problem aber mindern können, da die Messpunkte und die Geometrie komplett aus dem Lot waren.Gehen wir mal davon aus, die Linearschiene der X-Achse wäre in sich verdreht.
Dann wäre eine Möglichkeit dieses herauszufinden, die Schiene zu demontieren und um 180° gedreht, wieder einzubauen.Ist jetzt der Fehler bei dem Testdruck (wie auf dem Foto zu sehen) auch verdreht (oder die Werte der Auslösehöhe), dann ist der Übeltäter gefunden.
Wenn die HiWin Schienen alle gleich lang sind, könntest Du die X Schiene dann gegen eine der Y oder Z Achse austauschen.
Du solltest Dir das mit dem Umsetzen des BLTouch überlegen. Dann hättest Du auch eine stabilere Halterung, diese Inserts als Abstandhalter sehen nicht sehr Vertrauenserweckend aus.

P.S.:
Wenn die Linearschiene auf ihrer gesamten Länge gleichmäßig gedrillt ist, dann hat das umdrehen natürlich keinen Sinn, aber ich glaube das dieser Fehler mehr in der linken Hälfte auftritt, wenn ich mir den Testdruck ansehe. -
@norder said in Mesh bed compensation issue:
Let's assume that the linear rail of the X-axis is twisted.
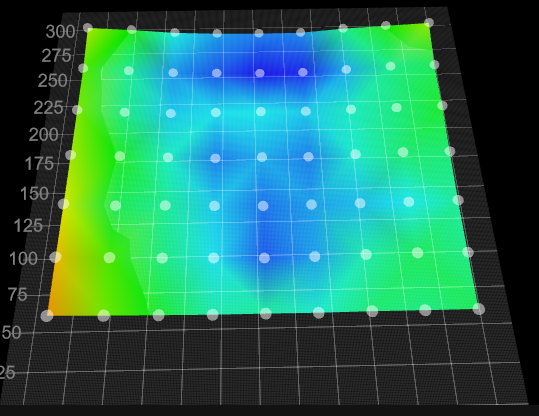
Then one way to find out would be to dismantle the rail and turn it 180° to reinstall it.So the X rail is flipped over. It looks slightly different now but it is weird that now it looks like the front left is the slightly higher point and not the rear left corner. I would have expected now that this moves to the front right corner. Although due to the reason that I have the 3 axis bed leveling and I have 2 Z axis on the right this could compensate for it and maybe this is why it is now showing up on the fron left.
But to be honest the end result is the same. Still during printing the left side is closer to the bed. Shall I go to mess with the Y extrusions (although this su*ks because lots of bolted on componenets here )?
)?
@norder said in Mesh bed compensation issue:
You should think twice about moving the BLTouch. Then you would also have a more stable mount, these inserts as spacers do not look very confidence-inspiring.
I think I should do this but the problem is that my head is really wide already so I would loose a hell amount of width on the print bed. But maybe just to try it works it would worth a try...
-
@kiki0000
The fact that the lower corner is now red is really strange, I would have expected the upper right corner instead.
But it can be due to the leveling of the 3 Z-axes.
The BLTouch has a certain repeat accuracy, I think it's 0.05mm according to the factory specification!?Getting the BLTouch as close as possible to Y0 with the nozzle is probably the best solution in your case, as @Phaedrux already explained.
On the heightmap, however, you can see less than half of the problem because it is distorted by the real unevenness of the printing surface.
If you had a really absolutely smooth surface, then you could only see the error in your X-axis in the heightmap.I made a quick sketch to make it clearer.
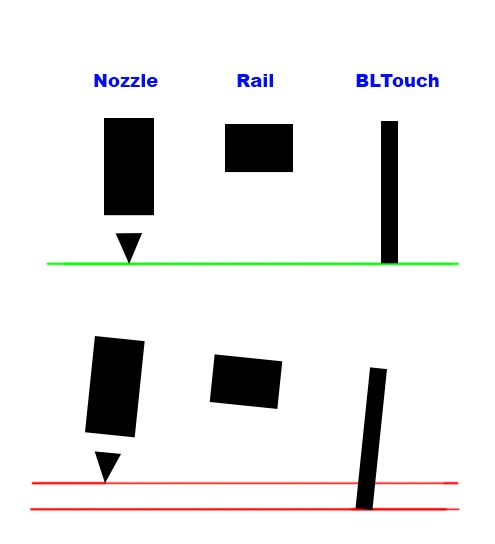
You have determined the Z offset of the BLTouch at a point on the print bed, i.e. the distance between the nozzle tip and the trigger point of the probe (green line).
Now the printhead moves to a point where the entire printhead tilts backwards or forwards (red line sketch).
Unfortunately, you mounted the BLTouch in a place that amplifies the usually small problem and even affects the pressure.
Because the determined Z offset of the BLTouch to the nozzle tip changes with the movement in the X direction.The error pattern that would show up in the heighmap with an absolutely smooth print surface is about half of the error that would show up in print.
Because the axis of rotation (twisted X linear rail) is exactly between the nozzle and the BLTouch.
Please correct me if I'm wrong here.Assuming the problem really is the twisted X rail.
Since we don't have the printer in our own hands, remote troubleshooting is always difficult.
If it were standing here on the table, I would measure some parts to look for the error.
But that should be clear to everyone anyway.
It's annoying when someone completely disassembles their printer out of desperation and in the end it turns out that only one screw was loose.
Your heihgtmap still starts at Y60.

Google Translate
-- Original Text --Das die untere Ecke jetzt Rot wird ist wirklich komisch, ich hätte eher mit der rechten oberen Ecke gerechnet.
Es kann aber an der Nivelierung der 3 Z-Achsen liegen.
Der BLTouch hat ja eine gewisse Wiederholgenauigkeit, ich glaube es sind 0,05mm laut Werksangabe !?Den BLTouch so weit wie möglich auf Y0 mit der Düse zu bringen, ist in Deinem Fall wohl die beste Lösung, so wie @Phaedrux es bereits erklärt hat.
Auf der heightmap sieht man aber weniger als die Hälfte des Problems denn es wird durch die wahren Unebenheiten der Druckoberfläche verfälscht.
Hätte man eine wirklich absolut glatte Oberfläche, dann könnte man erst den Fehler Deiner X-Achse in der heightmap erkennen.Ich habe auf die schnelle mal eine Skizze gemacht um es zu verdeutlichen.
(Skizze siehe oben)Du hast auf einem Punkt auf dem Druckbett das Z-Offset des BLTouch ermittelt, also der Abstand zwischen Düsenspitze und Auslösepunkt der Sonde (Grüne Linie).
Jetzt bewegt sich der Druckkopf an einen Punkt wo der gesamte Druckkopf sich nach hinten oder vorne neigt (Skizze mit der roten Linie).
Nur hast Du den BLTouch leider an einer Stelle montiert, die das normalerweise kleine Problem verstärkt und sich sogar auf den Druck auswirkt.
Denn der Ermittelte Z-Offset des BLTouch zur Düsenspitze ändert sich mit der Bewegung in X Richtung.Das Fehlerbild welches sich bei einer absolut glatten Druckoberfläche in der heihgtmap zeigen würde ist in etwa die Hälfte des Fehlers welches sich im Druck zeigen würde.
Weil die Drehachse (verdrehte X Linearschiene) sich genau zwischen Düse und BLTouch liegt.
Man möge mich berichtigen wenn ich mich hier irren sollte.Vorausgesetzt das Problem ist wirklich die verdrehte X Schiene.
Da wir den Drucker selber nicht in den Händen habe, ist eine Fehlersuche aus der Ferne immer schwierig.
Stünde er hier auf dem Tisch, würde ich einige Teile vermessen um den Fehler zu suchen.
Aber dass sollte eh jedem klar sein.
Ärgerlich wenn jemand aus Verzweiflung seinen Drucker komplett zerlegt und am Ende stellt sich heraus es war nur eine Schraube locker.
Deine heihgtmap fängt ja immer noch bei Y60 an.

-
@norder said in Mesh bed compensation issue:
Getting the BLTouch as close as possible to Y0 with the nozzle is probably the best solution in your case, as @Phaedrux already explained.
I have done this now and put the BL touch on the left in line with the X axis and the result is amazing. I have lost now ca 40mm on the right side of the bed but I do not care. There were really something with the X rail.
Look at the first layer now with just some random 0,2mm thick 50x50mm rectangles.

Furthermore my bed is also pretty damn flat. There is something on the rear left corner and some deeper points. At first I though those blue deeper points are because of the magnets but I have put 2 of the rectangles on the exact point and they are also perfect.
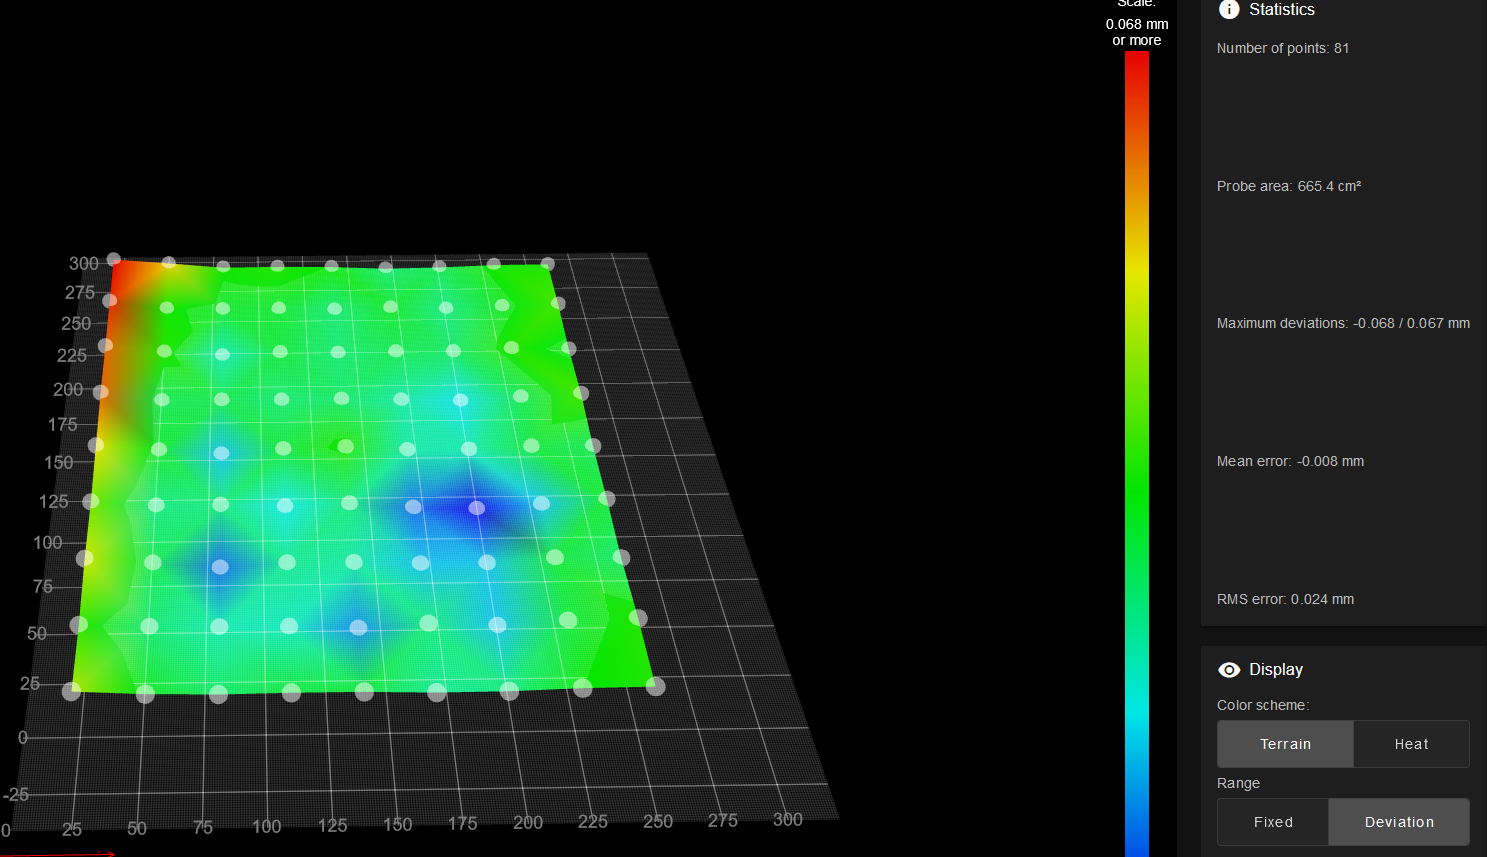
Thank you for your support! I am really happy now. Lost ca 4-5 evenings with this issue

-
@kiki0000 said in Mesh bed compensation issue:
I have lost now ca 40mm on the right side of the bed but I do not care.
You have to die a death.

Great that the problem is over, the layers look great.Besides, my bed is damn flat too.
Yes, that's right.
That a corner goes up a bit isn't bad, it's compensated by the MBL.
IIt's probably from bending the pressure plate to loosen the pressure parts.
I have the same printing plate and bent it too much once, after which there was such tension in it that it bent once with a bang from the heat of the pressure bed.
I had to get this tension out again by bending in the opposite direction and for a while I attached additional clamps to the corners.If I should buy a spring steel plate again, it will only be bent very slightly.
But my main pressure plate is an FR4 with a magnetic plate glued underneath, which doesn't get any stress from bending.
Google Translate
-- Original Text --Ich habe jetzt ca 40mm auf der rechten Bettseite verloren aber das ist mir egal.
Einen Tod muss man sterben.

Super dass das Problem aus der Welt ist, die Layer sehen super aus.Außerdem ist mein Bett auch verdammt flach.
Ja, das stimmt.
Das eine Ecke etwas hoch geht ist nicht schlimm, es wird ja durch das MBL ausgeglichen.
Vermutlich kommt es vom biegen der Druckplatte um die Druckteile zu lösen.
Ich habe die gleiche Druckplatte und habe sie auch einmal zu stark gebogen, danach war dort so eine Spannung drin, dass sie sich einmal mit einem Knall durch die Hitze des Druckbettes gekrümmt hat.
Ich musste diese Spannung wieder raus bekommen durch entgegengesetztes biegen und habe eine Zeit lang an den Ecken zusätzlich Klammern angebracht.Falls ich mir noch einmal eine Federstahlplatte zulegen sollte, wird diese nur sehr wenig gebogen.
Meine Haupt-Druckplatte ist aber eine FR4 mit untergeklebter Magnetplatte, die bekommt keine Spannungen vom biegen.
-
@norder said in Mesh bed compensation issue:
That a corner goes up a bit isn't bad, it's compensated by the MBL.
Yes, exactly. Furthermore it is really rare that I print really big objects....
@norder said in Mesh bed compensation issue:
IIt's probably from bending the pressure plate to loosen the pressure parts.
Yes, something might have happened with it. It is already 2 years old so no wonder to be honest.
@norder said in Mesh bed compensation issue:
But my main pressure plate is an FR4 with a magnetic plate glued underneath, which doesn't get any stress from bending
I have heard about this PCB material as bed. My only concern is that this is a super good thermal insulator material.
How much higher temp do you have to set to reach the requested temp on the top?
Are these bare FR4 plates without copper I assume? Maybe it would even be better if the bottom layer would be copper coated because this would spread the heat amazingly.
Does this work with most of the materials? (PLA, PETG, ABS)
How high temperatures do you have to set for these?Sorry for the lots of questions

-
@kiki0000 said in Mesh bed compensation issue:
Sorry for the lots of questions
No Problem

The FR4 is only 0.5mm thick. If I set 60°C in the DWC, it also becomes 60°C in the middle and around 2°C less towards the edge.
It is without copper, so no material for circuit boards.
It's the Blackprint from Printbay. It is matt black and has no imprints such as logos or writing. And I'm very happy about that because I use the IR probe and it "could" make differences if there is a colored imprint.
Also, it looks better when the print bed is just matte black.
I've had it for several years now and it still looks the same as it did on the first day... well, by occasionally sanding the surface, you can now see the fibers "a little" better than before, if you use a magnifying glass you can see it like kevlar/carbon fiber.So far it works with all materials, except PC (polycarbonate), but PC is such a bitch anyway and sticks best on a PC (Makrolon) surface, but unfortunately it gets a bit soft.
I need to experiment a little more with this. I haven't been able to print large PCs yet.There's a special printing plate for PC, unfortunately the company doesn't say what it's made of, it's supposed to feel and smell like hard rubber. Unfortunately, this record is extremely...really extremely expensive.
I just forgot the company name.
If you are interested, just search for printing documents for PC-Filament. The website has PC or polycarbonate in the name, I remember that.
Didn't bookmark myself.But I mostly print ABS and Nylon.
So far there has been no adhesion problem with any filament apart from PC.I only print PLA from the samples I received and I once won a 1kg roll. It's such an ugly color that you can only print piggy banks with it... it's piggy pink.

I print ABS and nylon with a bed temperature of 60°C (max 70°C).
But this is far from possible with every ABS or Nylon filament.
ABS+ from Minadax, TitanX or rTitan (recycled TitanX) from FormFutura and Nylon (CoPa) from Polymaker are my absolute favorite filaments.
You can print CoPa Nylon warp-free at a bed temperature of 30°C without housing. It is extremely stable and easily withstands temperatures of 180°C.
Go to their websites.I like matte filaments.

CoPa and TitanX (rTitan) are absolutely matt black.
ABS+ are also matte filaments. With the orange you can hardly see the layers.CoPa YouTube Video (The 3D Print General)
Unfortunately CoPa is very expensive at 70€ for 750g, but if you are looking for filament for extreme components... definitely CoPa.
ABS and especially nylon should be stored very dry.I hope I was able to answer your questions?
Google Translate
-- Original Text --Sorry for the lots of questions
Kein Problem

Die FR4 ist nur 0,5mm dick. Wenn ich 60°C im DWC einstelle werden es in der Mitte auch 60°C und zum Rand hin sind es etwa 2°C weniger.
Sie ist ohne Kupfer, also kein Material für Platinen.
Es ist die Blackprint von Printbay. Sie ist Mattschwarz und hat keinerlei Aufdrucke wie Logos oder Schriften. Und darüber bin ich sehr froh weil ich den IR-Probe nutze und er Unterschiede machen "könnte" wenn dort ein farbiger Aufdruck ist.
Außerdem sieht es besser aus wenn das Druckbett nur Mattschwarz ist.
Ich habe sie jetzt schon mehrere Jahre und sie sieht noch so aus wie am ersten Tag... naja, durch das gelegentliche Abschleifen der Oberfläche kann man jetzt die Fasern "etwas" besser sehen als vorher, geht man mit der Lupe ran dann sieht es so aus wie Kevlar / Kohlefaser.Sie funktioniert bis jetzt mit allen Materialien, außer PC (Polycarbonat) aber PC ist eh so eine Zicke und hält am besten auf einer PC (Makrolon) Fläche, aber leider wird diese etwas weich.
Ich muss damit noch etwas mehr experimentieren. Noch habe ich PC nicht groß drucken können.Es gibt da eine spezielle Druckplatte für PC, leider sagt die Firma nicht aus was sie besteht, sie soll sich anfühlen wie harter Gummi und auch so riechen. Leider ist diese Platte extrem... wirklich extrem teuer.
Der Firmenname ist mir gerade entfallen.
Bei Interesse einfach mal nach Druckunterlagen für PC-Filament suchen. Die Webseite hat PC oder Polycarbonat in Namen, das weiß ich noch.
Habe mir kein Lesezeichen gemacht.Ich drucke aber zum größten Teil ABS und Nylon.
Bis jetzt gab es außer PC aber mit keinem Filament ein Haftungsproblem.PLA drucke ich nur was ich an Proben erhalten habe und eine 1kg Rolle habe ich mal gewonnen. Es hat eine sehr hässliche Farbe dass man damit eigentlich nur Sparschweine drucken kann... es ist Schweinchen-Rosa.

ABS und Nylon drucke ich mit einer Betttemperatur von 60°C (max 70°C).
Das geht aber bei weitem nicht mit jedem ABS oder Nylon Filament.
ABS+ von Minadax, TitanX bzw rTitan (recyceltes TitanX) von FormFutura und Nylon (CoPa) von Polymaker sind meine absoluten Lieblingsfilamente.
CoPa Nylon kannst Du Warp-Frei bei 30°C Betttemperatur drucken ohne Umhausung. Es ist extremst stabil und hält Temperaturen von 180°C locker aus.
Geh mal auf deren Webseiten.Ich mag matte Filamente. 🥰
CoPa und TitanX (rTitan) sind absolut Mattschwarz.
ABS+ sind auch matte Filamente. Bei dem Orange sieht man kaum noch die Layer.CoPa YouTube Video (The 3D Print General)
Leider ist CoPa mit 70€ für 750g sehr teuer, aber wenn man Filament für extreme Bauteile sucht... ganz klar CoPa
ABS und besonders Nylon sollte sehr trocken gelagert werden.Ich hoffe ich konnte Deine Fragen beantworten ?
-
@norder said in Mesh bed compensation issue:
The FR4 is only 0.5mm thick. If I set 60°C in the DWC, it also becomes 60°C in the middle and around 2°C less towards the edge.
This sounds good.
@norder said in Mesh bed compensation issue:
It's the Blackprint from Printbay
I have checked this now. I have a bed with embedded magnets. I know that in general FR4 is like resin so it is not magnetic so do I need to glue a magnetic foil onto the FR4? Or there is already 1 magnetic sheet on the FR4 sheet and they give an other one to glue onto the bed?
Because as I see I can jsut buy separately the FR4 sheet.
https://printbay.eu/Ersatzplatte-Blackprint-Magnetsystem-BPIf it works so well I will give it a go. It is not expensive at all... Those low tempeartures are super impressive too.
I will also check the filaments you proposed. I usually only use PETG and PLA. I would use ABS but at the moment I am living in a flat and I do not want to use ABS in the room Although at the end of the year we will move into our house so my options will increase.
Thank you for the detailed summary. I really appreciate it.
-
@kiki0000 said in Mesh bed compensation issue:
Or there is already 1 magnetic sheet on the FR4 sheet and they give an other one to glue onto the bed ?
It was the same with me. I also ordered a pair of magnetic plates because I wanted to stick a hard paper printing plate and this Makrolon plate with a magnetic underlayer.
Do you have individual magnets permanently installed in your print bed ?
To avoid problems I would ask Printbay what would be best for you.
I think he will send you exactly what you need. When I ordered from Printbay, it was still a one-man operation.
A very nice person.I know that in general FR4 is like resin
It is a fiberglass sheet impregnated with epoxy resin.
I would use ABS but at the moment I am living in a flat and I do not want to use ABS in the room
This is absolutely no problem with ABS+ from Minadax, it hardly smells at all.
I have an ABS from China, which prints well, but without ventilation or filtering it is unbearable. You get a headache very quickly.
Also the other filaments I mentioned... no problem with smell.Google Translate
-- Original Text --Or there is already 1 magnetic sheet on the FR4 sheet and they give an other one to glue onto the bed ?
Genauso war es bei mir. Ich habe mir zusätzlich noch ein Pärchen Magnetplatten dazu bestellt, weil ich noch eine Hartpapier Druckplatte und eben diese Makrolon Platte mit einer magnetischen Unterschicht bekleben wollte.
Hast Du einzelne Magnete fest in Deinem Druckbett verbaut ?
Um Probleme zu vermeiden würde ich Printbay fragen was das beste für Dich wäre.
Ich denke er wird Dir genau das zuschicken was Du brauchst. Als ich bei Printbay bestellt habe, war es noch ein Einmannbetrieb.
Ein sehr netter Mensch.I know that in general FR4 is like resin
Es ist eine mit Epoxydharz getränkte Glasfaserplatte.
I would use ABS but at the moment I am living in a flat and I do not want to use ABS in the room
Das ist mit ABS+ von Minadax absolut kein Problem, es riecht so gut wie gar nicht.
Ich habe ein ABS aus China, welches sich gut drucken lässt, aber ohne Belüftung oder Filterung ist es nicht auszuhalten. Man bekommt sehr schnell Kopfschmerzen.
Auch die anderen von mir genannten Filamente... kein Problem mit Geruch. -
@norder said in Mesh bed compensation issue:
Do you have individual magnets permanently installed in your print bed ?
Yes, I do have individual magnets and I fear if I would order this 0,5mm FR4 sheet the magnets would bend it at each and every point. I assume this sheet in 0,5mm thickness is pretty flexible.
So I will contact with the guy.@norder said in Mesh bed compensation issue:
This is absolutely no problem with ABS+ from Minadax, it hardly smells at all.
OK, though if it does not smell it does not mean it is healthy

-
@kiki0000 said in Mesh bed compensation issue:
I assume this sheet in 0,5mm thickness is pretty flexible.
No, it can be compared to the spring steel plate and the PEI.
However, it is more dimensionally stable than spring steel and retains its shape after bending.
It is slightly lighter than the spring steel plate.I just measured both plates again.
The spring steel with PEI is almost 1.8mm thick.
The black print is 1.9mm.
I made a mistake... the FR4 without a magnetic plate is 1mm thick and not 0.5mm as I wrote earlier by mistake.
I would have bet it would have been 0.5mm... Lost.
Sorry for the misunderstanding.OK, though if it does not smell it does not mean it is healthy

No, it's definitely not healthy. Whether PETG or TPU etc. are better ?... I doubt it.
Google Translate
-- Original Text --I assume this sheet in 0,5mm thickness is pretty flexible.
Nein, es ist zu vergleichen mit der Federstahlplatte und dem PEI.
Sie ist aber formstabiler wie Federstahl, behält ihre Form nach dem biegen.
Sie ist etwas leichter wie die Federstahlplatte.Ich habe beide Platten gerade noch einmal gemessen.
Die Federstahl mit PEI ist knapp 1,8mm dick.
Die Blackprint ist 1,9mm.
Ich habe mich versehen... die FR4 ohne Magnetplatte ist 1mm dick und nicht 0,5mm wie vorher von mir fälschlicherweise geschrieben.
Ich hätte drauf wetten können es wäre 0,5mm gewesen... Verloren.
Sorry für das Missverständnis.OK, though if it does not smell it does not mean it is healthy

Nein, gesund ist es garantiert nicht. Ob PETG oder TPU etc. da besser sind ?... ich waage es zu bezweifeln.
-
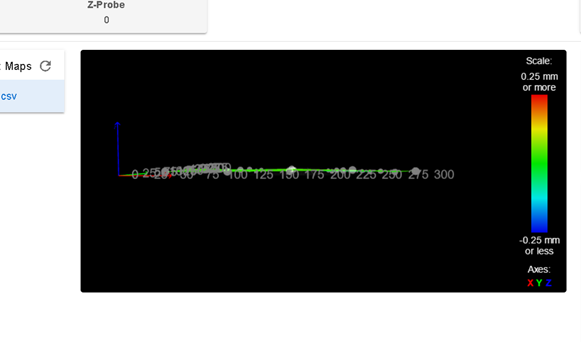
Here are my findings. When i first started using Duet with the RatRig, I had similar issues. My 3 probe points were taken from the online example, and this gave me problems where my LEFT FRONT corner was always higher than the rest of the bed. I finally solved this issue by realizing the probe points must be symmetrical. Its all about the
G29G32 level command.My original probe points were:
Left X5 Y5, Back X150 Y285, Right X270 Y5I tried for 2 weeks to fix by adjusting my 3030 extrusion, reversing my bed, etc, but the left side always remained higher no matter what i did, so it hit me that it was not hardware related.
The fix was making the 3 probe points SYMMETRICAL, as follows:
Left X30 Y5 Back X150 Y285 Right X270 Y5It is imperative that the distance from each leadscrew to the probe be IDENTICAL. during a bed level, when the bed is being raised , the probe is being intercepted a few milliseconds earlier than on the other probe point, but i dont think the software can compensate for this, because it doesnt know where in physical space the leadscrews are actually located, so it trusts that the user is giving it identically spaced probe points. so it tricks the bed mesh into thinking one side is higher than the other, when in reality it just closed a shorter distance in the same amount of time. so it essentially tricked the Z adjustment.
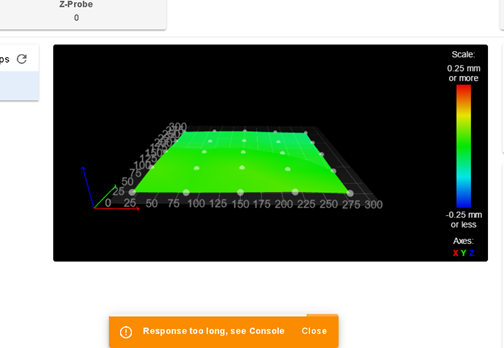
Once I made my probe points truly symmetrical, my bed mesh became like this:
-
It is exactly like that.
I have a cascading printer with an 8mm aluminum plate as a print bed, so I also have three level screws because four level screws make little sense and there would only be tension because the silicone dampers cannot bend the 8mm aluminum plate.With your printers, the bed leveling is automatic, I have to adjust the bed level wheels by hand.
I don't use a sheet of paper for this, but the IR-Probe shows me the correct height... if I see 0.000 then the level screw is set perfectly (I created my own macros for this).
That's just a side note.
I measure directly above each of the three level screws.
And you are absolutely right, if these points are not symmetrical or if all measuring points are not on the right line from the spindle to the middle of the bed, then the measuring results are incorrect.
That's why I pointed out in post #6 that the measuring points in the bed.g file are not symmetrical.
I don't know the new coordinates, but @kiki0000 wrote in post #8 that he has now arranged the measuring points symmetrically.Your MBL or your print surface is extremely flat.
Congratulations... the best MBL I've ever seen.
Could almost be Photoshop.
Google Translate
-- Original Text --Genau so ist es.
Ich habe ein kaskadischen Drucker mit einer 8mm Aluplatte als Druckbett, daher habe ich auch drei Levelschrauben denn vier Levelschrauben machen da wenig Sinn und es würden nur Spannungen entstehen da sie Silikondämpfer die 8mm Aluplatte nicht verbiegen können.Bei Euren Druckern ist das Bettlevelling automatisch, ich muss dazu die Bettlevelräder per Hand anpassen.
Ich nutze dazu aber kein Blatt Papier sondern die IR-Probe zeigt mir die richtige Höhe an... wird mir 0,000 angezeigt dann ist die Levelschraube perfekt eingestellt (Habe mir dazu eigene Makros erstellt).
Das nur so am Rande.
Bei mir wird direkt über jeder der drei Levelschrauben gemessen.
Und Du hast vollkommen Recht, sind diese Punkte nicht symmetrisch bzw alle Messpunkte nicht auf der richtigen Linie von der Spindel bis zur Bettmitte, dann sind die Messergebnisse nicht korrekt.
Daher habe ich in Post #6 auch darauf hingewiesen dass die Messpunkte in der bed.g Datei nicht symmetrisch sind.
Ich kenne zwar die neuen Koordinaten nicht, aber @kiki0000 hat in Post #8 geschrieben dass er die Messpunkte jetzt symmetrisch angeordnet hat.Dein MBL bzw Deine Druckoberfläche ist ja extrem plan.
Glückwunsch... das beste MBL was ich je gesehen habe.
Könnte fast Photoshop sein.
-
@norder I promise it is my actual bed mesh.:)
But i made one mistake in my post, i meant to reference G32, which needs symmetrical probe points, not G29. Although G29 also needs to be symmetrical as well. But the G32 symmetry is what finally gave me my good results because this is where bed angle can be affected.
-
@norder said in Mesh bed compensation issue:
No, it can be compared to the spring steel plate and the PEI.
However, it is more dimensionally stable than spring steel and retains its shape after bending.
It is slightly lighter than the spring steel plate.
I just measured both plates again.
The spring steel with PEI is almost 1.8mm thick.
The black print is 1.9mm.Thanks for the info.
I will go and grab one with a magnetic sheet and my bed magnets and the sheet magnet will grab onto each other.@rogerpodacter said in Mesh bed compensation issue:
y 3 probe points were taken from the online example, and this gave me problems where my LEFT FRONT corner was always higher than the rest of the bed. I finally solved this issue by realizing the probe points must be symmetrical. Its all about the G29 G32 level command.
Yes, this is still my problem. I will go ahead and really define all the bed probing points and Z axis points simmetrically.
What I find a little bit strange that certain commands are taking into account the offset of the probe others not and this is nowhere really documented (at least I could not find these comments at the G29 and G32 command in the doku). Ok, for sure I can see while testing if it is off by 50mm or not but anyway it would be easier if they would all show the same.
One thing I never really tought about is that it is really important that the probe points for the 3 Z axis must also be simmetrical to everything. I thought 3 points are defining a shape and as soon as my Z axis points are properly defined it should be able to calculate from this wherever I probe. But it looks likie this i snot the case. I also started to mess with my Y rails to compensate for the bed misalignment on on side but maybe this is similarly to you not really my problem.@norder said in Mesh bed compensation issue:
That's why I pointed out in post #6 that the measuring points in the bed.g file are not symmetrical.
I don't know the new coordinates, but @kiki0000 wrote in post #8 that he has now arranged the measuring points symmetrically.I did not even mention to you yet that after putting my printer back to its original place mesh bed leveling wasn't perfect again. Significantly bettern then before but not perfect. So now I will really define all the probing points to
-
@norder and @rogerpodacter I 3D drew my printer with the correct positions and really certains things were off. Now I perfectly symmetrically defined everything. All the Z axis probe points are an eqal distance from the axes, everything is in line etc. The 3 axis automatic leveling is now really finding the right plane in no time.
This is how my heightmap looks like:
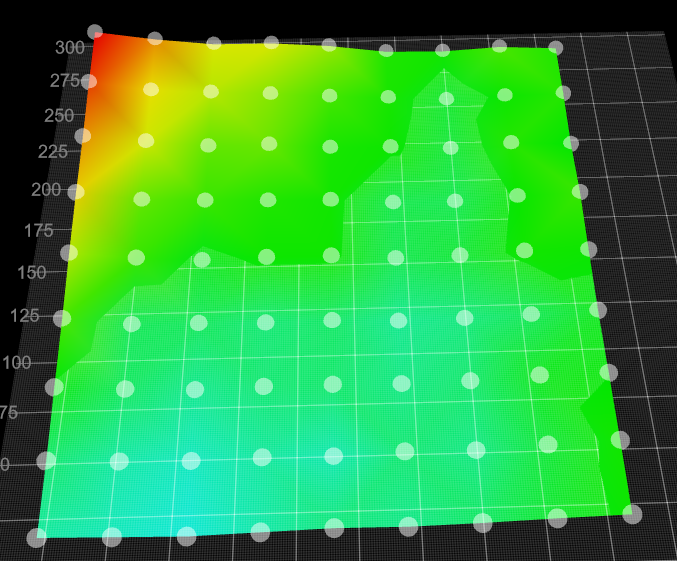

As you can see from the left view I definitely have an alignment problem with one of the Y rail. There is a nice slope in it. So I will try to compensate this now and lets see... This might have happened when I lifted up my heavy printer at the rail and put it down. Something might have shifted although I have now idea how was this possible because everything is perfectly definted by the aluminium brackets.... Lets see...
My bed.g
M561
G28
G90
			; home all axis bb
;M557 X30:280 Y64:296 S50:50                           ; define mesh grid
G30 P0 X53 Y155 Z-99999  ; probe near a leadscrew, half way along Y axis
G30 P1 X260 Y281 Z-99999  ; probe near a leadscrew, half way along Y axis
G30 P2 X260 Y28 Z-99999 S3  ; probe near a leadscrew and calibrate 3 motors
My config.g
G90 ; send absolute coordinates... M83 ; ...but relative extruder moves M550 P"Kikicube" ; set printer name M575 P1 S1 B57600 M669 K1 ; select CoreXY mode ; Network M552 S1 ; enable network M586 P0 S1 ; enable HTTP M586 P1 S0 ; disable FTP M586 P2 S0 ; disable Telnet ; Drives M569 P0 S1 ; physical drive 0 goes forwards M569 P1 S0 ; physical drive 1 goes forwards M569 P2 S1 ; physical drive 2 goes forwards M569 P3 S0 ; physical drive 3 goes forwards M569 P4 S1 ; physical drive 4 goes forwards M569 P6 S0 M584 X0 Y1 Z2:4:6 E3 P3 ; set drive mapping M350 X16 Y16 Z16 E16 I1 ; configure microstepping with interpolation M92 X80.2 Y80.2 Z400.00 E882 ; set steps per mm M566 X700.00 Y700.00 Z240.00 E2000.00 ; set maximum instantaneous speed changes (mm/min) M203 X12000.00 Y12000.00 Z1000.00 E2000.00 ; set maximum speeds (mm/min) M201 X3000.00 Y3000.00 Z100.00 E5600.00 ; set accelerations (mm/s^2) ;M593 F66 M906 X900 Y900 Z550 E450 I30 ; set motor currents (mA) and motor idle factor in per cent M84 S30 ; Set idle timeout M671 X-50:363:363 Y155:281:28 S15 ; leadscrews at left and right of X axis M572 D0 S0.03 ; pressure advance 0,1 M592 D0 A-0.00971 B0.003424 ;non-linear extrusion ; Axis Limits M208 X2 Y-40 Z0 S1 ; set axis minima M208 X320 Y303 Z300 S0 ; set axis maxima ; Endstops M574 X1 S1 P"xstop" ; configure active-high endstop for low end on X via pin xstop M574 Y2 S1 P"ystop" ; configure active-high endstop for high end on Y via pin ystop M574 Z1 S2 ; configure Z-probe endstop for low end on Z ; Z-Probe M558 P9 C"^zprobe.in" H6 F300 T12000 ; set Z probe type to bltouch and the dive height + speeds M950 S0 C"duex.pwm1" ; create servo pin 0 for BLTouch G31 P500 X-58 Y0 Z2.55 ; set Z probe trigger value, offset and trigger height M557 X20:260 Y20:290 P9 ; define mesh grid ;M557 X60:242 Y75:240 S40 ; define mesh grid ; Heaters M308 S0 P"bedtemp" Y"thermistor" T100000 B3950 R4700 ; configure sensor 0 as thermistor on pin bedtemp M950 H0 C"bed_heat" Q10 T0 ; create bed heater output on bedheat and map it to sensor 0 M140 H0 ; map heated bed to heater 0 M143 H0 S120 ; set temperature limit for heater 0 to 120C M307 H0 B0 S1.00 ; disable bang-bang mode for the bed heater and set PWM limit M308 S1 P"e0temp" Y"thermistor" T100000 B3950 R4700 ; configure sensor 1 as thermistor on pin e0temp M950 H1 C"e0heat" T1 ; create nozzle heater output on e0heat and map it to sensor 1 M143 H1 S260 ; set temperature limit for heater 1 to 260C M307 H1 B0 S1.0 ; disable bang-bang mode for heater and set PWM limit M307 H1 A573.2 C177.0 D7.3 V23.8 B0 S1.0 ;Heater 1 model: gain 573.2, time constant 177.0, dead time 7.3, max PWM 1.00, calibration voltage 23.8, mode PID ;Computed PID parameters for setpoint change: P7.5, I0.209, D38.6 ;Computed PID parameters for load change: P7.5, I0.406, D38.6 M307 H0 A61.3 C251.9 D3.4 B0 S1.0 V23.9 ;Heater 0 model: gain 61.3, time constant 251.9, dead time 3.4, max PWM 1.00, calibration voltage 23.9, mode PID ;Computed PID parameters for setpoint change: P217.1, I7.439, D513.5 ;Computed PID parameters for load change: P217.1, I19.173, D513.5 ; Fans M950 F0 C"fan0" Q500 ; create fan 0 on pin fan0 and set its frequency M106 P0 H-1 ; set fan 0 value. Thermostatic control is turned off M950 F1 C"fan1" Q500 ; create fan 1 on pin fan1 and set its frequency M106 P1 X0.75 H1 T45 ; set fan 1 value. Thermostatic control is turned on ;M950 F8 C"duex.fan8" ;M106 P8 S250 H-1 ; PSU cooler fan ; Tools M563 P0 D0 H1 F0 ; define tool 0 G10 P0 X0 Y0 Z0 ; set tool 0 axis offsets G10 P0 R0 S0 ; set initial tool 0 active and standby temperatures to 0C ; Custom settings are not defined ; Miscellaneous M911 S10 R11 P"M913 X0 Y0 G91 M83 G1 Z3 E-1 F1000" ; set voltage thresholds and actions to run on power loss ;M501; -
@norder and @rogerpodacter after correcting the Y rail alignment the heightmap looks pretty good. No more slope on hte left side.
But my first layer is still not perfect especially on the left side.

Maybe now it is really the BL touch?
-
I think you have a little misconception here.
The super result of @rogerpodacter on his heihtmap, that everything is very flat there and one corner of yours turns red, simply has to do with the fact that @rogerpodacter's printing surface has no bumps or is bent, yours seems to be a little bent in one corner .
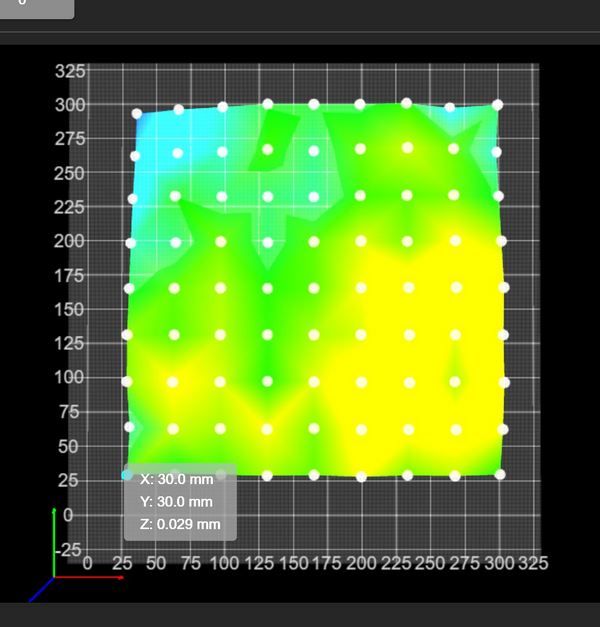
Mine too, by the way.This is how my heihgtmap looks like with the IR probe.
The manual leveling was done, which the G32 command does automatically for you.
After that an MBL was made with G29.
My first layer of 0.1mm across the entire print bed would be perfectly even.The heihgtmap shows the unevenness of the pressure plate somewhat exaggerated. The differences are hardly bigger than a hair is thick. My FR4 pressure plate is as smooth as a mirror when you look at it.
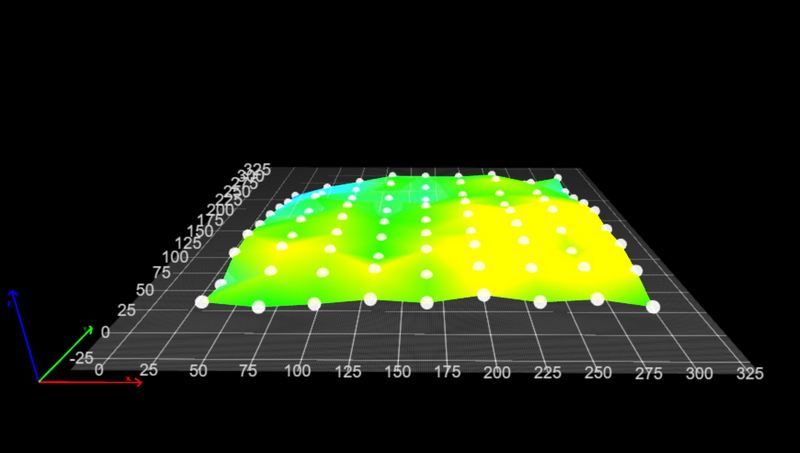
Here is a heightmap with the BLTouch where I haven't done the manual leveling yet, you can see everything is red and I was also warned that the MBL cannot compensate for this extreme difference, I should level the print bed manually first.
You can also see that both probes have the same measuring points with me.
All around is an area of 30mm that is not measured because the BLTouch doesn't quite reach the right edge.
It is not important that both probes have the same measuring points, I just wanted it to be identical and it makes it easier for me to compare the two probes to each other.
So not important for you.
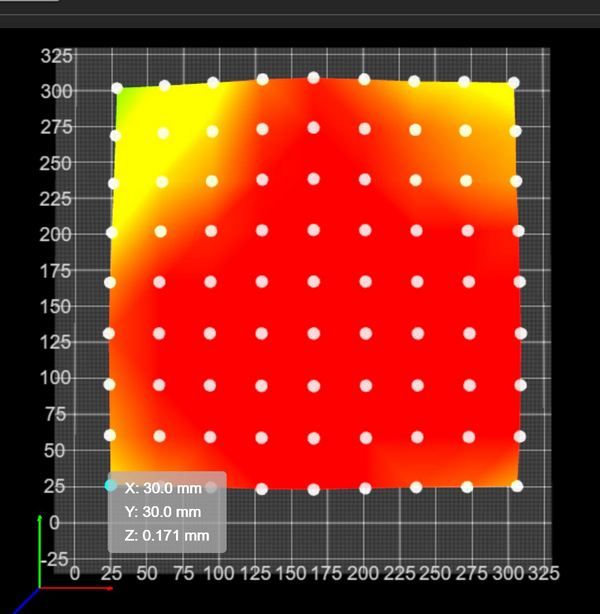
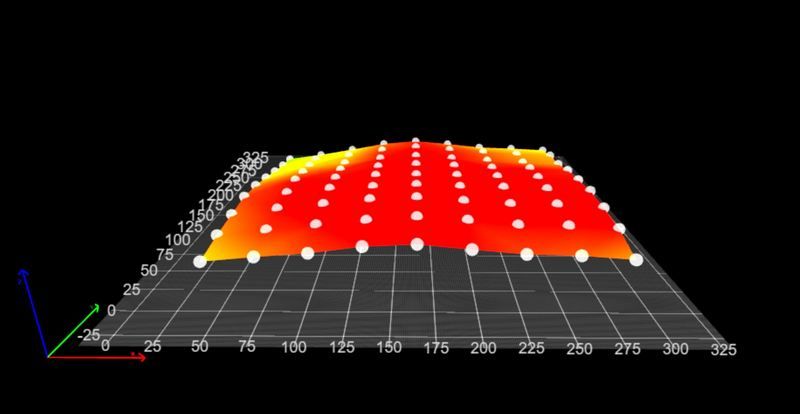
.
.
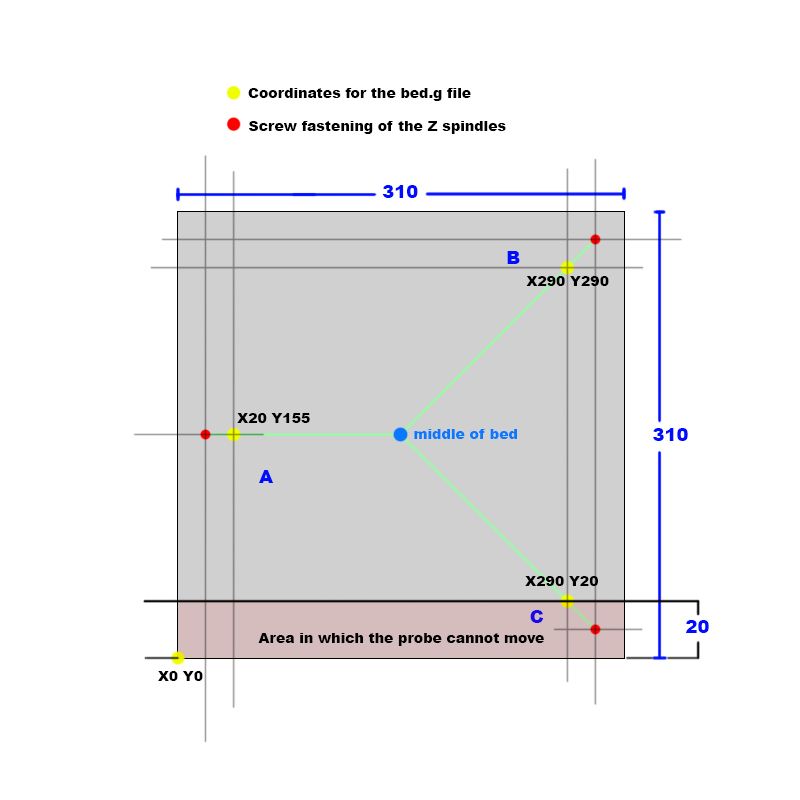
But this plan is important for you after I have calculated my level points.
In your case it would be the coordinates in your bed.g file.
So what is manual leveling for me is the bed.g file for you, which you call up with the G32 command.My level screws (red dots) are 10mm from the edge but my BLTouch can only get up to 30mm on one side of the print bed.
Shown in the sketch as a somewhat reddish area, here it is given as 20mm and in the lower area of the print bed.
But that doesn't matter because you have to determine beforehand where your probe goes and where it doesn't go.
Often it's an area on the print bed... right edge, left edge, top or bottom depending on where your probe is mounted on the print head.Now you have to draw a line from each mounting point of the spindles (red dots) to the middle of the print bed (green lines).
Then calculate the area where the probe cannot reach.
And with these measurements you can calculate where the coordinates for the bed.g file are (yellow dots).
They must be on the green line and all the same distance from the attachment point.I saw that your axis limits are not quite OK.
At minimal you have a positive value (X2).
M208 X2 Y-40 Z0 S1 ; set axis minimumAnd at maximum you have a value that is smaller than the actual print bed (Y303).
M208 X320 Y303 Z300 S0 ; set axis maximaTopic G32 + G30..
Yes, sometimes it is a bit confusing whether the offset values of the probe are taken into account or whether you have to do it yourself.
If you enter G30 without coordinates, then the probe measures where the print head is currently located.
If it is to be a specific point that is to be measured, such as X20 Y30, then you have to go there beforehand with G1 and calculate the offset yourself, i.e. G1 X78 Y30.
Your new probe offsets are included here.If you enter G30 P0 X20 Y30 Z-99999 as in the bed.g file, then the probe will measure exactly at the point, the offset of the probe will be automatically taken into account.
So enter the coordinates in bed.g that you would calculate with such a sketch, you don't have to consider the offset of the probe.
Phew... written a lot.
I hope Google doesn't translate it into cryptic and it helps you get there.
Conclusion: Not many people have such a nice, flat and uniformly green heightmap as @rogerpodacter has, which does not mean that the first layer cannot be printed absolutely perfectly.Your task in my eyes would be...
Measure the area where the BLTouch goes after the conversion, remember the M564 command I gave you in comment #15.Measure the points and coordinates from the example sketch.
Changing the axis limits in the config.g with the new insights from the M564 thingy.
So I have to vote now. Today is elected here in Germany / Lower Saxony.
I hope there will be positive changes after that.
It can't go on like this.Google Translate
-- Original Text--Ich glaube Du hast hier einen kleinen Denkfehler.
Das Super Ergebnis von @rogerpodacter seiner heihtmap das dort alles sehr plan ist und bei Dir eine Ecke ins Rot geht, hat einfach damit zu tun das die Druckoberfläche von @rogerpodacter keine Unebenheiten hat oder verbogen ist, Deine scheint in einer Ecke etwas verbogen zu sein.
Meine übrigens auch.So sieht zB meine heihgtmap mit dem IR-Probe aus.
Das manuelle Leveling wurde gemacht, was bei Dir der G32 Befehl automatisch macht.
Danach wurde ein MBL mit G29 gemacht.
Mein erster Layer mit 0,1mm über das gesamte Druckbett wäre absolut gleichmäßig.Die heihgtmap zeigt die Unebenheiten der Druckplatte etwas übertrieben dar. Die unterschiede sind kaum größer wie ein Haar dick ist. Meine FR4 Druckplatte ist so glatt wie ein Spiegel wenn man sie sich ansieht.
Hier eine heightmap mit dem BLTouch wo ich das manuelle Leveling noch nicht gemacht habe, man sieht alles ist Rot und es wurde mir auch eine Warnung angezeigt dass das MBL diesen extremen Unterschied nicht ausgleichen kann, ich möge doch erst einmal das Druckbett manuell leveln.
Du siehst auch das beide Sonden die gleichen Messpunkte bei mir haben.
Rundherum ist ein Bereich von 30mm der nicht gemessen wird, weil der BLTouch nicht ganz bis an die rechte Kante kommt.
Es ist nicht wichtig das beide Sonden den gleichen Messpunkte haben, ich wollte es nur identisch haben und es erleichtert mir etwas beim Vergleich der beiden Sonden zueinander.
Also nicht wichtig für Dich.Wichtig für Dich ist aber dieser Plan nachdem ich meine Levelpunkte ausgerechnet habe.
Es wären in Deinem Fall die Koordinaten in Deiner bed.g Datei.
Also das was bei mir das manuelle Leveln ist, ist bei Dir die bed.g Datei die Du mit dem Befehl G32 aufrufst.Meine Levelschrauben (Rote Punkte) sind 10mm vom Rand entfernt aber mein BLTouch kommt an einer Seite des Druckbettes nur bis 30mm heran.
In der Skizze als etwas rötlichen Bereich dargestellt, hier jetzt mal mit 20mm angegeben und im unteren Bereich des Druckbettes.
Aber das ist egal denn Du muss vorher feststellen wo Deine Sonde hin kommt bzw wo sie nicht hin kommt.
Oft ist es ein Bereich auf dem Druckbett... rechter Rand, linker Rand, oben oder unten, je nachdem wo Deine Sonde am Druckkopf montiert ist.Jetzt musst Du eine Linie von jedem Befestigungspunkt der Spindeln (Rote Punkte) bis zur Mitte des Druckbettes eine Linie (Grüne Linien) ziehen.
Dann den Bereich einberechnen wo die Sonde nicht hin kommt.
Und mit diesen Maßen kannst Du ausrechnen wo die Koordinaten für die bed.g Datei sind (Gelbe Punkte).
Sie müssen auf der grünen Linie sein und alle den gleichen Abstand zum Befestigungspunkt haben.Ich habe gesehen das Deine Axis Limits nicht ganz OK sind.
Bei minimal hast Du einen positiven Wert (X2).
M208 X2 Y-40 Z0 S1 ; set axis minimaUnd bei maximal hast Du einen Wert der kleiner wie das tatsächliche Druckbett ist (Y303).
M208 X320 Y303 Z300 S0 ; set axis maximaThema G32 + G30..
Ja, manchmal ist es etwas verwirren ob die Offset Werte der Sonde mit einberechent werden oder ob man es selber machen muss.
Gibst Du G30 ohne Koordinaten an, dann misst die Sonde dort wo der Druckkopf gerade steht.
Soll es ein bestimmter Punkt sein der gemessen werden soll wie zB X20 Y30, dann muss man dort vorher mit G1 hingefahren sein und das Offset selber mit berechen, also G1 X78 Y30.
Hier sind Deine neuen Offsets der Sonde mit drin.Gibst Du wie in der bed.g Datei G30 P0 X20 Y30 Z-99999 ein, dann misst die Sonde genau an dem Punkt, der Offset der Sonde wird automatisch mit einberechnet.
Also in bed.g die Koordinaten eingeben die Du mit so einer Skizze ausrechnen würdest, den Offset der Sonde musst Du nicht beachten.
Puh... viel geschrieben.
Ich hoffe Google übersetzt es nicht ins Kryptische und es hilft Dir ans Ziel zu kommen.
Fazit: So eine schöne plane und einheitlich Grüne heightmap wie @rogerpodacter er sie hat, haben nicht viele, was aber nicht bedeutet das der erste Layer nicht absolut perfekt gedruckt werden kann.Deine Aufgabe in meinen Augen, wäre...
Bereich ausmessen wohin der BLTouch nach dem Umbau überall hin kommt, denke dabei an den M564 Befehl den ich Dir in Kommentar #15 gegeben habe.Ausmessen der Punkte und Koordinaten aus der Beispiel-Skizze.
Ändern der Axis Limits in der config.g mit den neuen Erkenntnissen aus dem M564 Dingsbums.
So, ich muss nun zur Wahl. Heute wird hier in Germany / Lower Saxony gewählt.
Ich hoffe es gibt danach positive Veränderungen.
So kann das ja nicht weiter gehen. -
@norder said in Mesh bed compensation issue:
But this plan is important for you after I have calculated my level points.
At first thank you for the detailed comment again.
I have done a similar CAD drawing already in the morning the only difference was that I did not put hte G31 points onto the line pointing into the middle of the bed only the same distance from the Z axes in all 3 cases. Now I changed this according to your proposal.
This is how it looks like (I know it i sa mess just because I wanted to put all the measurements from the frame etc onto the drawing.)
The biggest rectangle is my frame (I cannot reach with the current setup the rear 5mm of the bed this is why my max Y limit is 305. I know this is stupid because I could move the complete Z assmebly 5-10mm forward and then I could reach it but I have just done some changes and I was too lazy to do this up to now ).
).
The bed is clearly the 310 x 310. Furhtermore you can see the 3 outside points (41mm from the frame on both sides ) for the 3 axis and the 3 inner points on the lines now are the probing points for the G32 (262mm is my max Y reach point on the right for the BL touch).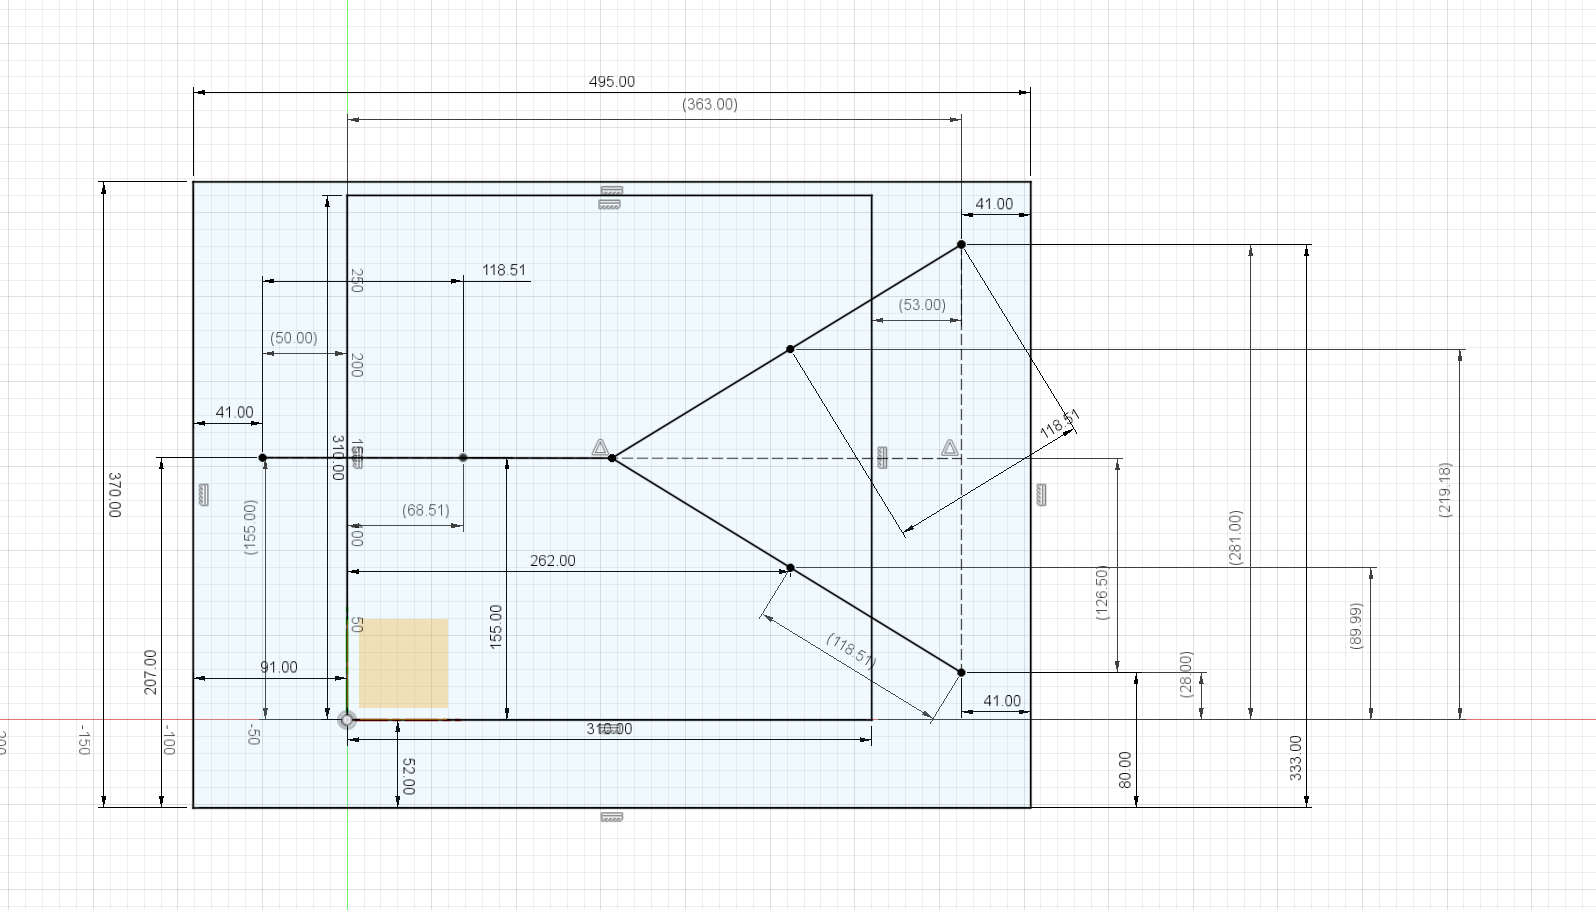
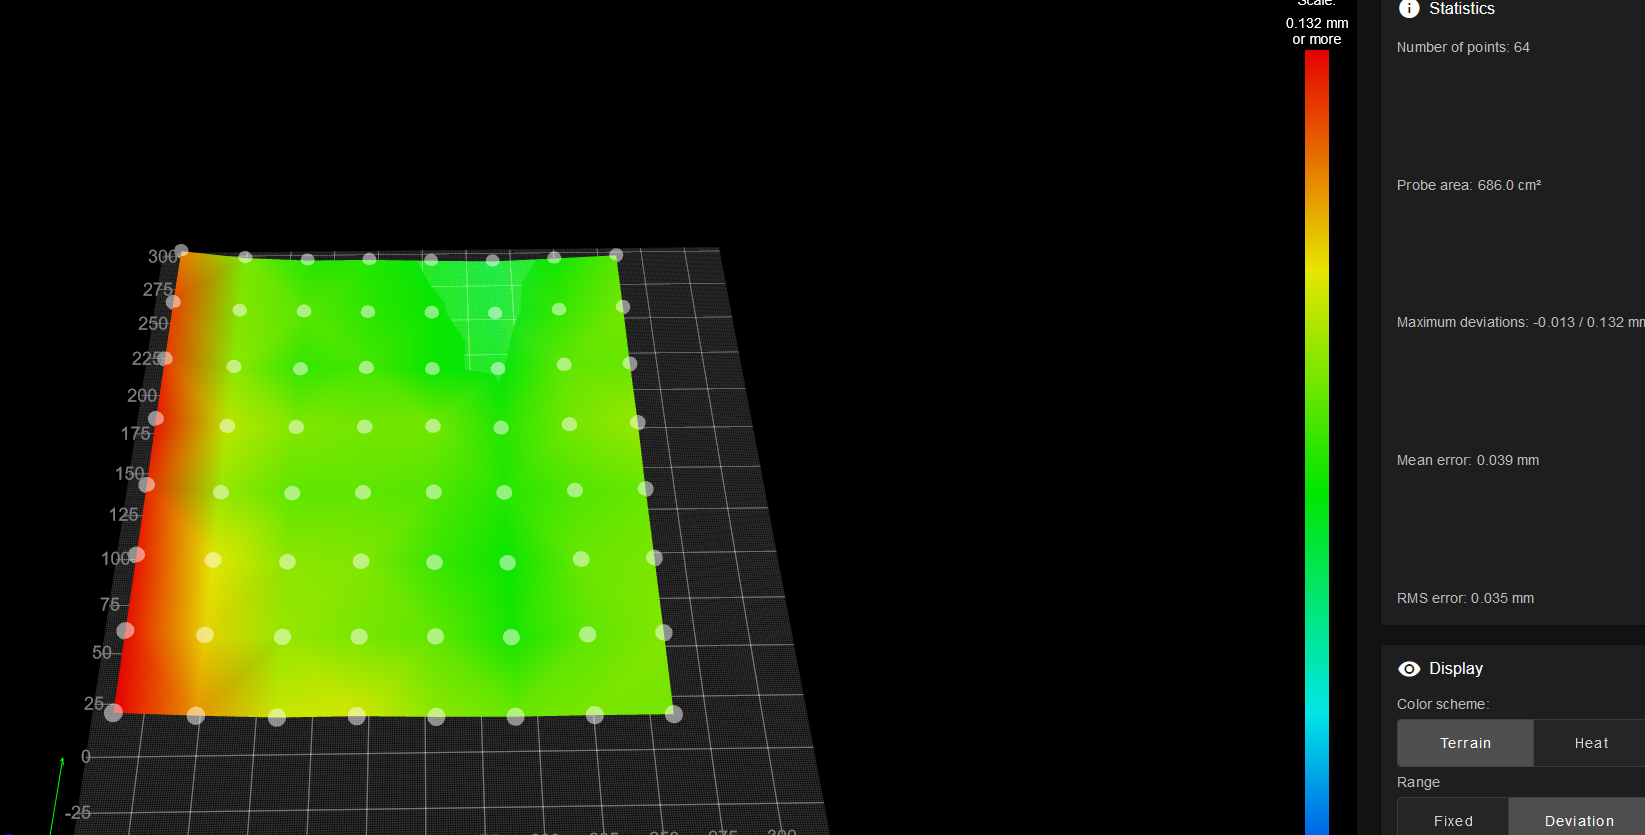
This is how my heightmap looks like with a narrow space all around (after the Y axis realignment now this is on the same level in the entire bed length but ca 0.13mm higher than the rest of teh bed.).
@norder said in Mesh bed compensation issue:
I saw that your axis limits are not quite OK.
At minimal you have a positive value (X2).
M208 X2 Y-40 Z0 S1 ; set axis minimum
And at maximum you have a value that is smaller than the actual print bed (Y303).
M208 X320 Y303 Z300 S0 ; set axis maximaAs I wrote above I am limited at 305mm at the moment because of the bed position on the actuan assembly. I will later on move the complete Z assembly forward by 10-15mm.
@norder said in Mesh bed compensation issue:
Yes, sometimes it is a bit confusing whether the offset values of the probe are taken into account or whether you have to do it yourself.
If you enter G30 without coordinates, then the probe measures where the print head is currently located.
If it is to be a specific point that is to be measured, such as X20 Y30, then you have to go there beforehand with G1 and calculate the offset yourself, i.e. G1 X78 Y30.
Your new probe offsets are included here.Yes, little bit confusing but now I already figured out which is taking into account the offset and which not. Thanks a lot

@norder said in Mesh bed compensation issue:
I hope Google doesn't translate it into cryptic and it helps you get there.
No, it was perfect. Thanks for the lots of help again

@norder said in Mesh bed compensation issue:
Not many people have such a nice, flat and uniformly green heightmap as @rogerpodacter has, which does not mean that the first layer cannot be printed absolutely perfectly
Unfortunatley not... and this is my 2nd cast alu bed for a hell amount of money.......
@norder said in Mesh bed compensation issue:
Measure the area where the BLTouch goes after the conversion, remember the M564 command I gave you in comment #15.
Measure the points and coordinates from the example sketch.
Changing the axis limits in the config.g with the new insights from the M564 thingy.I have done these all now
 I am just printing my test.
@norder said in Mesh bed compensation issue:
So I have to vote now. Today is elected here in Germany / Lower Saxony.
I hope there will be positive changes after that.
It can't go on like this.Haha
 By the way I am also living in Germany at the moment (since 4 years) but I am moving in 1,5 month